一、概述
1.KubeEdge存储
1
2
3
# 官方文档

https://release-1-13.docs.kubeedge.io/docs/advanced/storage

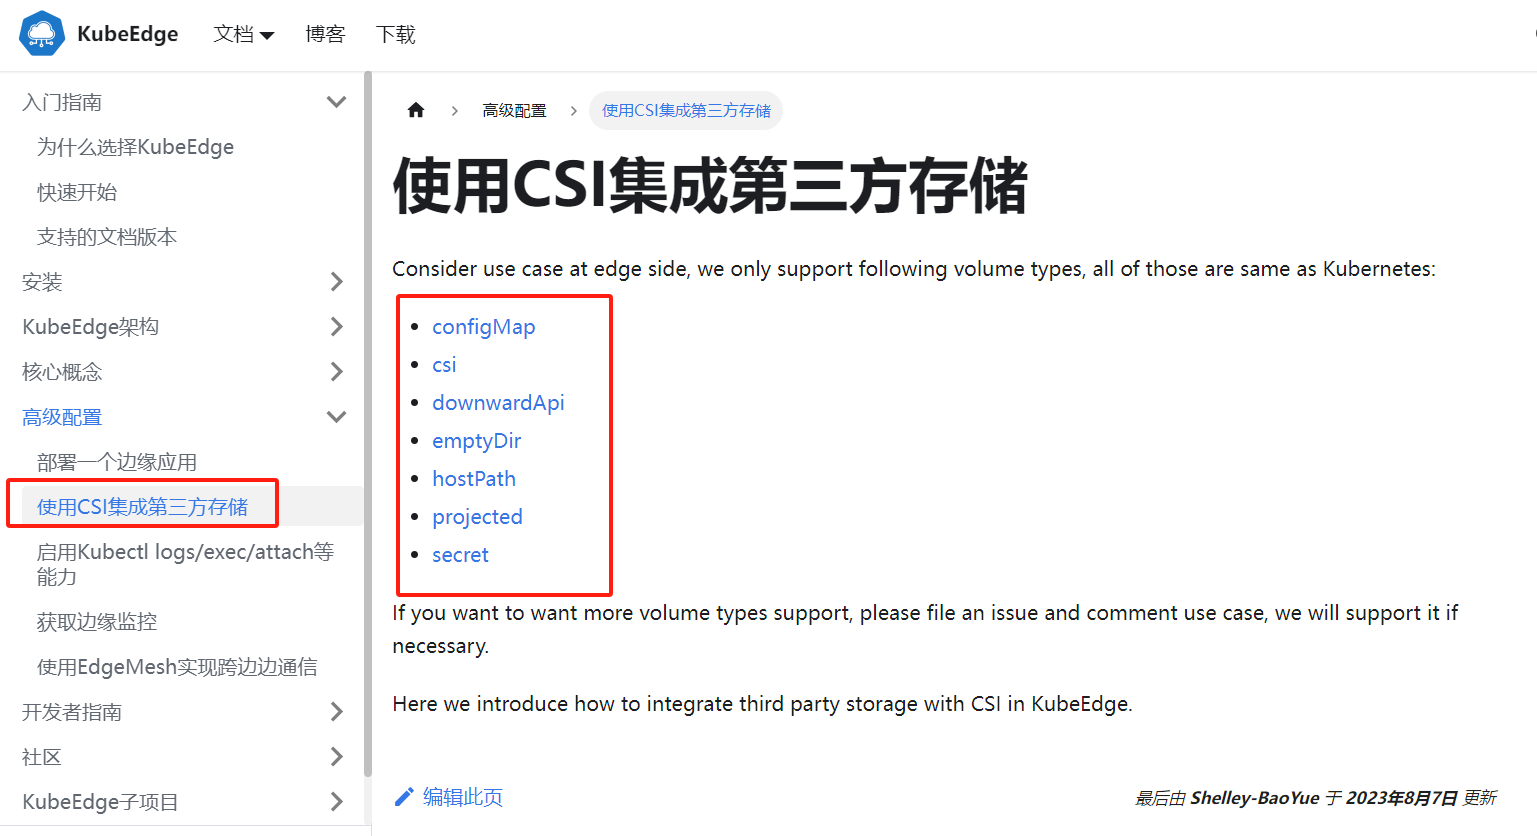
KubeEdge 存储实践:
- hostPath
- emptyDir
- configMap
- secret
2.hostPath存储卷
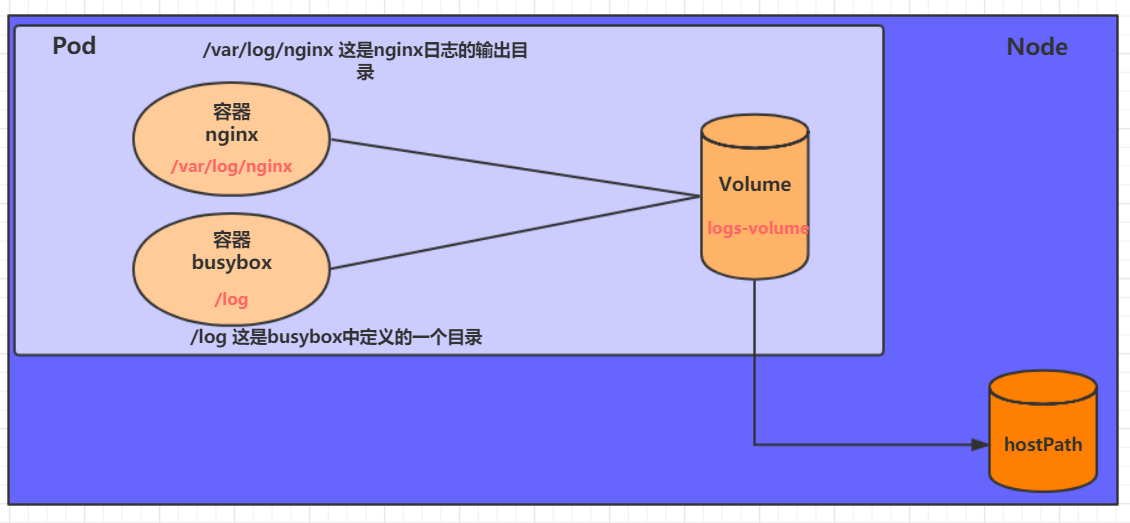
hostPath宿主机路径,就是把pod所在的宿主机之上的脱离pod中的容器名称空间的之外的宿主机的文件系统的某一目录和pod建立关联关系,在pod删除时,存储数据不会丢失。
hostPath可以实现持久存储,但是在node节点故障时,也会导致数据的丢失

创建一个volume-hostpath.yaml:
1
2
3
4
5
6
7
8
9
10
11
12
13
14
15
16
17
18
19
20
21
22
23
24
25
apiVersion: v1
kind: Pod
metadata:
  name: volume-hostpath
  namespace: dev
spec:
  containers:
  - name: nginx
    image: nginx:1.17.1
    ports:
    - containerPort: 80
    volumeMounts:
    - name: logs-volume
      mountPath: /var/log/nginx
  - name: busybox
    image: busybox:1.30
    command: ["/bin/sh","-c","tail -f /logs/access.log"]
    volumeMounts:
    - name: logs-volume
      mountPath: /logs
  volumes:
  - name: logs-volume
    hostPath:
      path: /root/logs
      type: DirectoryOrCreate  # 目录存在就使用,不存在就先创建后使用
1
2
3
4
5
6
7
8
关于type的值的一点说明:
	DirectoryOrCreate 目录存在就使用,不存在就先创建后使用
	Directory	目录必须存在
	FileOrCreate  文件存在就使用,不存在就先创建后使用
	File 文件必须存在
    Socket	unix套接字必须存在
	CharDevice	字符设备必须存在
	BlockDevice 块设备必须存在
1
2
3
4
5
6
7
8
9
10
11
12
13
14
15
16
17
18
# 创建Pod
[root@master ~]# kubectl create -f volume-hostpath.yaml
pod/volume-hostpath created

# 查看Pod
[root@master ~]# kubectl get pods volume-hostpath -n dev -o wide
NAME                  READY   STATUS    RESTARTS   AGE   IP             NODE   ......
pod-volume-hostpath   2/2     Running   0          16s   10.244.1.104   node1  ......

#访问nginx
[root@master ~]# curl 10.244.1.104

# 接下来就可以去host的/root/logs目录下查看存储的文件了
###  注意: 下面的操作需要到Pod所在的节点运行(案例中是node1)
[root@node1 ~]# ls /root/logs/
access.log  error.log

# 同样的道理,如果在此目录下创建一个文件,到容器中也是可以看到的
3.emptyDir存储卷
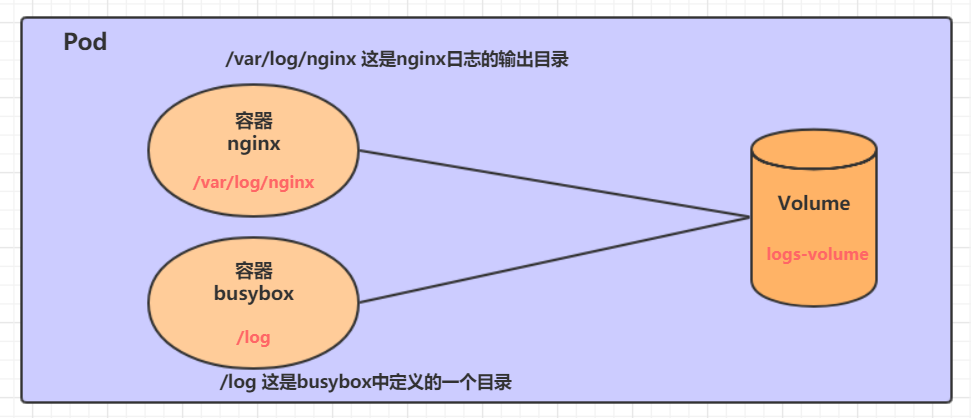
EmptyDir是最基础的Volume类型,一个EmptyDir就是Host上的一个空目录。
EmptyDir是在Pod被分配到Node时创建的,它的初始内容为空,并且无须指定宿主机上对应的目录文件,因为kubernetes会自动分配一个目录,当Pod销毁时, EmptyDir中的数据也会被永久删除。 EmptyDir用途如下:
-
临时空间,例如用于某些应用程序运行时所需的临时目录,且无须永久保留
-
一个容器需要从另一个容器中获取数据的目录(多容器共享目录)
接下来,通过一个容器之间文件共享的案例来使用一下EmptyDir。
在一个Pod中准备两个容器nginx和busybox,然后声明一个Volume分别挂在到两个容器的目录中,然后nginx容器负责向Volume中写日志,busybox中通过命令将日志内容读到控制台。

创建一个volume-emptydir.yaml
1
2
3
4
5
6
7
8
9
10
11
12
13
14
15
16
17
18
19
20
21
22
23
apiVersion: v1
kind: Pod
metadata:
  name: volume-emptydir
  namespace: dev
spec:
  containers:
  - name: nginx
    image: nginx:1.14-alpine
    ports:
    - containerPort: 80
    volumeMounts:  # 将logs-volume挂在到nginx容器中,对应的目录为 /var/log/nginx
    - name: logs-volume
      mountPath: /var/log/nginx
  - name: busybox
    image: busybox:1.30
    command: ["/bin/sh","-c","tail -f /logs/access.log"] # 初始命令,动态读取指定文件中内容
    volumeMounts:  # 将logs-volume 挂在到busybox容器中,对应的目录为 /logs
    - name: logs-volume
      mountPath: /logs
  volumes: # 声明volume, name为logs-volume,类型为emptyDir
  - name: logs-volume
    emptyDir: {}
1
2
3
4
5
6
7
8
9
10
11
12
13
14
15
16
# 创建Pod
[root@master ~]# kubectl create -f volume-emptydir.yaml
pod/volume-emptydir created

# 查看pod
[root@master ~]# kubectl get pods volume-emptydir -n dev -o wide
NAME                  READY   STATUS    RESTARTS   AGE   IP             NODE   ......
volume-emptydir   2/2     Running   0          97s   10.244.1.100   node1  ......

# 通过podIp访问nginx
[root@master ~]# curl 10.244.1.100
......

# 通过kubectl logs命令查看指定容器的标准输出
[root@master ~]# kubectl logs -f volume-emptydir -n dev -c busybox
10.244.0.0 - - [13/Apr/2020:10:58:47 +0000] "GET / HTTP/1.1" 200 612 "-" "curl/7.29.0" "-"
4.配置存储
4.1.ConfigMap
ConfigMap是一种比较特殊的存储卷,它的主要作用是用来存储配置信息的。
创建configmap.yaml,内容如下:
1
2
3
4
5
6
7
8
9
apiVersion: v1
kind: ConfigMap
metadata:
  name: configmap
  namespace: dev
data:
  info: |
    username:admin
    password:123456
接下来,使用此配置文件创建configmap
1
2
3
4
5
6
7
8
9
10
11
12
13
14
15
16
17
18
19
# 创建configmap
[root@master ~]# kubectl create -f configmap.yaml
configmap/configmap created

# 查看configmap详情
[root@master ~]# kubectl describe cm configmap -n dev
Name:         configmap
Namespace:    dev
Labels:       <none>
Annotations:  <none>

Data
====
info:
----
username:admin
password:123456

Events:  <none>
接下来创建一个pod-configmap.yaml,将上面创建的configmap挂载进去
1
2
3
4
5
6
7
8
9
10
11
12
13
14
15
16
apiVersion: v1
kind: Pod
metadata:
  name: pod-configmap
  namespace: dev
spec:
  containers:
  - name: nginx
    image: nginx:1.17.1
    volumeMounts: # 将configmap挂载到目录
    - name: config
      mountPath: /configmap/config
  volumes: # 引用configmap
  - name: config
    configMap:
      name: configmap
1
2
3
4
5
6
7
8
9
10
11
12
13
14
15
16
17
18
19
20
21
# 创建pod
[root@master ~]# kubectl create -f pod-configmap.yaml
pod/pod-configmap created

# 查看pod
[root@master ~]# kubectl get pod pod-configmap -n dev
NAME            READY   STATUS    RESTARTS   AGE
pod-configmap   1/1     Running   0          6s

#进入容器
[root@master ~]# kubectl exec -it pod-configmap -n dev /bin/sh
# cd /configmap/config/
# ls
info
# more info
username:admin
password:123456

# 可以看到映射已经成功,每个configmap都映射成了一个目录
# key--->文件     value---->文件中的内容
# 此时如果更新configmap的内容, 容器中的值也会动态更新
4.1.Secret
在kubernetes中,还存在一种和ConfigMap非常类似的对象,称为Secret对象。它主要用于存储敏感信息,例如密码、秘钥、证书等等。
1) 首先使用base64对数据进行编码
1
2
3
4
[root@master ~]# echo -n 'admin' | base64 #准备username
YWRtaW4=
[root@master ~]# echo -n '123456' | base64 #准备password
MTIzNDU2
2) 接下来编写secret.yaml,并创建Secret
1
2
3
4
5
6
7
8
9
apiVersion: v1
kind: Secret
metadata:
  name: secret
  namespace: dev
type: Opaque
data:
  username: YWRtaW4=
  password: MTIzNDU2
1
2
3
4
5
6
7
8
9
10
11
12
13
14
15
# 创建secret
[root@master ~]# kubectl create -f secret.yaml
secret/secret created

# 查看secret详情
[root@master ~]# kubectl describe secret secret -n dev
Name:         secret
Namespace:    dev
Labels:       <none>
Annotations:  <none>
Type:  Opaque
Data
====
password:  6 bytes
username:  5 bytes
3) 创建pod-secret.yaml,将上面创建的secret挂载进去:
1
2
3
4
5
6
7
8
9
10
11
12
13
14
15
16
apiVersion: v1
kind: Pod
metadata:
  name: pod-secret
  namespace: dev
spec:
  containers:
  - name: nginx
    image: nginx:1.17.1
    volumeMounts: # 将secret挂载到目录
    - name: config
      mountPath: /secret/config
  volumes:
  - name: config
    secret:
      secretName: secret
1
2
3
4
5
6
7
8
9
10
11
12
13
14
15
16
17
# 创建pod
[root@master ~]# kubectl create -f pod-secret.yaml
pod/pod-secret created

# 查看pod
[root@master ~]# kubectl get pod pod-secret -n dev
NAME            READY   STATUS    RESTARTS   AGE
pod-secret      1/1     Running   0          2m28s

# 进入容器,查看secret信息,发现已经自动解码了
[root@master ~]# kubectl exec -it pod-secret /bin/sh -n dev
/ # ls /secret/config/
password  username
/ # more /secret/config/username
admin
/ # more /secret/config/password
123456
至此,已经实现了利用secret实现了信息的编码。
二、Edge存储
1.KubeEdge
1
2
3
4
5
6
7
8
9
10
11
12
13
14
[root@k8s-master kubeedge]# kubectl get nodes
NAME         STATUS   ROLES                  AGE    VERSION
edge-1       Ready    agent,edge             3d8h   v1.23.17-kubeedge-v1.13.4
edge-2       Ready    agent,edge             3d7h   v1.23.17-kubeedge-v1.13.4
k8s-master   Ready    control-plane,master   10d    v1.23.12
k8s-node1    Ready    <none>                 10d    v1.23.12


[root@k8s-master kubeedge]# kubectl get nodes --show-labels
NAME         STATUS   ROLES                  AGE    VERSION                     LABELS
edge-1       Ready    agent,edge             3d8h   v1.23.17-kubeedge-v1.13.4   beta.kubernetes.io/arch=amd64,beta.kubernetes.io/os=linux,kubernetes.io/arch=amd64,kubernetes.io/hostname=edge-1,kubernetes.io/os=linux,node-role.kubernetes.io/agent=,node-role.kubernetes.io/edge=,node-type=edge
edge-2       Ready    agent,edge             3d7h   v1.23.17-kubeedge-v1.13.4   beta.kubernetes.io/arch=amd64,beta.kubernetes.io/os=linux,kubernetes.io/arch=amd64,kubernetes.io/hostname=edge-2,kubernetes.io/os=linux,node-role.kubernetes.io/agent=,node-role.kubernetes.io/edge=,node-type=edge
k8s-master   Ready    control-plane,master   10d    v1.23.12                    beta.kubernetes.io/arch=amd64,beta.kubernetes.io/os=linux,kubernetes.io/arch=amd64,kubernetes.io/hostname=k8s-master,kubernetes.io/os=linux,node-role.kubernetes.io/control-plane=,node-role.kubernetes.io/master=,node.kubernetes.io/exclude-from-external-load-balancers=
k8s-node1    Ready    <none>                 10d    v1.23.12                    beta.kubernetes.io/arch=amd64,beta.kubernetes.io/os=linux,kubernetes.io/arch=amd64,kubernetes.io/hostname=k8s-node1,kubernetes.io/os=linux,node-type=node


2.hostPath存储卷
1
2
3
4
5
6
7
8
9
10
11
12
13
14
15
16
17
18
19
20
21
22
23
24
25
26
27
28
29
30
31
32
33
34
35
36
37
38
[root@k8s-master kubeedge]# vim volume-hostpath.yaml

apiVersion: apps/v1
kind: Deployment
metadata:
  name: volume-hostpath
spec:
  replicas: 2
  selector:
    matchLabels:
      app: nginx
  template:
    metadata:
      labels:
        app: nginx
    spec:
      hostNetwork: true   # 使用主机网络
      nodeSelector:
        node-type: edge
      containers:
      - name: nginx
        image: nginx
        ports:
        - containerPort: 80
        volumeMounts:
        - name: logs-volume
          mountPath: /var/log/nginx
      - name: busybox
        image: busybox:1.30
        command: ["/bin/sh","-c","tail -f /logs/access.log"]
        volumeMounts:
        - name: logs-volume
          mountPath: /logs
      volumes:
      - name: logs-volume
        hostPath:
          path: /root/logs
          type: DirectoryOrCreate  # 目录存在就使用,不存在就先创建后使用
1
2
3
4
5
6
7
8
[root@k8s-master kubeedge]# kubectl apply -f volume-hostpath.yaml
deployment.apps/volume-hostpath created


[root@k8s-master kubeedge]# kubectl get pod -owide
NAME                               READY   STATUS    RESTARTS   AGE   IP                NODE     NOMINATED NODE   READINESS GATES
volume-hostpath-75859bf69f-d9pq4   2/2     Running   0          65s   192.168.202.211   edge-1   <none>           <none>
volume-hostpath-75859bf69f-nj749   2/2     Running   0          65s   192.168.202.212   edge-2   <none>           <none>

1
2
3
4
5
6
7
8
9
10
11
12
13
14
15
16
17
18
19
20
21
22
23
24
25
26
27
28
29
30
31
32
33
34
35
36
37
38
39
40
41
42
43
44
45
#访问nginx
# curl 192.168.202.211


[root@k8s-master kubeedge]# curl 192.168.202.211
<!DOCTYPE html>
<html>
<head>
<title>Welcome to nginx!</title>
<style>
html { color-scheme: light dark; }
body { width: 35em; margin: 0 auto;
font-family: Tahoma, Verdana, Arial, sans-serif; }
</style>
</head>
<body>
<h1>Welcome to nginx!</h1>
<p>If you see this page, the nginx web server is successfully installed and
working. Further configuration is required.</p>

<p>For online documentation and support please refer to
<a href="http://nginx.org/">nginx.org</a>.<br/>
Commercial support is available at
<a href="http://nginx.com/">nginx.com</a>.</p>

<p><em>Thank you for using nginx.</em></p>
</body>
</html>


# 接下来就可以去host的/root/logs目录下查看存储的文件了
[root@edge-1 logs]# pwd
/root/logs

[root@edge-1 logs]# ll
total 8
-rw-r--r--. 1 root root  96 Dec 26 04:57 access.log
-rw-r--r--. 1 root root 510 Dec 26 04:54 error.log

[root@edge-1 logs]# vim access.log

192.168.202.201 - - [25/Dec/2023:20:57:45 +0000] "GET / HTTP/1.1" 200 615 "-" "curl/7.29.0" "-"


# 同样的道理,如果在此目录下创建一个文件,到容器中也是可以看到的
3.emptyDir存储卷
1
2
3
4
5
6
7
8
9
10
11
12
13
14
15
16
17
18
19
20
21
22
23
24
25
26
27
28
29
30
31
32
33
34
35
36
[root@k8s-master kubeedge]# vim volume-emptydir.yaml

apiVersion: apps/v1
kind: Deployment
metadata:
  name: volume-emptydir
spec:
  replicas: 2
  selector:
    matchLabels:
      app: nginx
  template:
    metadata:
      labels:
        app: nginx
    spec:
      hostNetwork: true   # 使用主机网络
      nodeSelector:
        node-type: edge
      containers:
      - name: nginx
        image: nginx
        ports:
        - containerPort: 80
        volumeMounts:  # 将logs-volume挂在到nginx容器中,对应的目录为 /var/log/nginx
        - name: logs-volume
          mountPath: /var/log/nginx
      - name: busybox
        image: busybox:1.30
        command: ["/bin/sh","-c","tail -f /logs/access.log"] # 初始命令,动态读取指定文件中内容
        volumeMounts:  # 将logs-volume 挂在到busybox容器中,对应的目录为 /logs
        - name: logs-volume
          mountPath: /logs
      volumes:  # 声明volume, name为logs-volume,类型为emptyDir
      - name: logs-volume
        emptyDir: {}
1
2
3
4
5
6
7
8
[root@k8s-master kubeedge]# kubectl apply -f volume-emptydir.yaml
deployment.apps/volume-emptydir created


[root@k8s-master kubeedge]# kubectl get pod -owide
NAME                               READY   STATUS    RESTARTS   AGE   IP                NODE     NOMINATED NODE   READINESS GATES
volume-emptydir-5dfff4f6c6-4fj4v   2/2     Running   0          22s   192.168.202.212   edge-2   <none>           <none>
volume-emptydir-5dfff4f6c6-rljw5   2/2     Running   0          22s   192.168.202.211   edge-1   <none>           <none>

1
2
3
4
5
6
7
8
9
10
11
12
13
14
15
16
17
18
19
20
21
22
23
24
25
26
27
28
29
30
31
32
33
34
# curl 192.168.202.211


[root@k8s-master kubeedge]# curl 192.168.202.211
<!DOCTYPE html>
<html>
<head>
<title>Welcome to nginx!</title>
<style>
html { color-scheme: light dark; }
body { width: 35em; margin: 0 auto;
font-family: Tahoma, Verdana, Arial, sans-serif; }
</style>
</head>
<body>
<h1>Welcome to nginx!</h1>
<p>If you see this page, the nginx web server is successfully installed and
working. Further configuration is required.</p>

<p>For online documentation and support please refer to
<a href="http://nginx.org/">nginx.org</a>.<br/>
Commercial support is available at
<a href="http://nginx.com/">nginx.com</a>.</p>

<p><em>Thank you for using nginx.</em></p>
</body>
</html>


# 通过kubectl logs命令查看指定容器的标准输出
# kubectl logs -f volume-emptydir-5dfff4f6c6-rljw5 -c busybox
[root@k8s-master kubeedge]# kubectl logs -f volume-emptydir-5dfff4f6c6-rljw5 -c busybox
192.168.202.201 - - [25/Dec/2023:21:14:24 +0000] "GET / HTTP/1.1" 200 615 "-" "curl/7.29.0" "-"
4.ConfigMap
1.创建configmap-nginx.yaml
1
2
3
4
5
6
7
8
apiVersion: v1
kind: ConfigMap
metadata:
  name: configmap-nginx
data:
  info: |
    username:admin
    password:123456
1
2
3
4
5
6
7
8
9
10
11
12
13
14
15
16
17
18
19
20
21
22
23
24
25
26
27
28
29
30
31
32
33
34
35
36
37
38
39
[root@k8s-master kubeedge]# kubectl apply -f configmap-nginx.yaml
configmap/configmap-nginx created


[root@k8s-master kubeedge]# kubectl get cm
NAME               DATA   AGE
configmap-nginx    1      19s
kube-root-ca.crt   1      10d


# 查看configmap详情
[root@k8s-master kubeedge]# kubectl apply -f configmap-nginx.yaml
configmap/configmap-nginx created


[root@k8s-master kubeedge]# kubectl get cm
NAME               DATA   AGE
configmap-nginx    1      19s
kube-root-ca.crt   1      10d


[root@k8s-master kubeedge]# kubectl describe cm configmap-nginx
Name:         configmap-nginx
Namespace:    default
Labels:       <none>
Annotations:  <none>

Data
====
info:
----
username:admin
password:123456


BinaryData
====

Events:  <none>
2.configmap挂载
1
2
3
4
5
6
7
8
9
10
11
12
13
14
15
16
17
18
19
20
21
22
23
24
25
26
27
28
29
30
31
[root@k8s-master kubeedge]# vim config-configmap.yaml

apiVersion: apps/v1
kind: Deployment
metadata:
  name: config-configmap
spec:
  replicas: 2
  selector:
    matchLabels:
      app: nginx
  template:
    metadata:
      labels:
        app: nginx
    spec:
      hostNetwork: true   # 使用主机网络
      nodeSelector:
        node-type: edge
      containers:
      - name: nginx
        image: nginx
        ports:
        - containerPort: 80
        volumeMounts: # 将configmap挂载到目录
        - name: config
          mountPath: /configmap/config
      volumes: # 引用configmap
      - name: config
        configMap:
          name: configmap-nginx
1
2
3
4
5
6
7
8
9
10
11
12
13
14
15
16
17
18
19
20
21
22
23
24
25
26
27
28
29
30
31
32
33
34
35
36
37
38
39
[root@k8s-master kubeedge]# kubectl apply -f config-configmap.yaml
deployment.apps/config-configmap created


[root@k8s-master kubeedge]# kubectl get pod -owide
NAME                                READY   STATUS    RESTARTS   AGE   IP                NODE     NOMINATED NODE   READINESS GATES
config-configmap-6b4d6cff9f-45zsv   1/1     Running   0          21s   192.168.202.212   edge-2   <none>           <none>
config-configmap-6b4d6cff9f-t7d9c   1/1     Running   0          21s   192.168.202.211   edge-1   <none>           <none>


#进入容器
# kubectl exec -it config-configmap-7b89d69b84-tbmss /bin/sh
# kubectl exec -it config-configmap-7b89d69b84-tbmss -- /bin/sh
[root@k8s-master kubeedge]# kubectl exec -it config-configmap-7b89d69b84-tbmss -- /bin/sh
#
# ls
bin  boot  configmap  dev  docker-entrypoint.d	docker-entrypoint.sh  etc  home  lib  lib64  media  mnt  opt  proc  root  run  sbin  srv  sys  tmp  usr  var
#
# cd configmap
#
# ls
config
#
# cd config
#
# ls
info
#
# more info
username:admin
password:123456
#
# exit
[root@k8s-master kubeedge]#


# 可以看到映射已经成功,每个configmap都映射成了一个目录
# key--->文件     value---->文件中的内容
# 此时如果更新configmap的内容, 容器中的值也会动态更新
5.Secret
1) 首先使用base64对数据进行编码
1
2
3
4
[root@master ~]# echo -n 'admin' | base64 #准备username
YWRtaW4=
[root@master ~]# echo -n '123456' | base64 #准备password
MTIzNDU2
2) 接下来编写config-secret.yaml,并创建Secret
1
2
3
4
5
6
7
8
apiVersion: v1
kind: Secret
metadata:
  name: config-secret
type: Opaque
data:
  username: YWRtaW4=
  password: MTIzNDU2
1
2
3
4
5
6
7
8
9
10
11
12
13
14
15
16
17
18
19
20
21
22
23
24
25
26
[root@k8s-master kubeedge]# kubectl apply -f config-secret.yaml
secret/config-secret created


[root@k8s-master kubeedge]# kubectl get secret
NAME                  TYPE                                  DATA   AGE
config-secret         Opaque                                2      19s
default-token-sx29l   kubernetes.io/service-account-token   3      10d


[root@k8s-master kubeedge]# kubectl describe config-secret
error: the server doesn't have a resource type "config-secret"


[root@k8s-master kubeedge]# kubectl describe secret config-secret
Name:         config-secret
Namespace:    default
Labels:       <none>
Annotations:  <none>

Type:  Opaque

Data
====
password:  6 bytes
username:  5 bytes
3) 创建config-secret.yaml,将上面创建的secret挂载进去:
1
2
3
4
5
6
7
8
9
10
11
12
13
14
15
16
17
18
19
20
21
22
23
24
25
26
27
28
29
30
31
[root@k8s-master kubeedge]# vim config-secret-nginx.yaml

apiVersion: apps/v1
kind: Deployment
metadata:
  name: config-secret-nginx
spec:
  replicas: 2
  selector:
    matchLabels:
      app: nginx
  template:
    metadata:
      labels:
        app: nginx
    spec:
      hostNetwork: true   # 使用主机网络
      nodeSelector:
        node-type: edge
      containers:
      - name: nginx
        image: nginx
        ports:
        - containerPort: 80
        volumeMounts: # 将secret挂载到目录
        - name: config
          mountPath: /secret/config
      volumes:
      - name: config
        secret:
          secretName: config-secret
1
2
3
4
5
6
7
8
9
10
11
12
13
14
15
16
17
18
19
20
21
22
23
24
25
26
27
28
29
30
31
[root@k8s-master kubeedge]# kubectl apply -f config-secret-nginx.yaml
deployment.apps/config-secret-nginx created


[root@k8s-master kubeedge]# kubectl get pod -owide
NAME                                   READY   STATUS    RESTARTS   AGE   IP                NODE     NOMINATED NODE   READINESS GATES
config-secret-nginx-7b7f9478f8-m55ws   1/1     Running   0          37s   192.168.202.212   edge-2   <none>           <none>
config-secret-nginx-7b7f9478f8-nv7zc   1/1     Running   0          37s   192.168.202.211   edge-1   <none>           <none>


# 进入容器,查看secret信息,发现已经自动解码了
# kubectl exec -it config-secret-nginx-7b7f9478f8-nv7zc /bin/sh
# kubectl exec -it config-secret-nginx-7b7f9478f8-nv7zc -- /bin/sh
[root@k8s-master kubeedge]# kubectl exec -it config-secret-nginx-7b7f9478f8-nv7zc -- /bin/sh
#
# ls
bin  boot  dev	docker-entrypoint.d  docker-entrypoint.sh  etc	home  lib  lib64  media  mnt  opt  proc  root  run  sbin  secret  srv  sys  tmp  usr  var
#
# ls /secret/config/
password  username
#
# more /secret/config/username
admin
#
# more /secret/config/password
123456
#
# exit
[root@k8s-master kubeedge]#

