On this page
PostgreSQL高可用
一、概述
1.PostgreSQL高可用
PostgreSQL是一款功能,性能,可靠性都可以和国际上成熟的商业数据库相媲美的开源数据库。而且PostgreSQL的许可和生态完全开放,不被任何一个单一的公司或国家所操控,保证了使用者没有后顾之忧。国内越来越多的企业开始用PostgreSQL代替原来昂贵的国外商业数据库。
在部署PostgreSQL到生产环境中时,选择适合的高可用方案是一项必不可少的工作。
PostgreSQL的开源HA工具有很多种,下面几种算是比较常用的
PAF(PostgreSQL Automatic Failomianver)
repmgr
Patroni
2.Patroni
Patroni基于Python开发的模板,结合DCS(例如 ZooKeeper, etcd, Consul )可以定制PostgreSQL高可用方案。
Patroni并不是一套拿来即用的PostgreSQL高可用组件,涉及较多的配置和定制工作。
Patroni接管PostgreSQL数据库的启停,同时监控本地的PostgreSQL数据库,并将本地的PostgreSQL数据库信息写入DCS。
Patroni的主备端是通过是否能获得 leader key 来控制的,获取到了leader key的Patroni为主节点,其它的为备节点。
Patroni + Etcd 方案优点
最近在在看基于 Patroni + Etcd 的高可用方案,此方案使用Patroni管理本地库,并结合Etcd作为数据存储和主节点选举
具有以下优势:
健壮性: 使用分布式key-value数据库作为数据存储,主节点故障时进行主节点重新选举,具有很强的健壮性支持多种复制方式: 基于内置流复制,支持同步流复制、异步流复制、级联复制支持主备延迟设置: 可以设置备库延迟主库WAL的字节数,当备库延迟大于指定值时不做故障切换自动化程度高:
支持自动化初始PostgreSQL实例并部署流复制
当备库实例关闭后,支持自动拉起
当主库实例关闭后,首先会尝试自动拉起
支持switchover命令,能自动将老的主库进行角色转换
避免脑裂: 数据库信息记录到 ETCD 中,通过优化部署策略(多机房部署、增加实例数)可以避免脑裂
二、PostgreSQL高可用部署
1.安装简介
1
2
3
4
5
6
7
8
9
10
11
12
13
14
15
16
17
18
# 安装环境
node1: 172.51.216.81
node2: 172.51.216.82
node3: 172.51.216.83

操作系统:centos7.5
数据库:  PostgreSQL12

# 部署方案:
PostgreSQL12:node1、node2
etcd:                  node1、node2、node3
Patroni:             node1、node2
haproxy:            node1、node2
keepalived:       node1、node2

VIP: 172.51.216.88

# 三台服务器允许挂掉一个节点,etcd挂掉两个节点就无法工作
2.安装准备
1
2
3
4
5
6
7
8
9
10
1.所有节点设置时钟同步
yum install -y ntpdate
ntpdate time.windows.com && hwclock -w
2.关闭防火墙
setenforce 0
sed -i .bak "s/SELINUX=enforcing/SELINUX=permissive/g" /etc/selinux/config
systemctl disable firewalld.service
systemctl stop firewalld.service
iptables -F
3.安装ETCD
1
2
3
yum install -y gcc python-devel epel-release

yum install -y etcd
1
2
3
4
5
6
7
8
9
10
11
12
13
14
15
16
17
18
19
20
21
22
23
24
25
26
27
28
29
30
31
32
33
34
35
36
37
配置文件:/etc/etcd/etcd.conf
# node1
ETCD_DATA_DIR = "/var/lib/etcd/etcd1.etcd"
ETCD_LISTEN_PEER_URLS = "http://172.51.216.81:2380"
ETCD_LISTEN_CLIENT_URLS = "http://172.51.216.81:2379,http://127.0.0.1:2379"
ETCD_NAME = "etcd1"
ETCD_INITIAL_ADVERTISE_PEER_URLS = "http://172.51.216.81:2380"
ETCD_ADVERTISE_CLIENT_URLS = "http://172.51.216.81:2379"
ETCD_INITIAL_CLUSTER = "etcd1=http://172.51.216.81:2380,etcd2=http://172.51.216.82:2380,etcd3=http://172.51.216.83:2380"
ETCD_INITIAL_CLUSTER_TOKEN = "etcd-cluster"
ETCD_INITIAL_CLUSTER_STATE = "new"
# node2
ETCD_DATA_DIR = "/var/lib/etcd/etcd2.etcd"
ETCD_LISTEN_PEER_URLS = "http://172.51.216.82:2380"
ETCD_LISTEN_CLIENT_URLS = "http://172.51.216.82:2379,http://127.0.0.1:2379"
ETCD_NAME = "etcd2"
ETCD_INITIAL_ADVERTISE_PEER_URLS = "http://172.51.216.82:2380"
ETCD_ADVERTISE_CLIENT_URLS = "http://172.51.216.82:2379"
ETCD_INITIAL_CLUSTER = "etcd1=http://172.51.216.81:2380,etcd2=http://172.51.216.82:2380,etcd3=http://172.51.216.83:2380"
ETCD_INITIAL_CLUSTER_TOKEN = "etcd-cluster"
ETCD_INITIAL_CLUSTER_STATE = "new"
# node3
ETCD_DATA_DIR = "/var/lib/etcd/etcd3.etcd"
ETCD_LISTEN_PEER_URLS = "http://172.51.216.83:2380"
ETCD_LISTEN_CLIENT_URLS = "http://172.51.216.83:2379,http://127.0.0.1:2379"
ETCD_NAME = "etcd3"
ETCD_INITIAL_ADVERTISE_PEER_URLS = "http://172.51.216.83:2380"
ETCD_ADVERTISE_CLIENT_URLS = "http://172.51.216.83:2379"
ETCD_INITIAL_CLUSTER = "etcd1=http://172.51.216.81:2380,etcd2=http://172.51.216.82:2380,etcd3=http://172.51.216.83:2380"
ETCD_INITIAL_CLUSTER_TOKEN = "etcd-cluster"
ETCD_INITIAL_CLUSTER_STATE = "new"
1
2
3
4
5
6
7
8
9
10
11
12
13
14
15
16
17
18
19
20
21
22
23
24
25
26
27
28
29
30
vim /usr/lib/systemd/system/etcd.service
# 直接删除原有内容,替换为以下配置
[ Unit]
Description = Etcd Server
After = network.target
After = network-online.target
Wants = network-online.target
[ Service]
Type = notify
WorkingDirectory = /var/lib/etcd/
EnvironmentFile = /etc/etcd/etcd.conf
User = etcd
# set GOMAXPROCS to number of processors
ExecStart = /bin/bash -c "GOMAXPROCS= $( nproc ) /usr/bin/etcd \
--name= \" ${ ETCD_NAME } \" \
--data-dir= \" ${ ETCD_DATA_DIR } \" \
--listen-peer-urls= \" ${ ETCD_LISTEN_PEER_URLS } \" \
--listen-client-urls= \" ${ ETCD_LISTEN_CLIENT_URLS } \" \
--initial-advertise-peer-urls= \" ${ ETCD_INITIAL_ADVERTISE_PEER_URLS } \" \
--advertise-client-urls= \" ${ ETCD_ADVERTISE_CLIENT_URLS } \" \
--initial-cluster= \" ${ ETCD_INITIAL_CLUSTER } \" \
--initial-cluster-token= \" ${ ETCD_INITIAL_CLUSTER_TOKEN } \" \
--initial-cluster-state= \" ${ ETCD_INITIAL_CLUSTER_STATE } \" "
Restart = on-failure
LimitNOFILE = 65536
[ Install]
WantedBy = multi-user.target
1
2
3
4
5
6
7
8
# 依次启动 node1、node2、node3 节点的 etcd

#启动Etcd
systemctl daemon-reload && systemctl enable etcd && systemctl start etcd

systemctl start etcd
systemctl enable etcd
systemctl status etcd
1
2
3
4
5
6
7
8
9
10
11
12
13
14
# 任意节点查看集群状态
etcdctl cluster-health
etcdctl member list
[ root@localhost ~]# etcdctl cluster-health
member 77b98c1c4d35f89e is healthy: got healthy result from http://172.51.216.83:2379
member 9ecc9898244a78c8 is healthy: got healthy result from http://172.51.216.81:2379
member e63b126eea6bfc6c is healthy: got healthy result from http://172.51.216.82:2379
cluster is healthy
[ root@localhost ~]# etcdctl member list
77b98c1c4d35f89e: name = etcd3 peerURLs = http://172.51.216.83:2380 clientURLs = http://172.51.216.83:2379 isLeader = true
9ecc9898244a78c8: name = etcd1 peerURLs = http://172.51.216.81:2380 clientURLs = http://172.51.216.81:2379 isLeader = false
e63b126eea6bfc6c: name = etcd2 peerURLs = http://172.51.216.82:2380 clientURLs = http://172.51.216.82:2379 isLeader = false
4.安装PostgreSQL
1
2
3
4
5
6
7
8
9
10
11
12
13
14
15
16
17
18
19
20
21
22
23
24
25
26
27
28
1.安装PostgreSQL 12
yum install -y https://download.postgresql.org/pub/repos/yum/reporpms/EL-7-x86_64/pgdg-redhat-repo-latest.noarch.rpm
yum install -y postgresql12-server postgresql12-contrib
2.创建PostgreSQL数据目录
mkdir -p /var/lib/pgsql/12/data
chown postgres:postgres -R /var/lib/pgsql/12
chmod -R 700 /var/lib/pgsql/12/data
3. 配置环境变量
解决pg_ctl的问题
-bash : pg_ctl: command not found
[ root@localhost ~]# su - postgres
-bash-4 .2$ pwd
/var/lib/pgsql
-bash-4 .2$ vim .bash_profile
-bash-4 .2$ source .bash_profile
增加配置信息
PGDATA = /var/lib/pgsql/12/data
export PGDATA
export PATH = /usr/pgsql-12/bin:$PATH
pg_ctl stop -m fast
pg_ctl --help
5.安装Patroni
1
2
3
4
5
6
7
8
9
10
11
12
13
14
15
16
17
18
19
20
21
22
23
24
yum install libffi-devel openssl-devel
# 安装gcc软件包
yum install gcc
wget https://www.python.org/ftp/python/3.7.4/Python-3.7.4.tgz
tar zxvf Python-3.7.4.tgz
cd Python-3.7.4/
./configure
make
su
make install
python3 -m pip install --upgrade pip
python3 -m pip install psycopg2_binary
python3 -m pip install patroni[etcd]
# 验证是否安装成功
which patroni
patronictl --help
patronictl version
[ root@localhost Python-3.7.4]# patronictl version
patronictl version 2.0.2
1
2
3
4
5
6
7
8
9
10
11
12
13
14
15
16
17
18
19
20
21
22
23
24
25
26
/etc/systemd/system/patroni.service
vim /etc/systemd/system/patroni.service
[ Unit]
Description = Runners to orchestrate a high-availability PostgreSQL
After = syslog.target network.target
[ Service]
Type = simple
User = postgres
Group = postgres
#StandardOutput=syslog
ExecStart = /usr/local/bin/patroni /etc/patroni.yml
ExecReload = /bin/kill -s HUP $MAINPID
KillMode = process
TimeoutSec = 30
Restart = no
[ Install]
WantedBy = multi-user.target
# 位置
/usr/local/bin/patroni
1
2
3
4
5
6
7
8
9
10
11
12
13
14
15
16
17
18
19
20
21
22
23
24
25
26
27
28
29
30
31
32
33
34
35
36
37
38
39
40
41
42
43
44
45
46
47
48
49
50
51
52
53
54
55
56
57
58
59
60
61
62
63
64
65
66
67
68
69
70
71
72
73
74
75
76
77
78
79
80
81
82
83
84
85
86
87
88
89
90
91
92
93
94
95
96
97
98
99
100
101
102
103
104
105
106
107
108
109
110
111
112
113
114
115
116
117
118
119
120
121
122
123
124
125
126
127
128
129
130
131
132
133
134
135
136
137
138
139
配置文件/etc/patroni.yml

vim /etc/patroni.yml


# node1
scope: pgsql
namespace: /service/
name: pg1

restapi:
  listen: 0.0.0.0:8008
  connect_address: 172.51.216.81:8008

etcd:
  host: 172.51.216.81:2379

bootstrap:
  dcs:
    ttl: 30
    loop_wait: 10
    retry_timeout: 10
    maximum_lag_on_failover: 1048576
    master_start_timeout: 300
    synchronous_mode: false
    postgresql:
      use_pg_rewind: true
      use_slots: true
      parameters:
        listen_addresses: "0.0.0.0"
        port: 5432
        wal_level: logical
        hot_standby: "on"
        wal_keep_segments: 100
        max_wal_senders: 10
        max_replication_slots: 10
        wal_log_hints: "on"

  initdb:
  - encoding: UTF8
  - locale: C
  - lc-ctype: zh_CN.UTF-8
  - data-checksums

  pg_hba:
  - host replication repl 0.0.0.0/0 md5
  - host all all 0.0.0.0/0 md5

postgresql:
  listen: 0.0.0.0:5432
  connect_address: 172.51.216.81:5432
  data_dir: /var/lib/pgsql/12/data
  bin_dir: /usr/pgsql-12/bin

  authentication:
    replication:
      username: repl
      password: "123456"
    superuser:
      username: postgres
      password: "postgres"

  basebackup:
    max-rate: 100M
    checkpoint: fast

tags:
    nofailover: false
    noloadbalance: false
    clonefrom: false
    nosync: false


# node2
scope: pgsql
namespace: /service/
name: pg2

restapi:
  listen: 0.0.0.0:8008
  connect_address: 172.51.216.82:8008

etcd:
  host: 172.51.216.82:2379

bootstrap:
  dcs:
    ttl: 30
    loop_wait: 10
    retry_timeout: 10
    maximum_lag_on_failover: 1048576
    master_start_timeout: 300
    synchronous_mode: false
    postgresql:
      use_pg_rewind: true
      use_slots: true
      parameters:
        listen_addresses: "0.0.0.0"
        port: 5432
        wal_level: logical
        hot_standby: "on"
        wal_keep_segments: 100
        max_wal_senders: 10
        max_replication_slots: 10
        wal_log_hints: "on"

  initdb:
  - encoding: UTF8
  - locale: C
  - lc-ctype: zh_CN.UTF-8
  - data-checksums

  pg_hba:
  - host replication repl 0.0.0.0/0 md5
  - host all all 0.0.0.0/0 md5

postgresql:
  listen: 0.0.0.0:5432
  connect_address: 172.51.216.82:5432
  data_dir: /var/lib/pgsql/12/data
  bin_dir: /usr/pgsql-12/bin

  authentication:
    replication:
      username: repl
      password: "123456"
    superuser:
      username: postgres
      password: "postgres"

  basebackup:
    max-rate: 100M
    checkpoint: fast

tags:
    nofailover: false
    noloadbalance: false
    clonefrom: false
    nosync: false
1
2
3
4
5
6
7
8
先在node1上启动Patroni
systemctl start patroni


systemctl status patroni
systemctl enable patroni
systemctl restart patroni
systemctl stop patroni
1
2
3
4
5
6
7
8
9
10
11
12
13
14
15
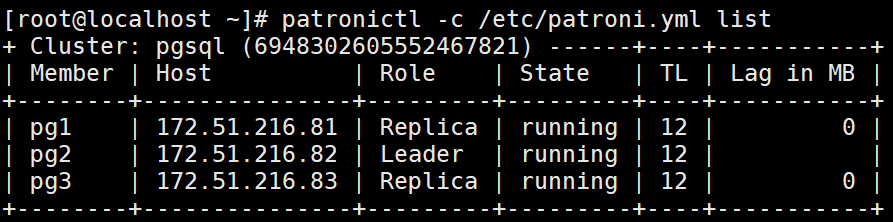
16
# patronictl -c /etc/patroni.yml list
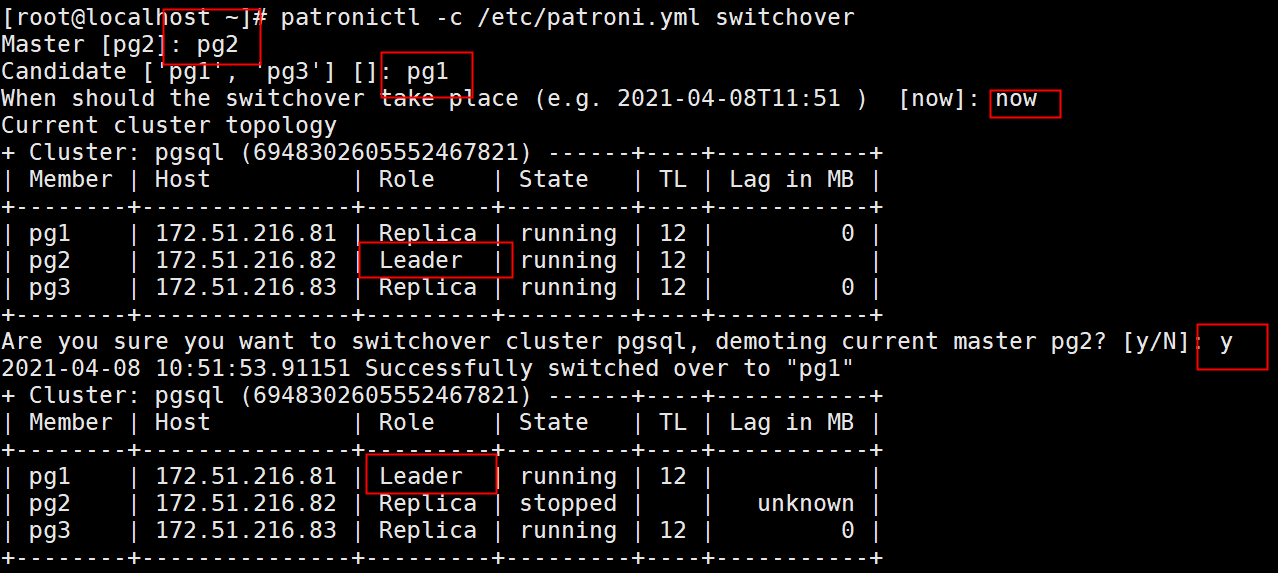
# 执行手动切换
patronictl -c /etc/patroni.yml switchover
curl -s "http://172.51.216.81:8008/cluster1" | jq .
create table test ( id int, name varchar( 100)) ;
insert into test values ( 1,'1' ) ;
select * from test ;
# 在主机node1上停从库,如下:
[ pg12@ydtf01 ~]$ pg_ctl stop -m fast
waiting for server to shut down.... done
server stopped
6.安装haproxy
1
2
3
4
node1: 172.51.216.81
node2: 172.51.216.82

yum install -y haproxy
1
2
3
4
5
6
7
8
9
10
11
12
13
14
15
16
17
18
19
20
21
22
23
24
25
26
27
28
29
30
31
32
33
34
35
36
37
38
39
#配置文件:/etc/haproxy/haproxy.cfg
vim /etc/haproxy/haproxy.cfg
global
maxconn 100
log 127.0.0.1 local2
defaults
log global
mode tcp
retries 2
timeout client 30m
timeout connect 4s
timeout server 30m
timeout check 5s
listen stats
mode http
bind * :7000
stats enable
stats uri /
listen pgsql
bind * :5000
option httpchk
http-check expect status 200
default-server inter 3s fall 3 rise 2 on-marked-down shutdown-sessions
server postgresql_172.51.216.81_5432 172.51.216.81:5432 maxconn 100 check port 8008
server postgresql_172.51.216.82_5432 172.51.216.82:5432 maxconn 100 check port 8008
listen pgsql_read
bind * :6000
option httpchk GET /read-only
http-check expect status 200
default-server inter 3s fall 3 rise 2 on-marked-down shutdown-sessions
server postgresql_172.51.216.81_5432 172.51.216.81:5432 maxconn 100 check port 8008
server postgresql_172.51.216.82_5432 172.51.216.82:5432 maxconn 100 check port 8008
1
2
3
4
5
6
7
8
9
10
11
12
13
14
15
systemctl start haproxy
systemctl enable haproxy
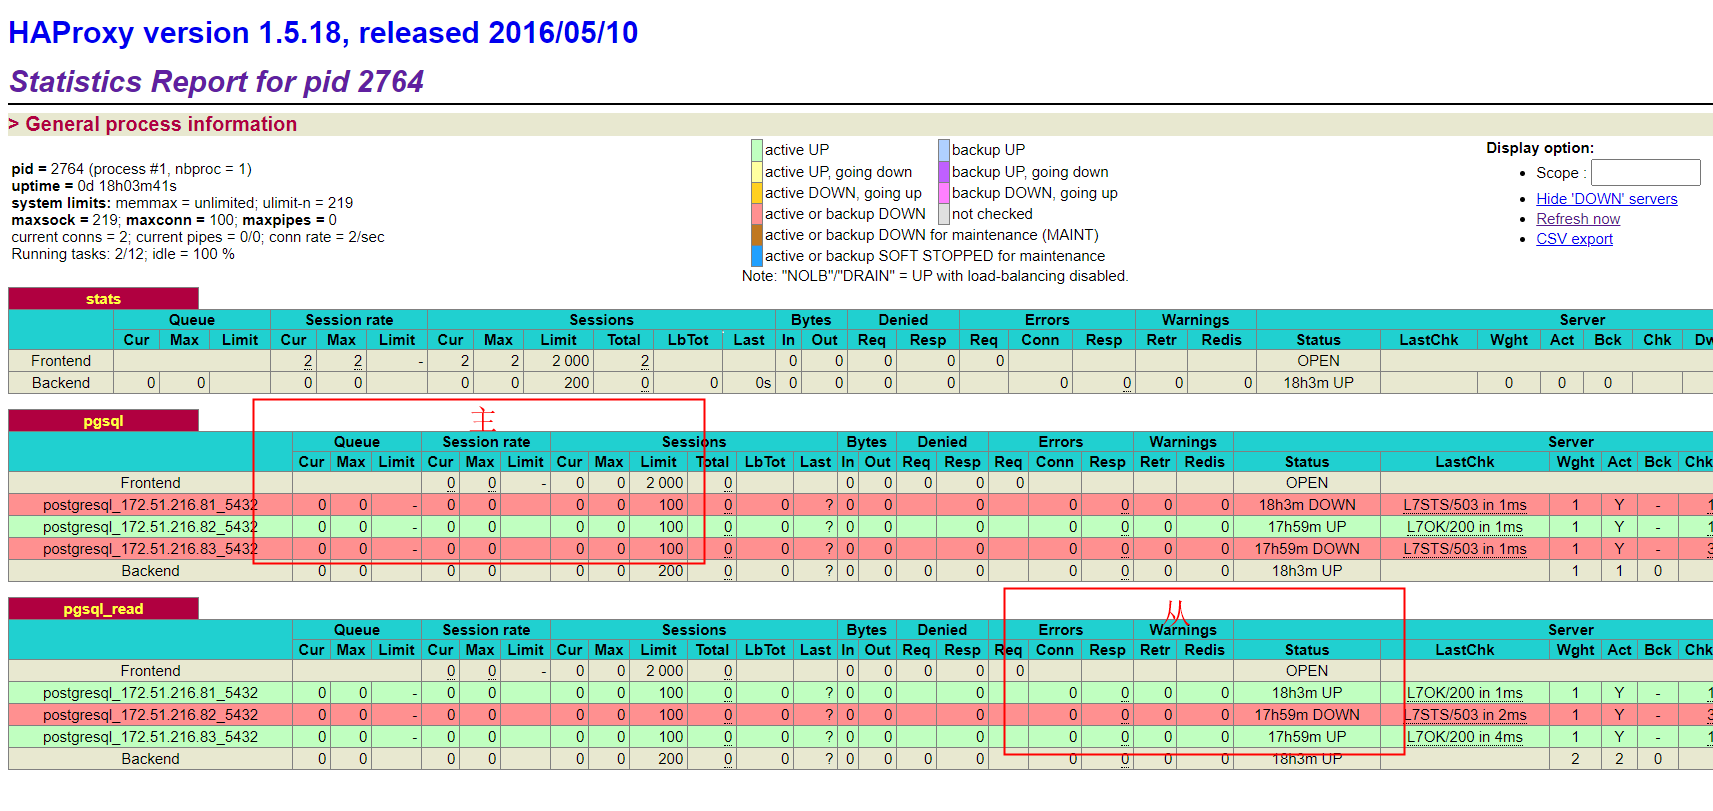
# haproxy部署后,可以通过它的web接口查看统计数据
http://172.51.216.81:7000/
http://172.51.216.82:7000/
http://172.51.216.88:7000/
# master:
psql "host=172.51.216.81 port=5000 password=postgres"
# slave:
psql "host=172.51.216.81 port=6000 password=postgres"
7.安装keepalived
1
2
3
4
node1: 172.51.216.81
node2: 172.51.216.82

# yum -y install keepalived
1
2
3
4
5
6
7
8
9
10
11
12
13
14
15
16
17
18
19
20
21
22
23
24
25
26
27
28
29
30
31
32
33
34
35
36
37
38
39
40
41
42
43
44
45
46
47
48
49
50
51
52
53
54
55
56
57
58
59
60
61
62
# 配置文件: /etc/keepalived/keepalived.conf

vim /etc/keepalived/keepalived.conf

# node1
 ! Configuration File for keepalived

global_defs {
   router_id haproxy1
}
vrrp_script check_haproxy {
   script "/etc/keepalived/haproxy_chk.sh"
   interval 5
}

vrrp_instance VI_1 {
    state MASTER
    interface eth0
    virtual_router_id 80
    priority 100
    advert_int 1
    authentication {
        auth_type PASS
        auth_pass 1111
    }
    virtual_ipaddress {
        172.51.216.88/24
    }
    track_script {
        check_haproxy
    }
}


# node2
! Configuration File for keepalived

global_defs {
   router_id haproxy2
}
vrrp_script check_haproxy {
   script "/etc/keepalived/haproxy_chk.sh"
   interval 5
}

vrrp_instance VI_1 {
    state BACKUP
    interface eth0
    virtual_router_id 80
    priority 50
    advert_int 1
    authentication {
        auth_type PASS
        auth_pass 1111
    }
    virtual_ipaddress {
        172.51.216.88/24
    }
    track_script {
        check_haproxy
    }
}
1
2
3
4
5
6
7
8
9
10
11
12
13
14
15
16
17
18
# 主从配置相同
vim /etc/keepalived/haproxy_chk.sh
#!/usr/bin/env bash
# test haproxy server running
systemctl status haproxy.service &>/dev/null
if [ $? -ne 0 ] ; then
systemctl start haproxy.service &>/dev/null
sleep 5
systemctl status haproxy.service &>/dev/null
if [ $? -ne 0 ] ; then
systemctl stop keepalived
fi
fi
# 修改权限
chmod +x /etc/keepalived/haproxy_chk.sh
1
2
3
systemctl start keepalived
systemctl enable keepalived
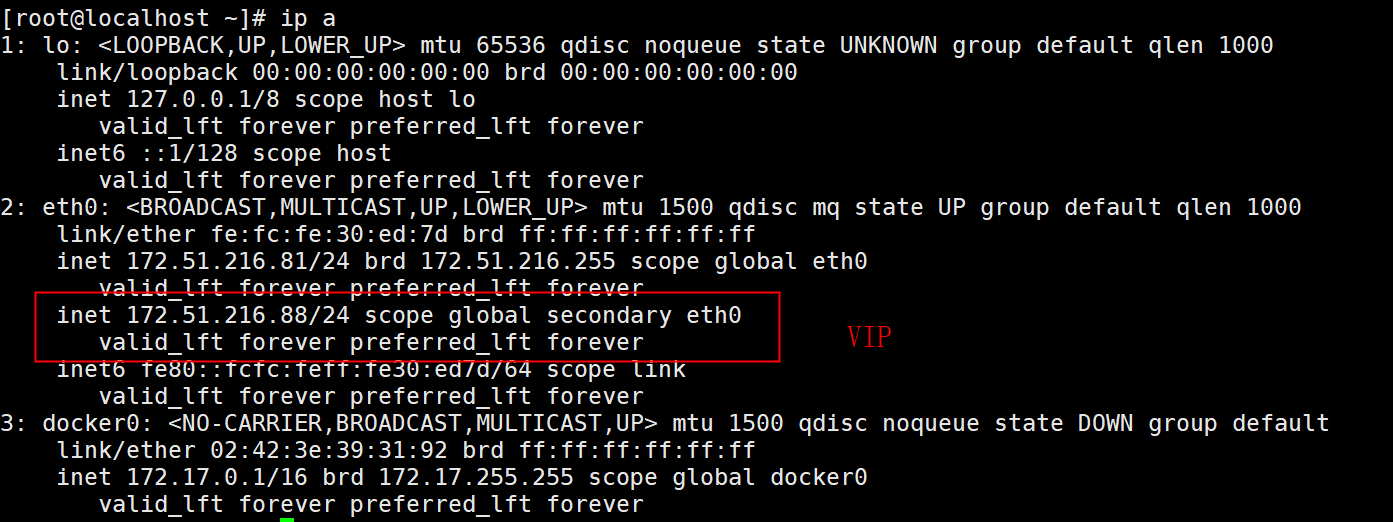
ip a
1
2
3
4
5
6
7
8
9
10
11
http://172.51.216.88:7000/
psql "host=172.51.216.88 port=5000 password=postgres"
psql "host=172.51.216.88 port=6000 password=postgres"
create table test ( id int, name varchar( 100)) ;
insert into test values ( 1,'1' ) ;
select * from test ;
8.测试
1
2
3
# 查看集群状态

# patronictl -c /etc/patroni.yml list
1
2
3
# 手动切换

# patronictl -c /etc/patroni.yml switchover
1
2
3
4
# 任意节点查看集群状态

etcdctl cluster-health
etcdctl member list
1
2
3
4
5
6
7
8
9
10
11
12
13
14
15
16
17
# haproxy
http://172.51.216.88:7000/
# psql
# 主
psql "host=172.51.216.88 port=5000 password=postgres"
# 从
psql "host=172.51.216.88 port=6000 password=123456"
create table test ( id int, name varchar( 100)) ;
insert into test values ( 1,'1' ) ;
select * from test ;
#停止数据库
$ pg_ctl stop -m fast
waiting for server to shut down.... done
server stopped
© 2024 IoTHub - 物联网开源技术社区