一、MQTT 设备服务
1.概述
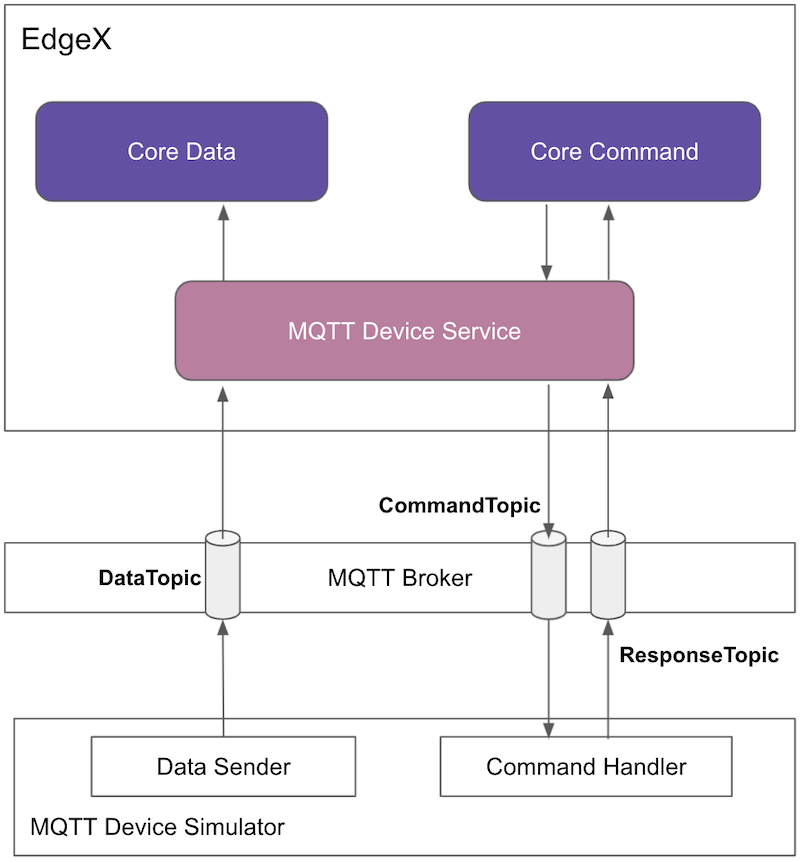
MQTT 设备服务使用 MQTT 协议将设备/传感器连接到 EdgeX。目标设备和此设备服务连接到同一 MQTT 代理并交换异步数据和设备命令的消息。
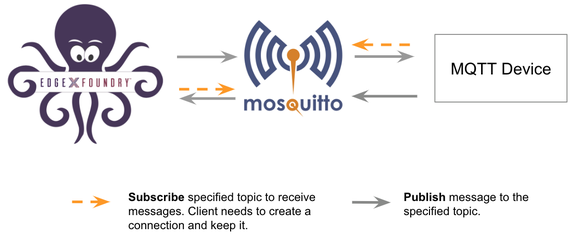
EdgeX 与 MQTT 设备通信
2.服务配置
MQTT 设备服务具有以下配置来实现 MQTT 协议。
| Configuration | Default Value | Description |
|---|---|---|
| MQTTBrokerInfo.Schema | tcp | The URL schema |
| MQTTBrokerInfo.Host | localhost | The URL host |
| MQTTBrokerInfo.Port | 1883 | The URL port |
| MQTTBrokerInfo.Qos | 0 | Quality of Service 0 (At most once), 1 (At least once) or 2 (Exactly once) |
| MQTTBrokerInfo.KeepAlive | 3600 | Seconds between client ping when no active data flowing to avoid client being disconnected. Must be greater then 2 |
| MQTTBrokerInfo.ClientId | device-mqtt | ClientId to connect to the broker with |
| MQTTBrokerInfo.CredentialsRetryTime | 120 | The retry times to get the credential |
| MQTTBrokerInfo.CredentialsRetryWait | 1 | The wait time(seconds) when retry to get the credential |
| MQTTBrokerInfo.ConnEstablishingRetry | 10 | The retry times to establish the MQTT connection |
| MQTTBrokerInfo.ConnRetryWaitTime | 5 | The wait time(seconds) when retry to establish the MQTT connection |
| MQTTBrokerInfo.AuthMode | none | Indicates what to use when connecting to the broker. Must be one of “none” , “usernamepassword” |
| MQTTBrokerInfo.CredentialsPath | credentials | Name of the path in secret provider to retrieve your secrets. Must be non-blank. |
| MQTTBrokerInfo.IncomingTopic | incoming/data/# | IncomingTopic is used to receive the async value |
| MQTTBrokerInfo.ResponseTopic | command/response/# | ResponseTopic is used to receive the command response from the device |
| MQTTBrokerInfo.Writable.ResponseFetchInterval | 500 | ResponseFetchInterval specifies the retry interval(milliseconds) to fetch the command response from the MQTT broker |
使用环境变量覆盖
用户可以使用 compose 文件中的变量覆盖上述任何配置 environment: 以满足他们的要求,例如:
The user can override any of the above configurations using environment: variables in the compose file to meet their requirement, for example:
1
2
3
4
5
6
7
8
9
# docker-compose.override.yml

  version: '3.7'

  services:
    device-mqtt:
      environment:
        MQTTBROKERINFO_CLIENTID: "my-device-mqtt"
        MQTTBROKERINFO_CONNRETRYWAITTIME: "10"
3.协议属性
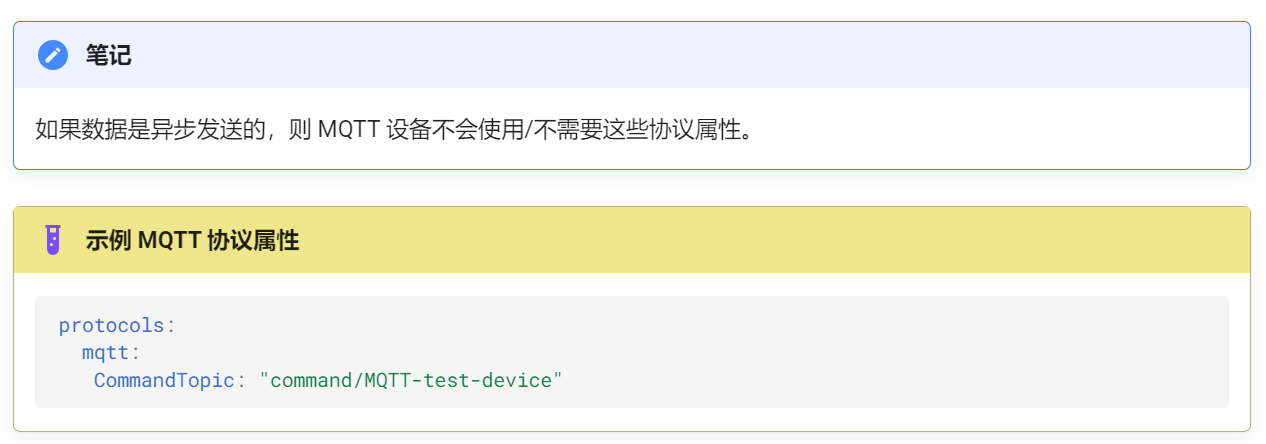
此服务为支持 2 路通信的每个已定义设备定义以下协议属性。这些属性位于每个设备定义部分的mqtt键下protocols。
| Property | Description |
|---|---|
| CommandTopic | 用于向设备发送命令的基本 MQTT 主题 |
4.多级 Topics
在多级 Topics 中,发布的有效载荷中的数据是读值数据。设备和源的名称嵌入到主题中。支持多级主题有两种方式——异步数据和命令。
4.1.异步数据
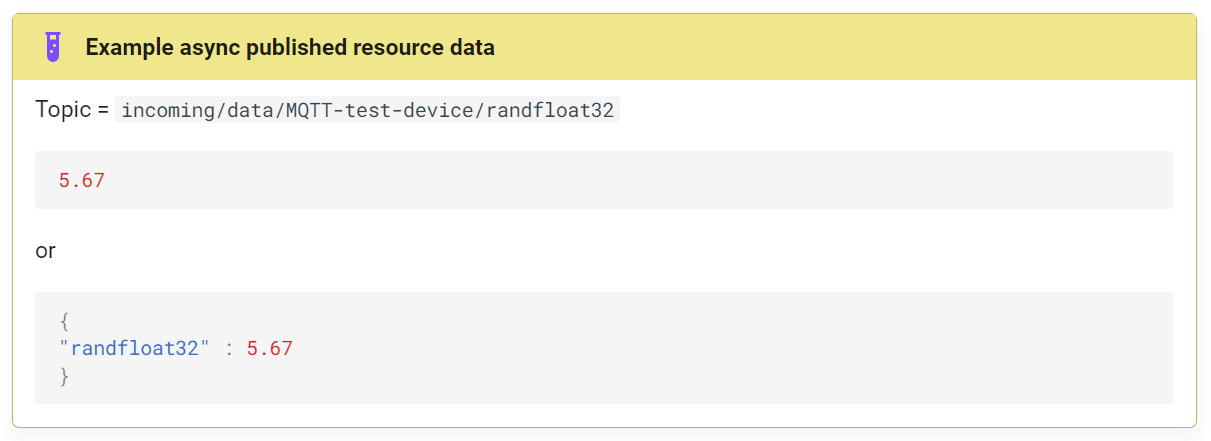
异步数据发布到主题,incoming/data/{device-name}/{source-name}其中:
- device-name 是发送读值的设备的名称
- source-name 是已发布数据的命令或资源名称
- 当源名称与命令名称匹配时,发布的数据必须是 JSON 对象,并且命令中指定的资源名称为字段名称。

- 当source-name 只匹配资源名称的情况下,发布的数据可以是资源的读取值,也可以是以资源名称作为字段名称的 JSON 对象。
4.2.命令
发送到设备的命令将针对以下主题发送 command/{device-name}/{command-name}/{method}/{uuid}:
- device-name 是将接收命令的设备的名称
- command-name 是发送到设备的命令的名称
- method 是命令的类型,
get或者set -
uuid 是命令请求的唯一标识符
- 设置命令
如果命令方法是 a set,则发布的有效负载包含一个 JSON 对象,其中包含资源名称和用于设置这些资源的值。作为响应,设备应在主题上发布空响应 command/response/{uuid},其中 uuid 与命令请求主题中发送的唯一标识符匹配。

- 获取命令
如果命令方法是 a get,则发布的有效负载为空,并且设备预计将发布对主题“command/response/{uuid}”的响应,其中 uuid 是在命令请求主题中发送的唯一标识符。发布的有效负载包含一个 JSON 对象,其中包含指定命令的资源名称及其值。

二、连接 MQTT 设备

1
2
3
# 官方文档

https://docs.edgexfoundry.org/3.1/microservices/device/services/device-mqtt/Ch-ExamplesAddingMQTTDevice/
1.docker-comepse
1
2
3
4
5
6
7
8
9
10
11
12
13
14
15
# 1.克隆 edgex-compose
$ git clone git@github.com:edgexfoundry/edgex-compose.git
$ git clone https://github.com/edgexfoundry/edgex-compose.git
$ cd edgex-compose
$ git checkout v3.1


# 2.生成 docker-compose.yml 文件(注意这包括 mqtt-broker)
$ cd compose-builder
$ make gen ds-mqtt mqtt-broker no-secty


# 3.检查生成的文件
$ ls | grep 'docker-compose.yml'
docker-compose.yml
1
2
3
4
5
6
7
8
9
10
11
12
13
14
15
16
17
18
19
20
21
22
23
24
25
26
27
28
29
30
31
32
33
34
35
36
37
38
39
40
41
42
[root@edgex mqtt-device]# git clone https://github.com/edgexfoundry/edgex-compose.git
Cloning into 'edgex-compose'...
remote: Enumerating objects: 4779, done.
remote: Counting objects: 100% (2916/2916), done.
remote: Compressing objects: 100% (173/173), done.
remote: Total 4779 (delta 2831), reused 2804 (delta 2741), pack-reused 1863
Receiving objects: 100% (4779/4779), 1.22 MiB | 450.00 KiB/s, done.
Resolving deltas: 100% (4042/4042), done.


[root@edgex mqtt-device]# ll
total 4
drwxr-xr-x. 6 root root 4096 Feb  1 04:10 edgex-compose


[root@edgex mqtt-device]# cd edgex-compose/
[root@edgex edgex-compose]# git checkout v3.1
Note: checking out 'v3.1'.

You are in 'detached HEAD' state. You can look around, make experimental
changes and commit them, and you can discard any commits you make in this
state without impacting any branches by performing another checkout.

If you want to create a new branch to retain commits you create, you may
do so (now or later) by using -b with the checkout command again. Example:

  git checkout -b new_branch_name

HEAD is now at 488a3fe... Merge pull request #424 from lenny-intel/device-mqtt-secure-mode-napa


[root@edgex edgex-compose]# cd compose-builder/

[root@edgex compose-builder]# make gen ds-mqtt mqtt-broker no-secty
echo MQTT_VERBOSE=
MQTT_VERBOSE=
docker compose  -p edgex -f docker-compose-base.yml -f add-device-mqtt.yml -f add-mqtt-broker-mosquitto.yml convert > docker-compose.yml
rm -rf ./gen_ext_compose


[root@edgex compose-builder]# ls | grep 'docker-compose.yml'
docker-compose.yml
2.设备配置文件
在本部分中,我们创建文件夹,其中包含部署自定义设备配置以与现有设备服务配合使用所需的文件:
1
2
3
4
5
- custom-config
  |- devices
     |- my.custom.device.config.yaml
  |- profiles
     |- my.custom.device.profile.yml
1
2
3
4
5
6
7
8
9
10
11
[root@edgex custom-config]# pwd
/edgex/mqtt-device-svc/custom-config

[root@edgex custom-config]# tree
.
├── devices
│   └── my.custom.device.config.yaml
└── profiles
    └── my.custom.device.profile.yml

2 directories, 2 files
1.设备配置
使用此配置文件来定义设备和调度作业。device-mqtt 在启动时生成一个相对实例。
创建设备配置文件,命名为my.custom.device.config.yaml,如下所示:
1
2
3
4
5
6
7
8
9
10
11
12
13
14
15
[root@edgex custom-config]# vim my.custom.device.config.yaml

# Pre-define Devices
deviceList:
- name: "my-custom-device"
  profileName: "my-custom-device-profile"
  description: "MQTT device is created for test purpose"
  labels: [ "MQTT", "test" ]
  protocols:
    mqtt:
      CommandTopic: "command/my-custom-device"
  autoEvents:
    - interval: "30s"
      onChange: false
      sourceName: "message"
CommandTopic 用于发布GET或SET命令请求
2.设备配置文件
DeviceProfile定义了设备的值和操作方法,可以是 Read 或 Write。
创建名为 的设备配置文件 my.custom.device.profile.yml,其中包含以下内容:
1
2
3
4
5
6
7
8
9
10
11
12
13
14
15
16
17
18
19
20
21
22
23
24
25
26
27
28
29
30
31
32
33
34
35
36
37
38
39
40
41
42
43
44
45
46
47
48
49
[root@edgex custom-config]# vim my.custom.device.profile.yml

name: "my-custom-device-profile"
manufacturer: "iot"
model: "MQTT-DEVICE"
description: "Test device profile"
labels:
  - "mqtt"
  - "test"
deviceResources:
  -
    name: randnum
    isHidden: true
    description: "device random number"
    properties:
      valueType: "Float32"
      readWrite: "R"
  -
    name: ping
    isHidden: true
    description: "device awake"
    properties:
      valueType: "String"
      readWrite: "R"
  -
    name: message
    isHidden: false
    description: "device message"
    properties:
      valueType: "String"
      readWrite: "RW"
  -
    name: json
    isHidden: false
    description: "JSON message"
    properties:
      valueType: "Object"
      readWrite: "RW"
      mediaType: "application/json"

deviceCommands:
  -
    name: values
    readWrite: "R"
    isHidden: false
    resourceOperations:
        - { deviceResource: "randnum" }
        - { deviceResource: "ping" }
        - { deviceResource: "message" }
3.安装自定义配置
创建一个 docker-compose 文件来扩展compose-builder 生成的docker-compose.override.yml compose 文件。在此文件中,我们添加卷路径和环境变量,如下所示:
1
2
3
4
5
6
7
8
9
10
11
 # docker-compose.override.yml

 version: '3.7'

 services:
     device-mqtt:
        environment:
          DEVICE_DEVICESDIR: /custom-config/devices
          DEVICE_PROFILESDIR: /custom-config/profiles
        volumes:
        - /path/to/custom-config:/custom-config
将示例中的替换/path/to/custom-config为正确的路径
1
2
3
4
5
6
7
8
9
10
11
[root@edgex custom-config]# vim docker-compose.override.yml

 version: '3.7'

 services:
     device-mqtt:
        environment:
          DEVICE_DEVICESDIR: /custom-config/devices
          DEVICE_PROFILESDIR: /custom-config/profiles
        volumes:
        - /edgex/mqtt-device-svc/custom-config:/custom-config
4.启动 EdgeX Foundry
使用以下命令部署 EdgeX:
1
2
3
4
5
6
7
$ cd edgex-compose/compose-builder
$ docker compose pull
$ docker compose -f docker-compose.yml -f docker-compose.override.yml up -d


# 修改配置文件
替换IP地址 127.0.0.1 为 0.0.0.0
1
2
3
# docker compose pull

# docker compose -f docker-compose.yml -f docker-compose.override.yml up -d

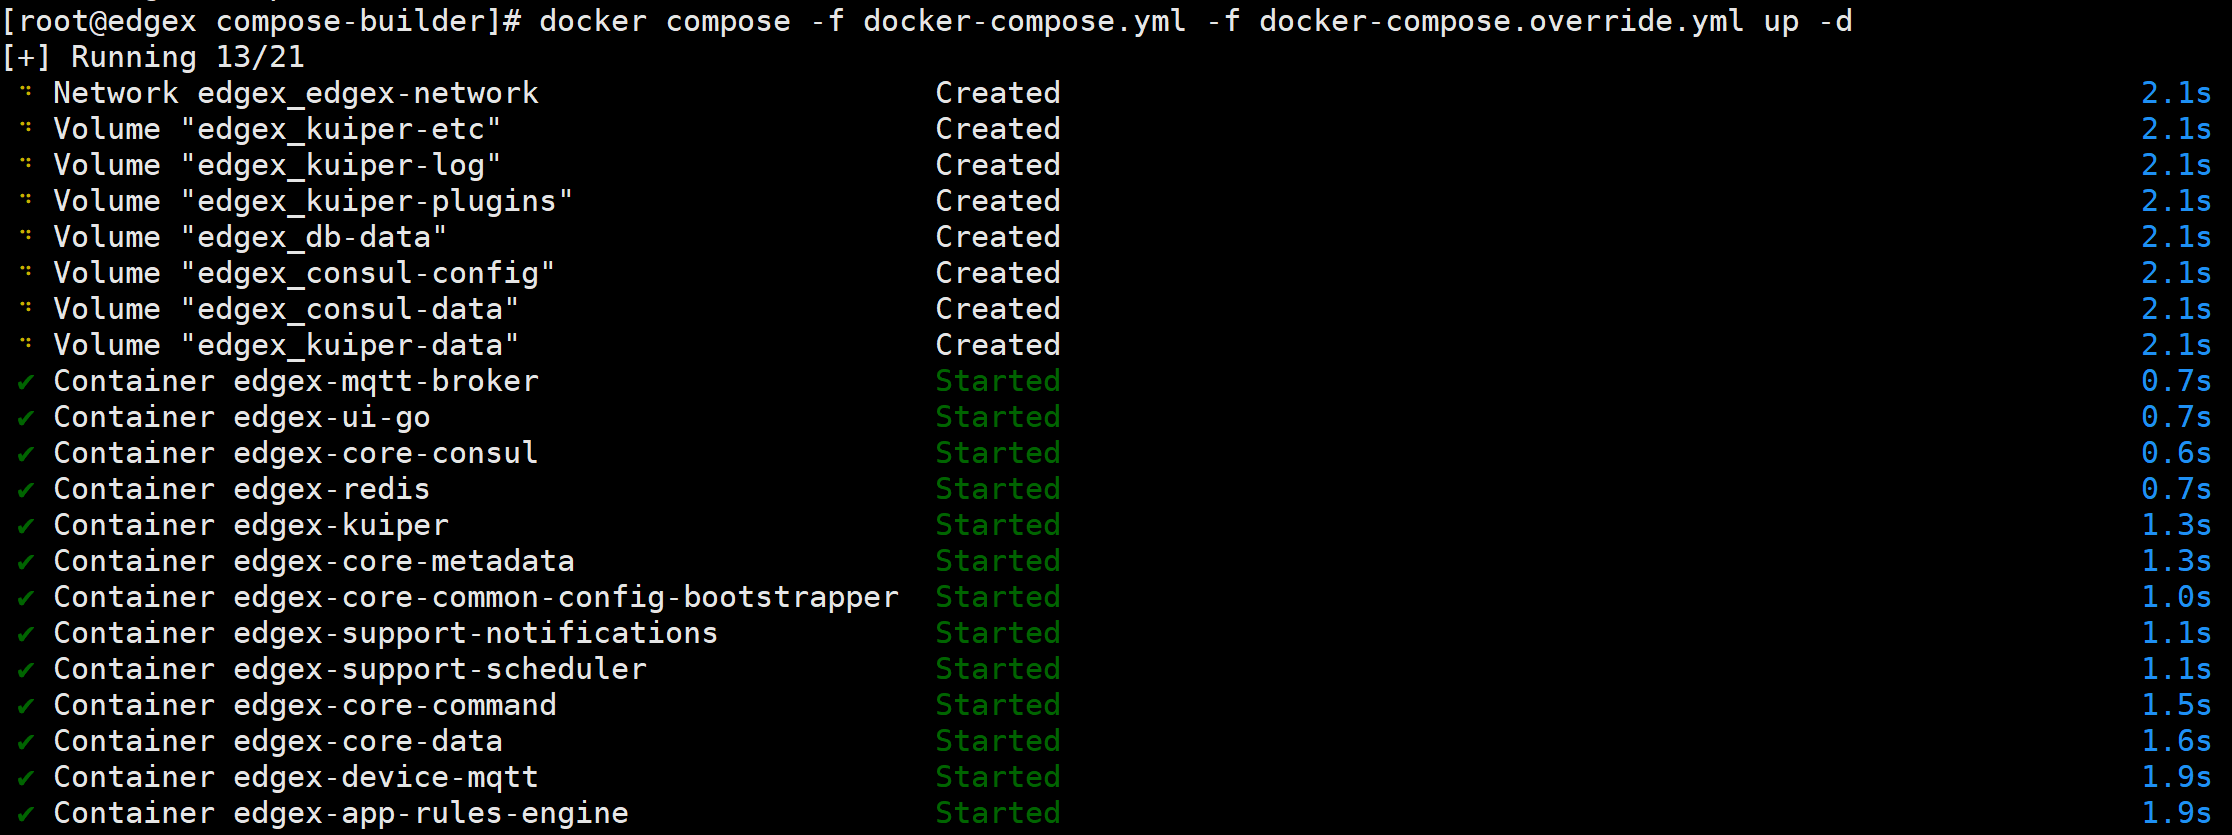
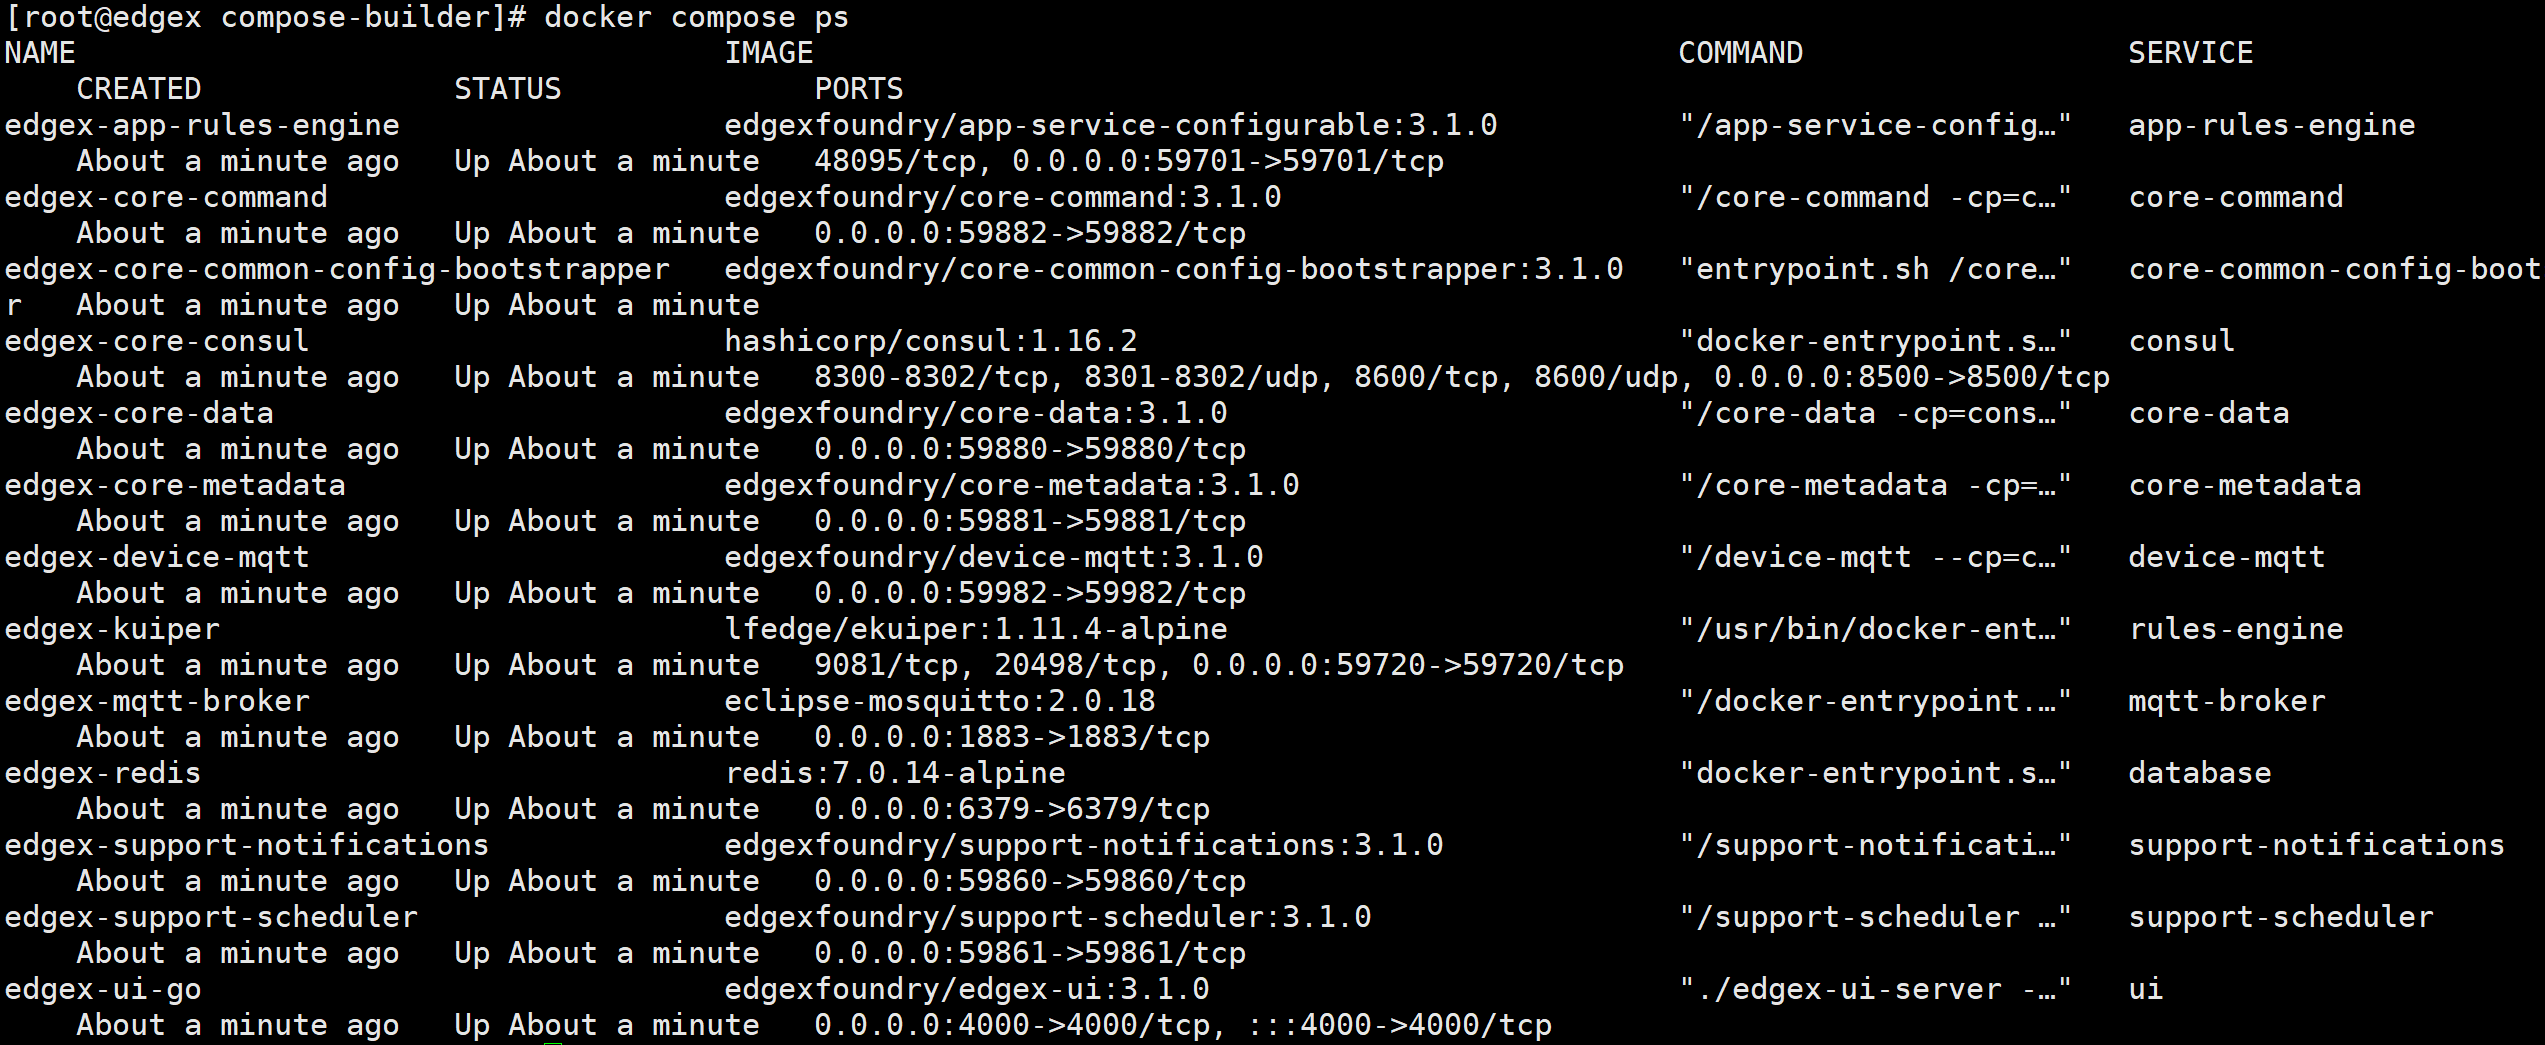
5.创建 MQTT 设备模拟器
要实现模拟的自定义 MQTT 设备,请创建一个名为 的 javascript,mock-device.js其中包含以下内容:
1
2
3
4
5
6
7
8
9
10
11
12
13
14
15
16
17
18
19
20
21
22
23
24
25
26
27
28
29
30
31
32
33
34
35
36
37
38
39
40
41
42
43
44
45
46
47
48
49
50
51
52
53
54
55
56
57
function getRandomFloat(min, max) {
    return Math.random() * (max - min) + min;
}

const deviceName = "my-custom-device";
let message = "test-message";
let json = {"name" : "My JSON"};

// DataSender sends async value to MQTT broker every 15 seconds
schedule('*/15 * * * * *', ()=>{
    var data = {};
    data.randnum = getRandomFloat(25,29).toFixed(1);
    data.ping = "pong"
    data.message = "Hello World"

    publish( 'incoming/data/my-custom-device/values', JSON.stringify(data));
});

// CommandHandler receives commands and sends response to MQTT broker
// 1. Receive the reading request, then return the response
// 2. Receive the set request, then change the device value
subscribe( "command/my-custom-device/#" , (topic, val) => {
    const words = topic.split('/');
    var cmd = words[2];
    var method = words[3];
    var uuid = words[4];
    var response = {};
    var data = val;

    if (method == "set") {
        switch(cmd) {
            case "message":
                message = data[cmd];
                break;
            case "json":
                json = data[cmd];
                break;
        }
    }else{
        switch(cmd) {
            case "ping":
                response.ping = "pong";
                break;
            case "message":
                response.message = message;
                break;
            case "randnum":
                response.randnum = 12.123;
                break;
            case "json":
                response.json = json;
                break;
        }
    }
    var sendTopic ="command/response/"+ uuid;
    publish( sendTopic, JSON.stringify(response));
});
要运行设备模拟器,请输入下面所示的命令并进行以下更改:
1
2
3
4
$ mv mock-device.js /path/to/mqtt-scripts
$ docker run --rm --name=mqtt-scripts \
    -v /path/to/mqtt-scripts:/scripts  --network host \
    dersimn/mqtt-scripts --dir /scripts
/path/to/mqtt-scripts将示例中的 mv 命令替换为正确的路径
然后 mqtt-scripts 显示日志如下:
1
2
3
2022-08-12 09:52:42.086 <info>  mqtt-scripts 1.2.2 starting
2022-08-12 09:52:42.227 <info>  mqtt connected mqtt://127.0.0.1
2022-08-12 09:52:42.733 <info>  /scripts/mock-device.js loading
1
2
3
4
5
6
7
8
9
10
# mv mock-device.js /edgex/mqtt-device/mqtt-scripts

# docker run --rm --name=mqtt-scripts \
    -v /edgex/mqtt-device-svc/mqtt-scripts:/scripts  --network host \
    dersimn/mqtt-scripts --dir /scripts


# docker run -d --rm --name=mqtt-scripts \
    -v /edgex/mqtt-device-svc/mqtt-scripts:/scripts  --network host \
    dersimn/mqtt-scripts --dir /scripts
1
2
3
4
5
6
7
8
9
10
11
12
13
14
15
16
17
# 运行容器

[root@edgex mqtt-device-svc]# docker run -d --rm --name=mqtt-scripts \
>     -v /edgex/mqtt-device-svc/mqtt-scripts:/scripts  --network host \
>     dersimn/mqtt-scripts --dir /scripts
Unable to find image 'dersimn/mqtt-scripts:latest' locally
latest: Pulling from dersimn/mqtt-scripts
4297e0229558: Pull complete
f75ab7205508: Pull complete
04c94b0d1e73: Pull complete
710dcd208222: Pull complete
e4edbf62c3fd: Pull complete
45c71e9674b9: Pull complete
a756f71ae17a: Pull complete
Digest: sha256:f554723bc1acff53483a4ad0102d617b9bbfa099bc129023c096318c6ddacf8e
Status: Downloaded newer image for dersimn/mqtt-scripts:latest
e810a3bffed5580efae6807cf1df986d152200ede5174908c48b2d10b17033c8
6.访问 UI
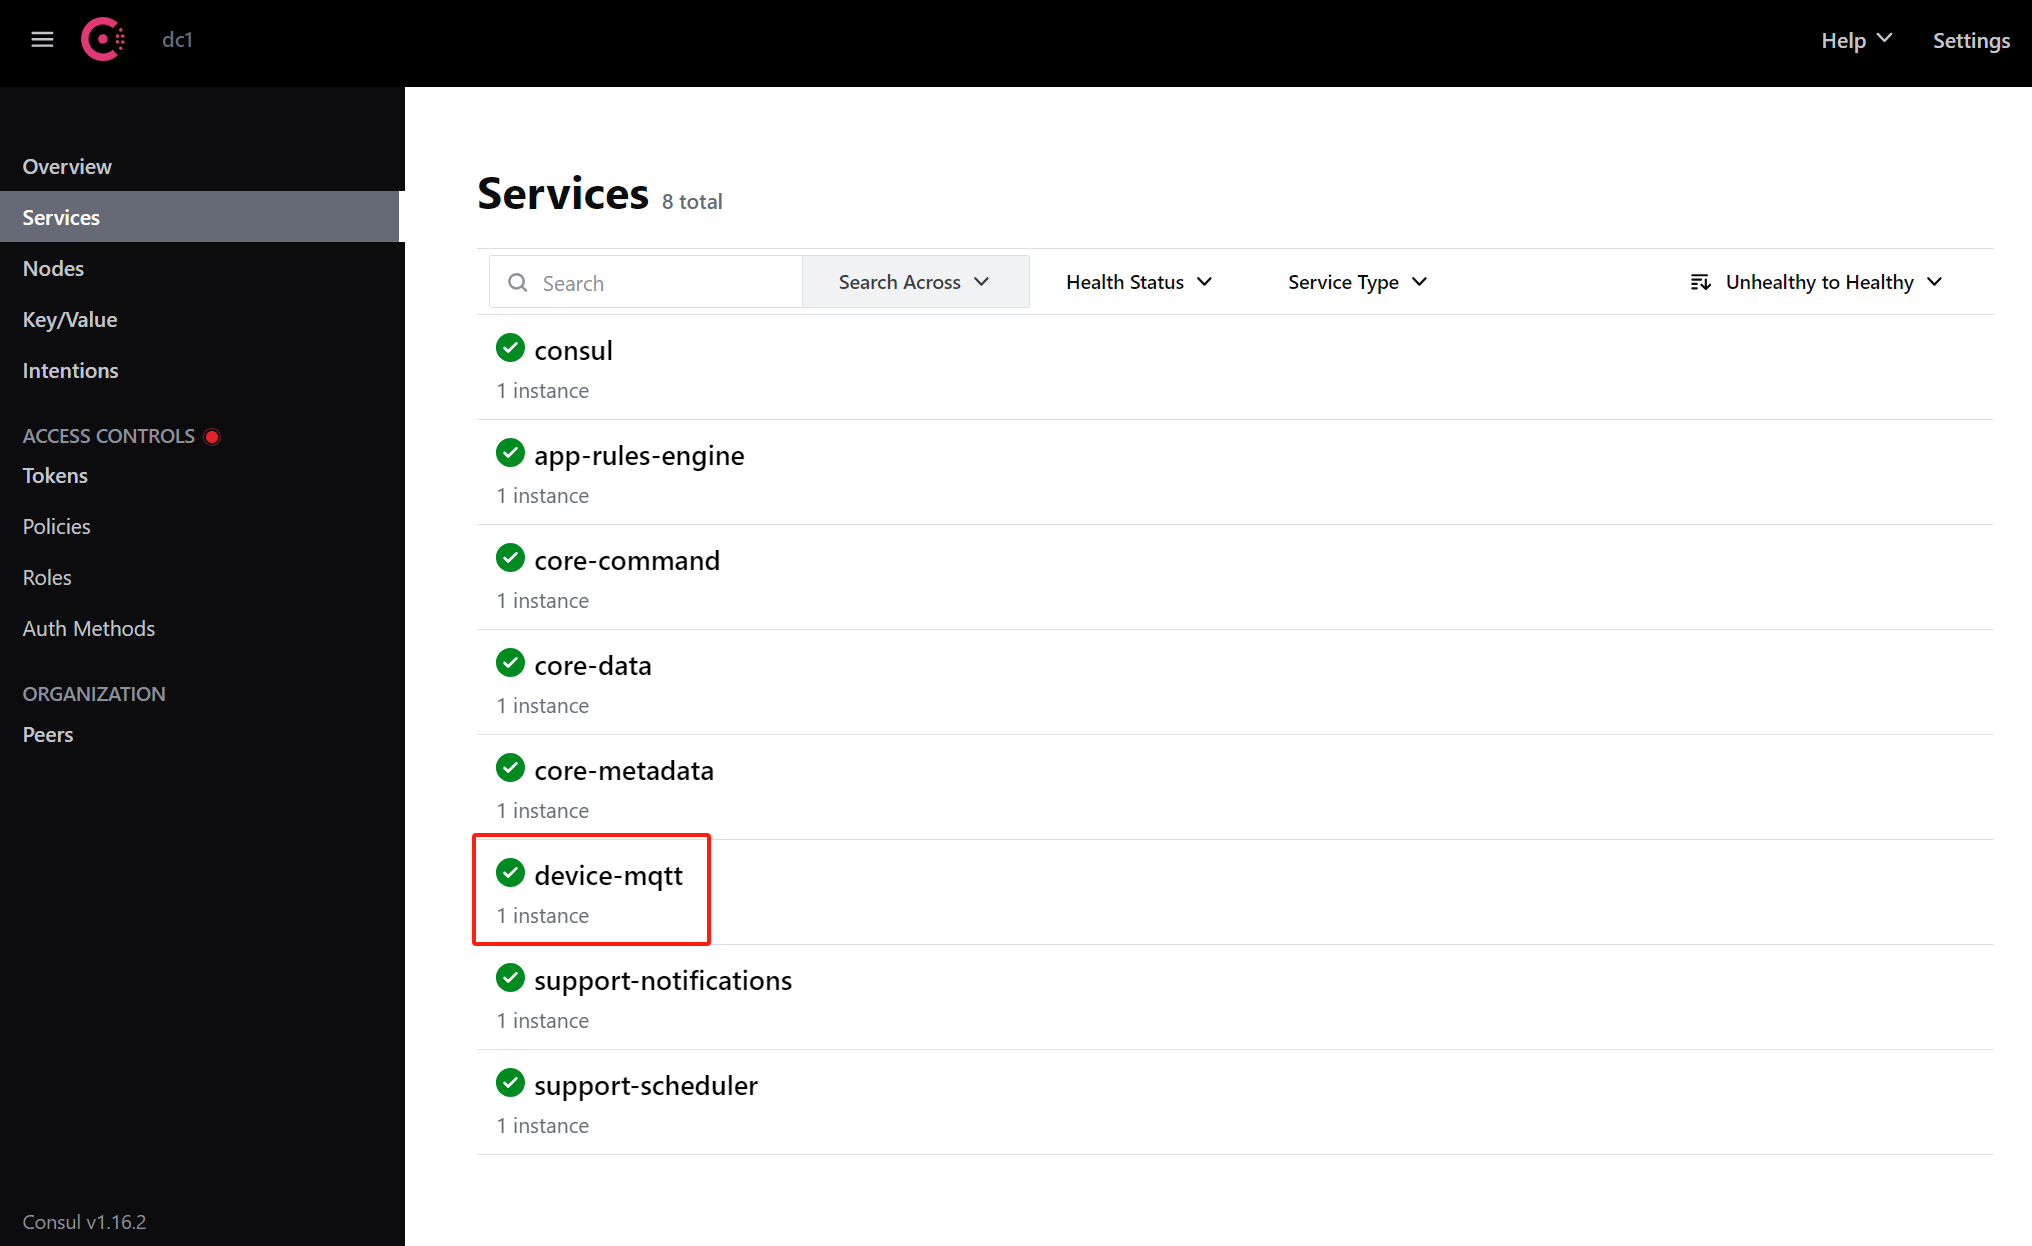
6.1. consul
1
2
# 访问地址
http://192.168.202.233:8500
6.2. EdgeX Console
1
2
# 访问地址
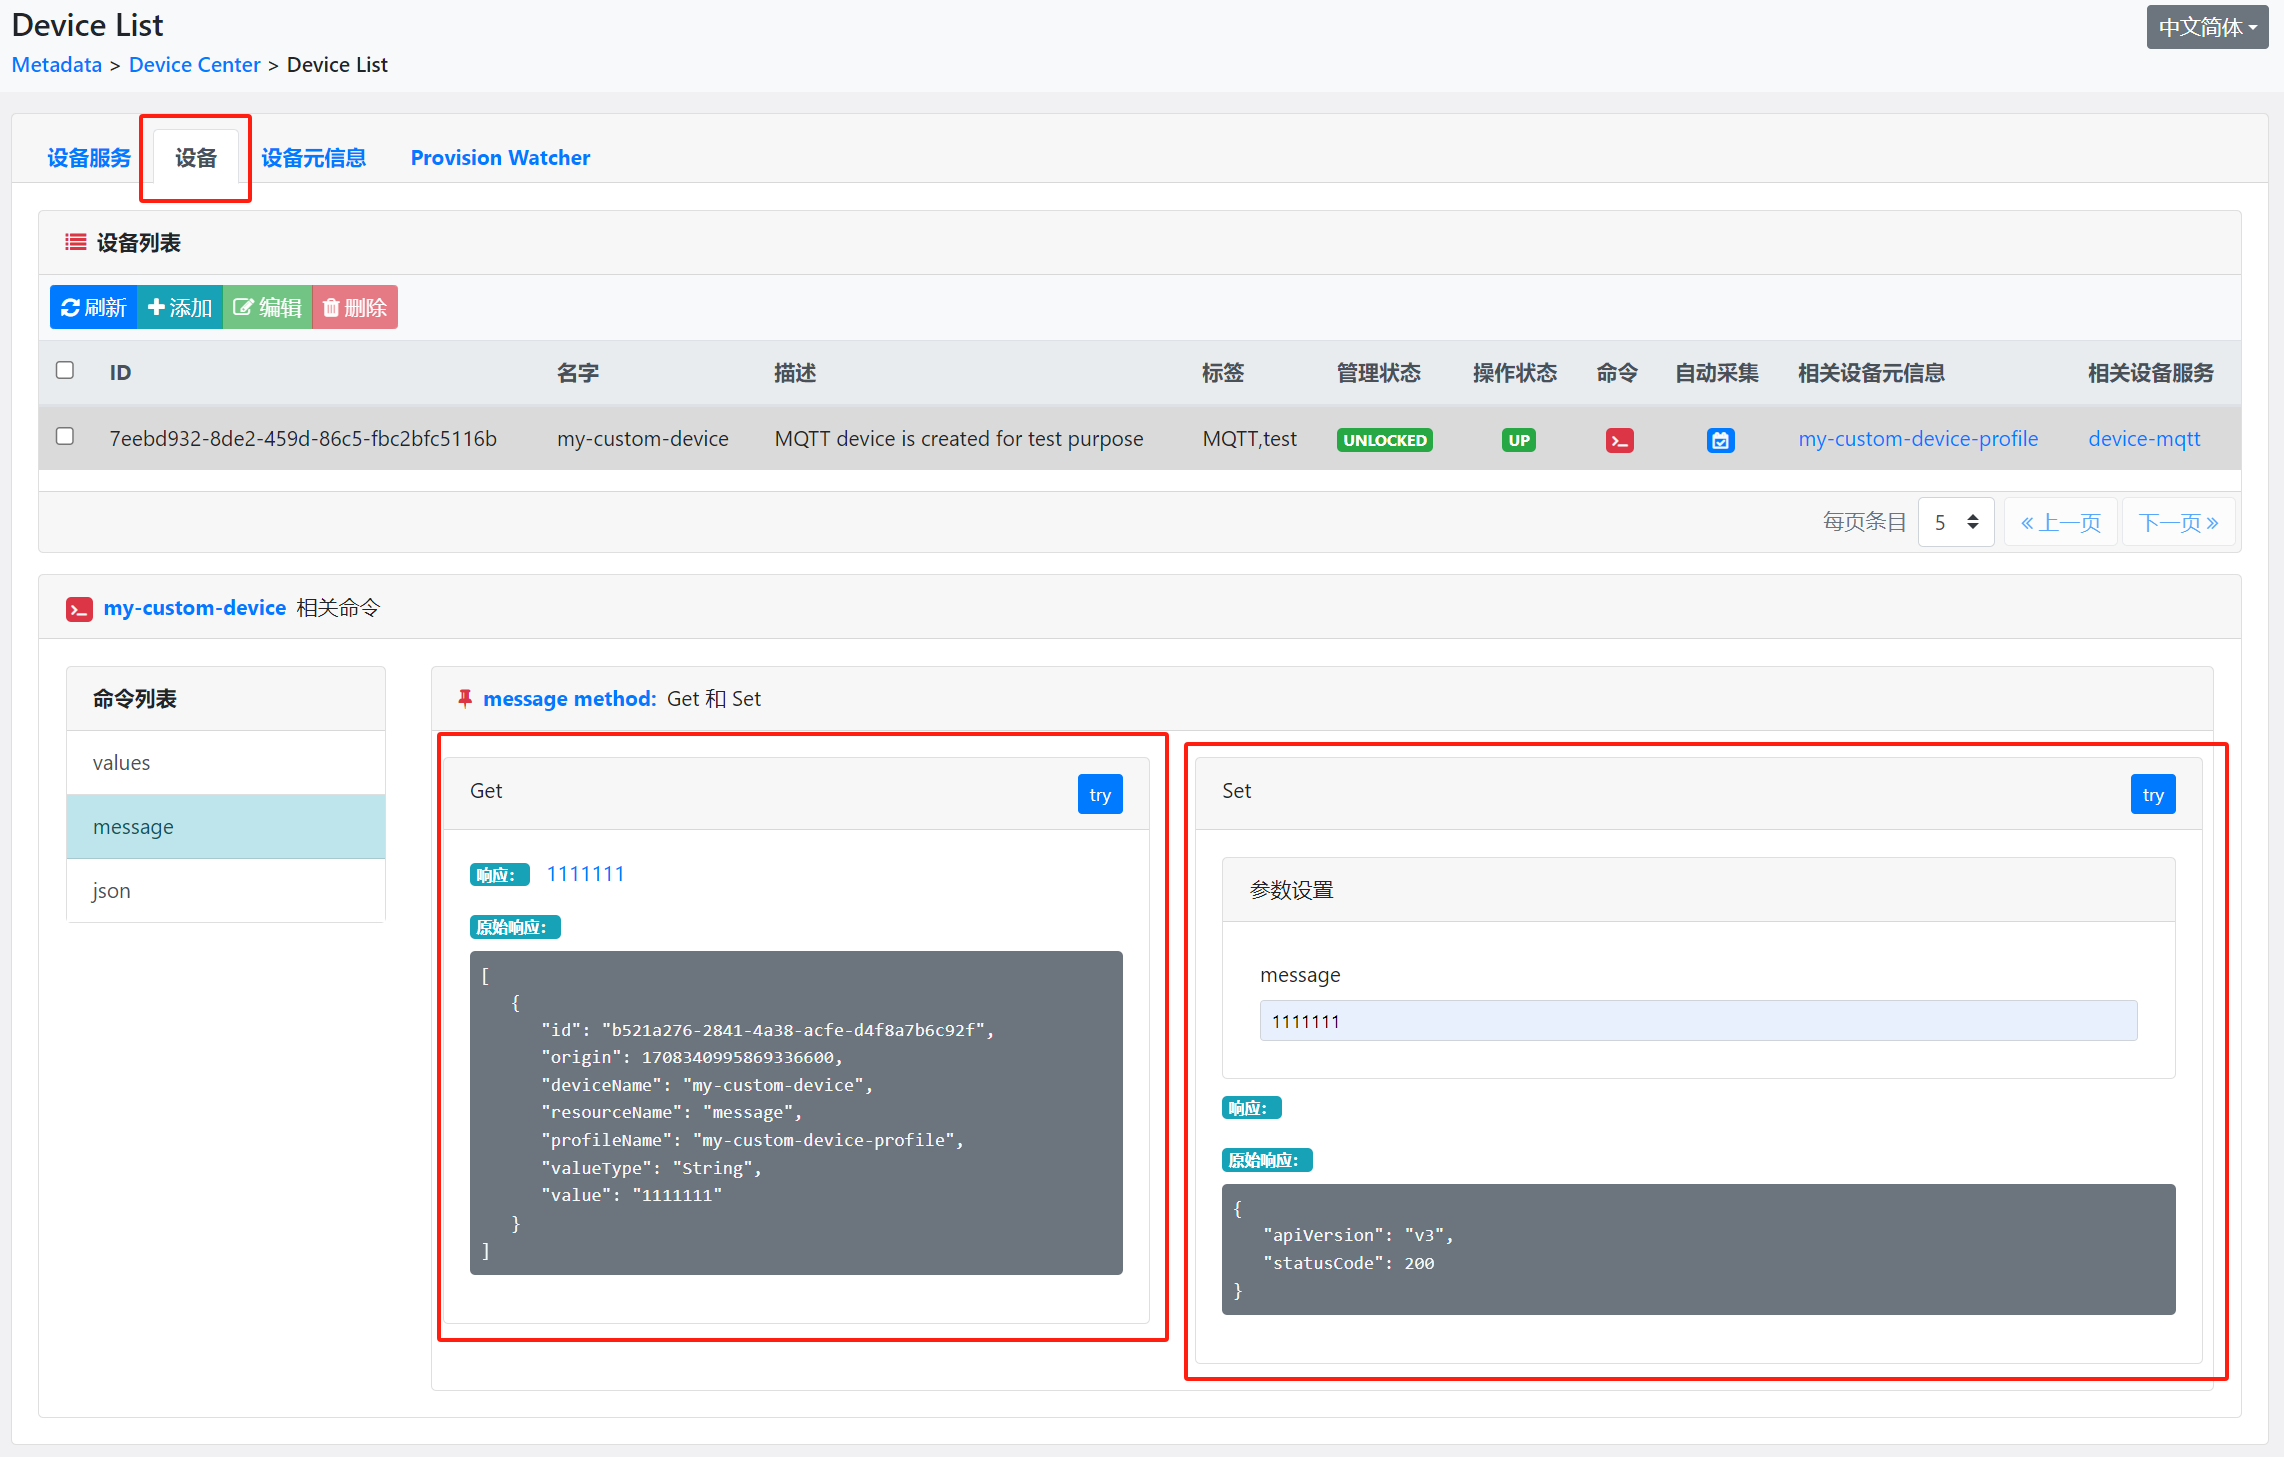
http://192.168.202.233:4000/


7.测试
7.1.命令
7.2.事件
1
2
3
4
5
6
7
8
9
10
11
12
13
14
15
16
17
18
19
20
21
22
23
24
25
26
27
28
29
30
31
32
33
34
35
36
37
38
39
40
41
42
43
44
45
46
47
48
49
50
51
52
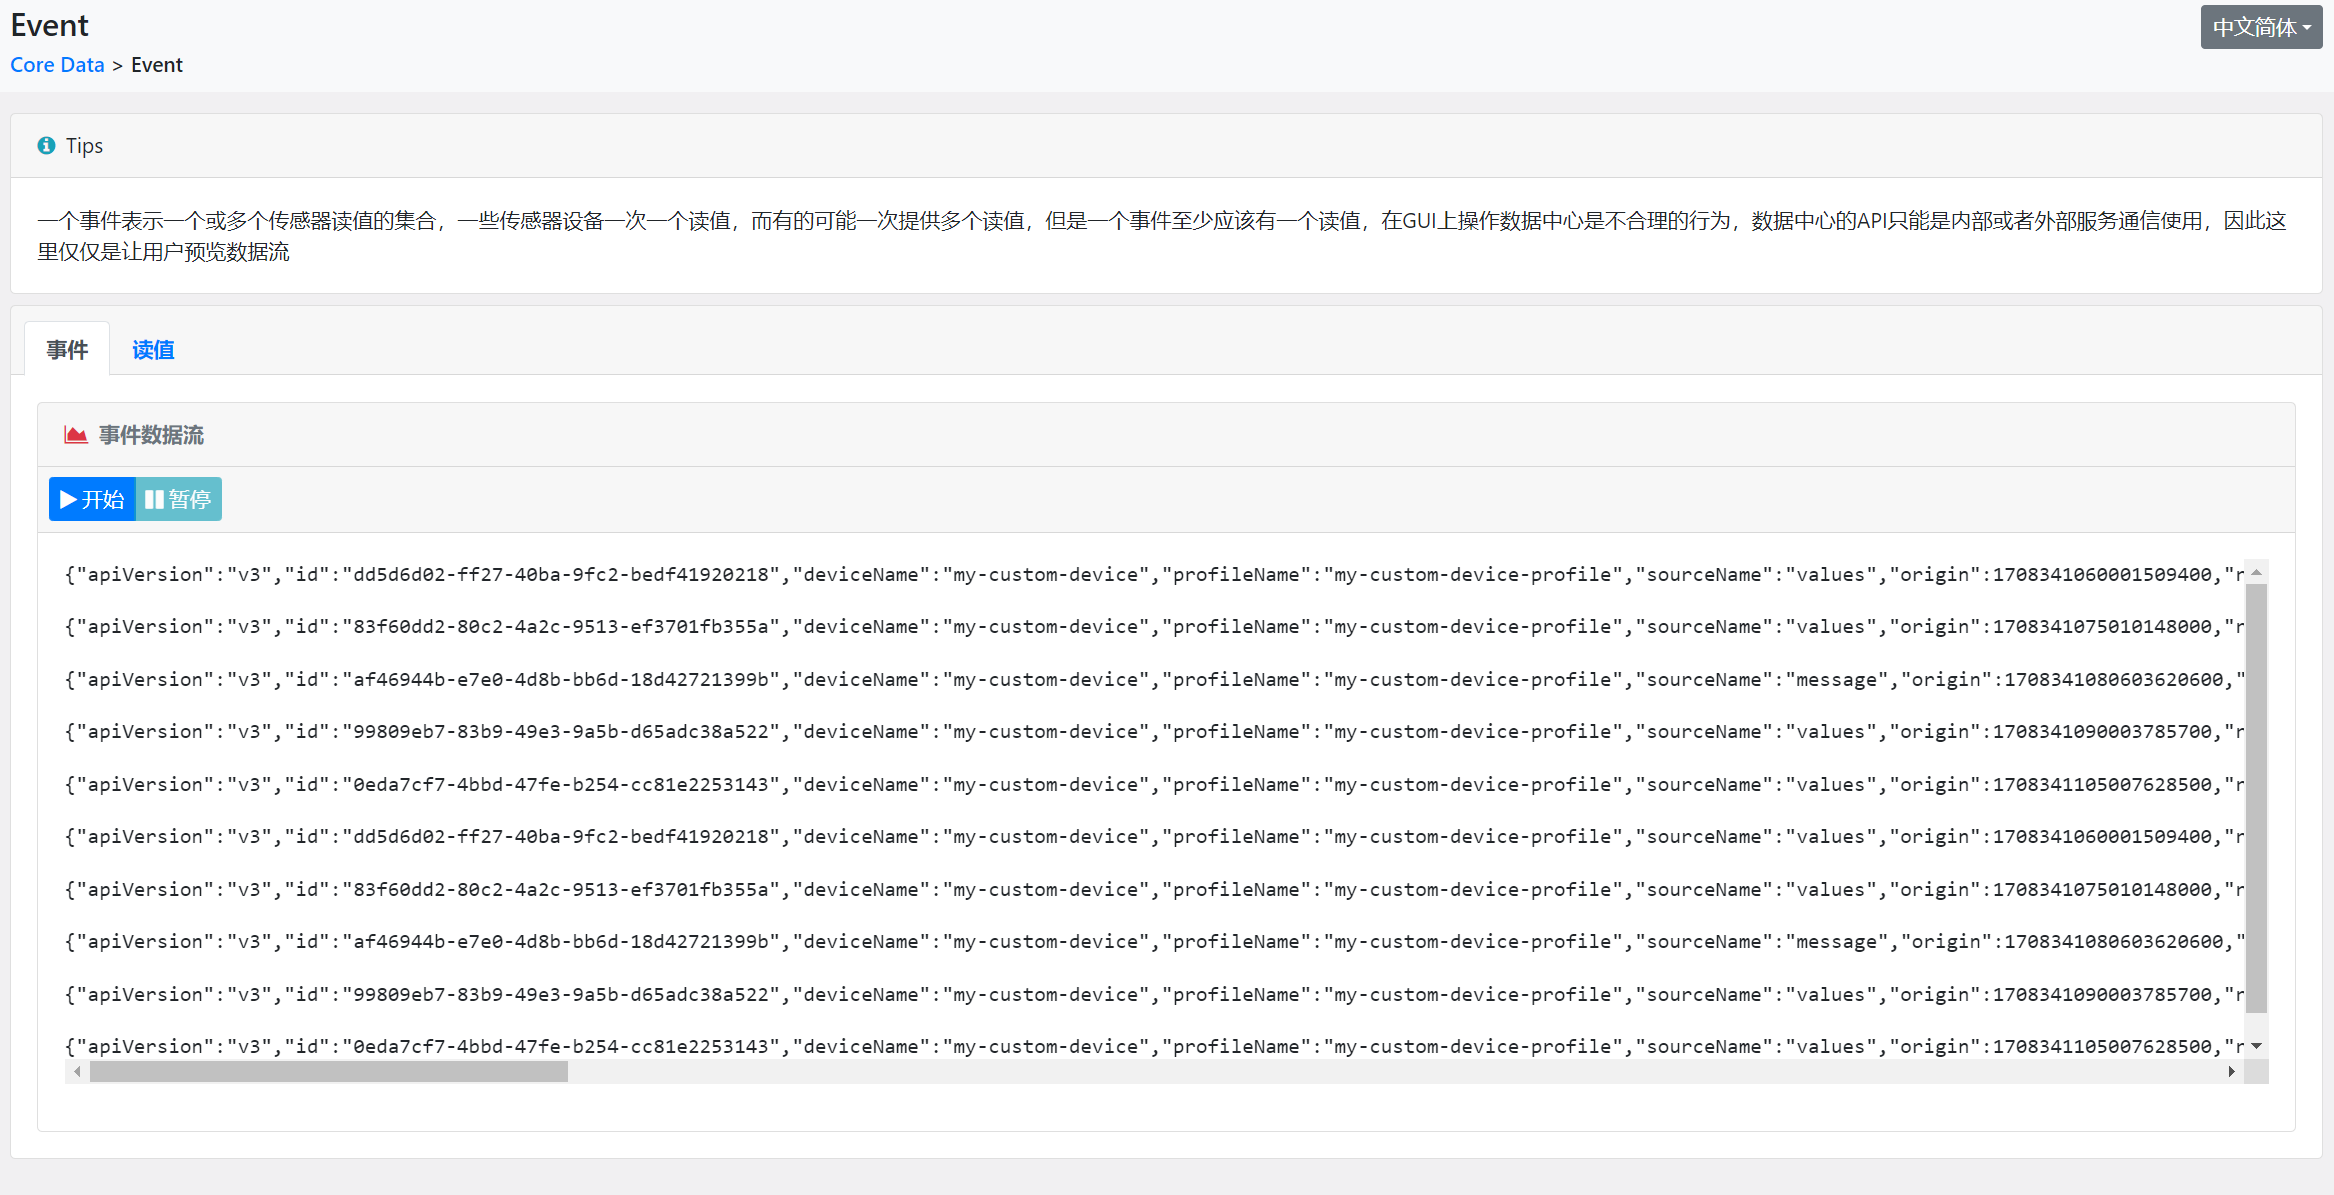
{
	"apiVersion": "v3",
	"id": "af46944b-e7e0-4d8b-bb6d-18d42721399b",
	"deviceName": "my-custom-device",
	"profileName": "my-custom-device-profile",
	"sourceName": "message",
	"origin": 1708341080603620600,
	"readings": [{
		"id": "edb1630b-7d15-49b8-97e3-1662520f7799",
		"origin": 1708341080603617300,
		"deviceName": "my-custom-device",
		"resourceName": "message",
		"profileName": "my-custom-device-profile",
		"valueType": "String",
		"value": "1111111"
	}]
}


{
	"apiVersion": "v3",
	"id": "99809eb7-83b9-49e3-9a5b-d65adc38a522",
	"deviceName": "my-custom-device",
	"profileName": "my-custom-device-profile",
	"sourceName": "values",
	"origin": 1708341090003785700,
	"readings": [{
		"id": "668df4eb-1404-4267-b0ee-464f1296e50b",
		"origin": 1708341090003772400,
		"deviceName": "my-custom-device",
		"resourceName": "randnum",
		"profileName": "my-custom-device-profile",
		"valueType": "Float32",
		"value": "2.650000e+01"
	}, {
		"id": "65067425-d134-4fc3-922f-2337d228cf0f",
		"origin": 1708341090003773700,
		"deviceName": "my-custom-device",
		"resourceName": "ping",
		"profileName": "my-custom-device-profile",
		"valueType": "String",
		"value": "pong"
	}, {
		"id": "fffe8f12-536c-43d9-9989-9d450d3b0b7b",
		"origin": 1708341090003774200,
		"deviceName": "my-custom-device",
		"resourceName": "message",
		"profileName": "my-custom-device-profile",
		"valueType": "String",
		"value": "Hello World"
	}]
}
7.3.读值
1
2
3
4
5
6
7
8
9
10
11
12
13
14
15
16
17
18
19
20
21
22
23
24
25
26
27
28
29
30
31
32
33
34
35
36
37
38
39
40
41
42
43
44
45
46
47
48
49
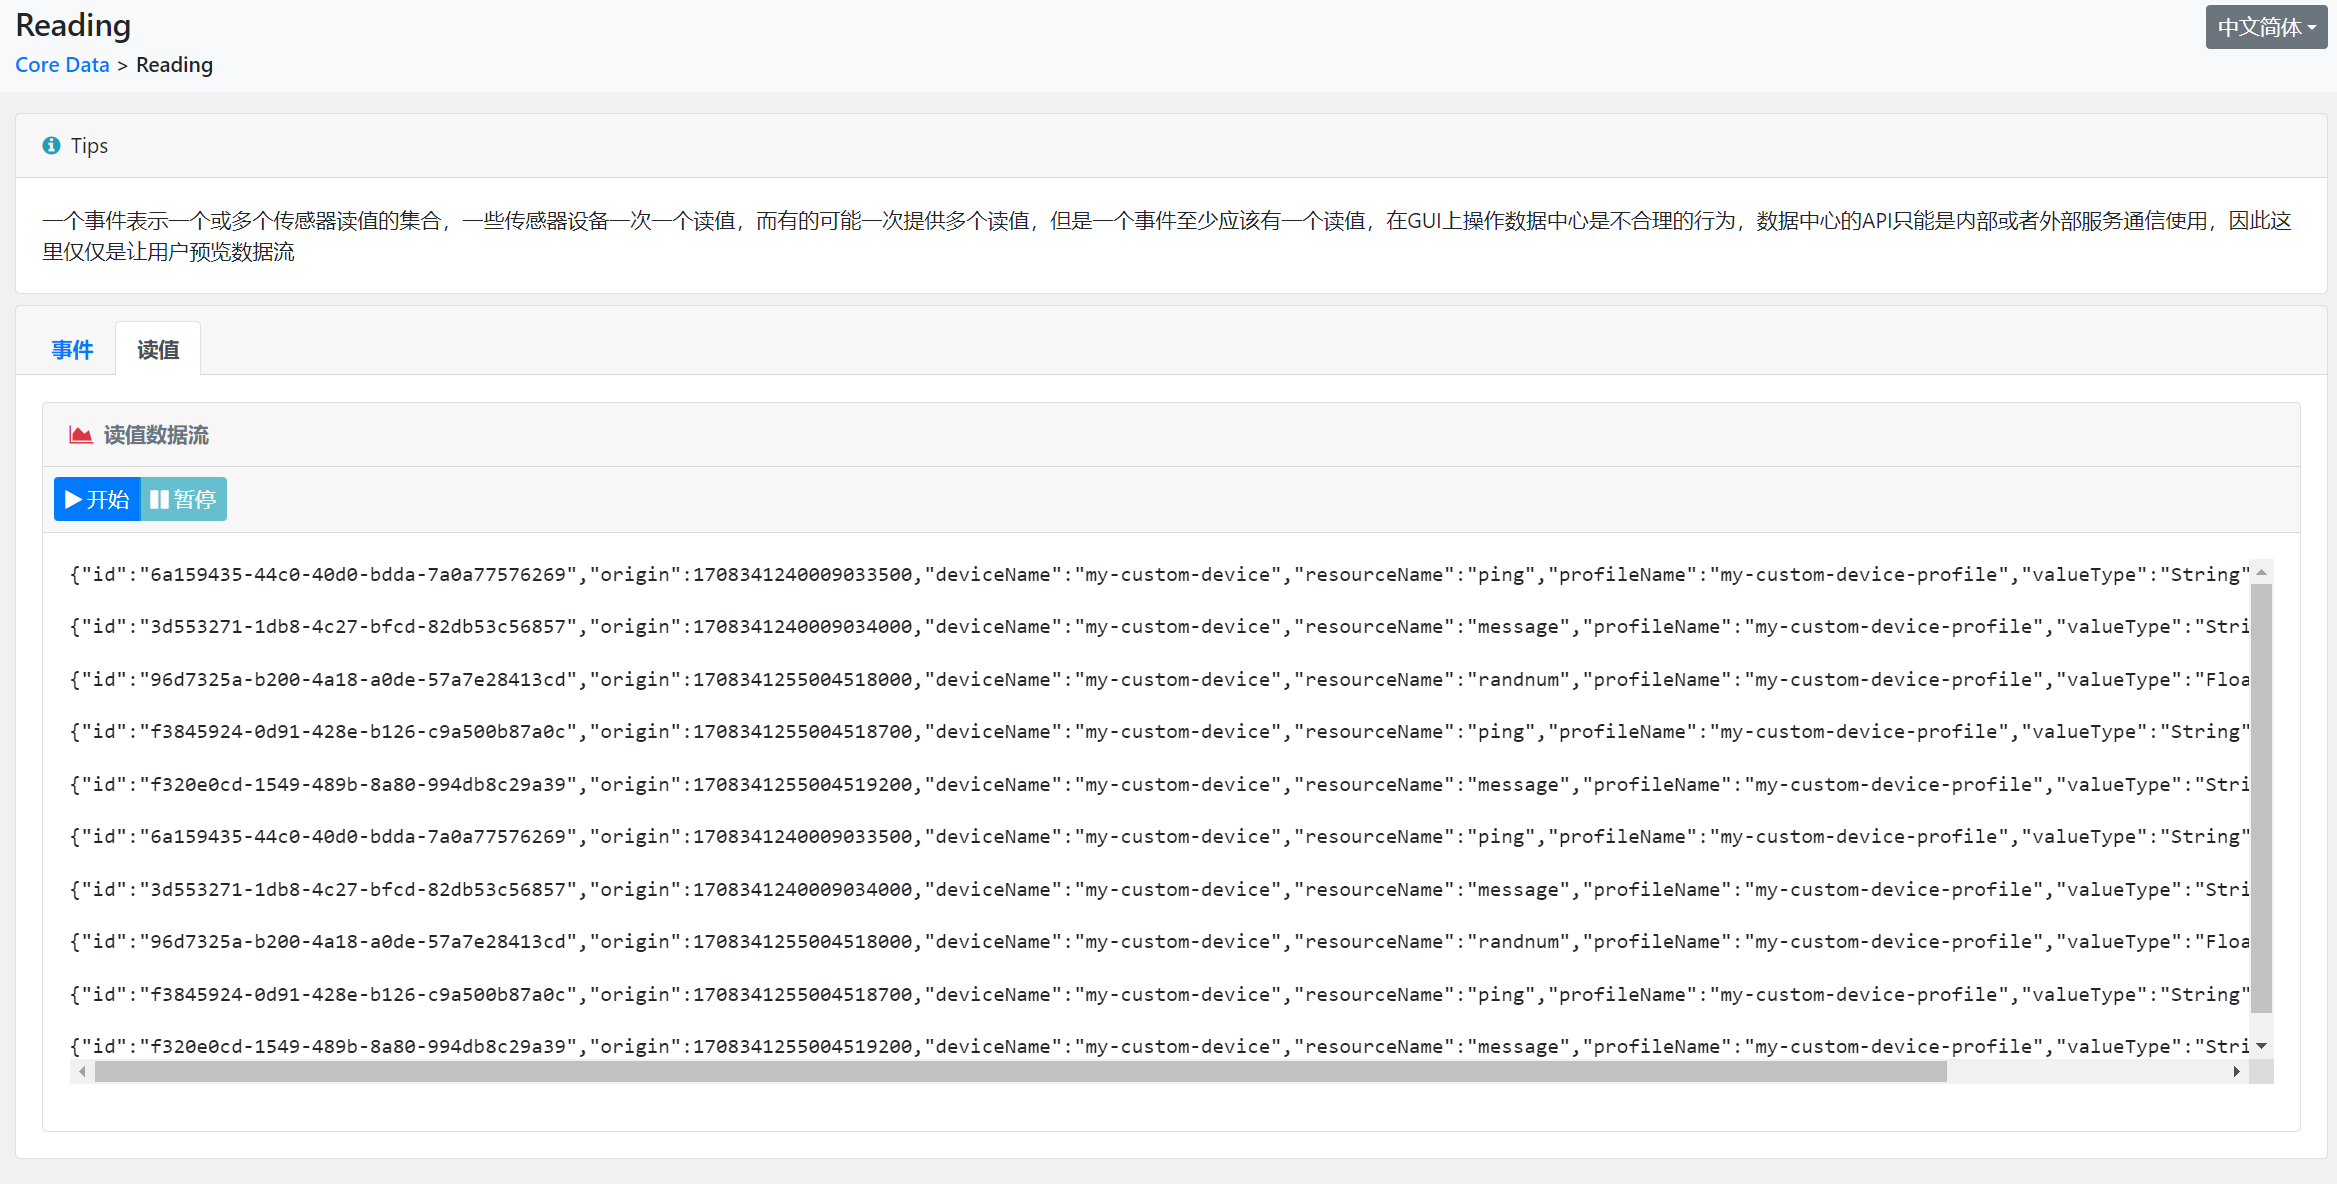
{
	"id": "aa29ebc7-2d31-4a4d-b58a-a8d85ba7903e",
	"origin": 1708341330008859000,
	"deviceName": "my-custom-device",
	"resourceName": "message",
	"profileName": "my-custom-device-profile",
	"valueType": "String",
	"value": "Hello World"
}

{
	"id": "448591a3-d4d7-4188-9943-88a289f9f54a",
	"origin": 1708341345006348800,
	"deviceName": "my-custom-device",
	"resourceName": "randnum",
	"profileName": "my-custom-device-profile",
	"valueType": "Float32",
	"value": "2.530000e+01"
}

{
	"id": "4af98f08-888a-495d-a07e-4c87dc6d2b82",
	"origin": 1708341345006350000,
	"deviceName": "my-custom-device",
	"resourceName": "ping",
	"profileName": "my-custom-device-profile",
	"valueType": "String",
	"value": "pong"
}

{
	"id": "26600864-c850-4d45-bf42-835dcf966249",
	"origin": 1708341345006350600,
	"deviceName": "my-custom-device",
	"resourceName": "message",
	"profileName": "my-custom-device-profile",
	"valueType": "String",
	"value": "Hello World"
}

{
	"id": "d70a679e-3532-4f7d-a3d1-0e53c8ad5f08",
	"origin": 1708341315007203800,
	"deviceName": "my-custom-device",
	"resourceName": "message",
	"profileName": "my-custom-device-profile",
	"valueType": "String",
	"value": "Hello World"
}

