一、概述
官网地址
1
2
3
4
# 官网地址

https://www.sonarqube.org/
https://www.sonarqube.org/downloads/
安装环境
| 软件 | 服务器 | 版本 | 备注 |
|---|---|---|---|
| JDK | 182.92.210.65 | 1.8 | Jenkins同一机器 |
| MySQL | 182.92.210.65 | 5.7 | |
| SonarQube | 182.92.210.65 | 6.7.4 |
安装步骤
1
2
3
4
5
6
7
8
9
10
11
12
13
14
15
16
17
18
19
20
21
22
23
24
25
26
27
28
29
30
31
32
33
34
35
36
# 1.安装MySQL,在MySQL创建sonar数据库


# 2.安装SonarQube

# 下载sonar压缩包:
https://www.sonarqube.org/downloads/
解压sonar,并设置权限
yum install unzip
unzip sonarqube-6.7.4.zip 解压
mkdir /opt/sonar 创建目录
mv sonarqube-6.7.4/* /opt/sonar 移动文件
useradd sonar 创建sonar用户,必须sonar用于启动,否则报错
chown -R sonar. /opt/sonar 更改sonar目录及文件权限


# 修改sonar配置文件
vi /opt/sonarqube-6.7.4/conf/sonar.properties
内容如下:
sonar.jdbc.username=root sonar.jdbc.password=Root@123
sonar.jdbc.url=jdbc:mysql://localhost:3306/sonar?
useUnicode=true&characterEncoding=utf8&rewriteBatchedStatements=true&useConfigs=
maxPerformance&useSSL=false
注意:sonar默认监听9000端口,如果9000端口被占用,需要更改。


# 启动sonar
cd /opt/sonarqube-6.7.4
su sonar ./bin/linux-x86-64/sonar.sh start 启动
su sonar ./bin/linux-x86-64/sonar.sh status 查看状态
su sonar ./bin/linux-x86-64/sonar.sh stop 停止
tail -f logs/sonar.logs 查看日志


# 访问sonar
http://192.168.66.101:9000
二、安装部署
1.安装部署SonarQube
1.1.安装MySQL
1
2
3
4
5
6
7
8
9
10
11
12
13
14
15
16
17
18
19
20
21
22
23
24
25
26
27
28
29
30
#创建目录
mkdir -p /devops/mysql/conf
mkdir -p /devops/mysql/data
chmod 777 * -R /devops/mysql/conf
chmod 777 * -R /devops/mysql/data

#创建配置文件
vim /devops/mysql/conf/my.cnf

#输入一下内容
[mysqld]
log-bin=mysql-bin #开启二进制日志
server-id=119 #服务id,取本机IP最后三位
sql_mode='STRICT_TRANS_TABLES,NO_ZERO_IN_DATE,NO_ZERO_DATE,ERROR_FOR_DIVISION_BY_ZERO,NO_AUTO_CREATE_USER,NO_ENGINE_SUBSTITUTION'


#启动容器
docker run -d --restart=always \
-p 3306:3306 \
-v /devops/mysql/data:/var/lib/mysql \
-v /devops/mysql/conf:/etc/mysql/ \
-e MYSQL_ROOT_PASSWORD=root \
--name mysql \
percona:5.6


#进入mysql容器内部
docker exec -it mysql bash
#登陆mysql
mysql -u root -p
1
2
3
4
5
6
7
8
9
10
11
12
13
14
15
16
17
18
19
20
21
22
23
24
25
26
27
28
29
30
31
32
33
34
35
36
37
38
39
40
41
42
[root@aliyun-8g ~]# docker exec -it mysql bash
bash-4.2$ mysql -u root -p
Enter password:
Welcome to the MySQL monitor.  Commands end with ; or \g.
Your MySQL connection id is 1
Server version: 5.6.51-91.0-log Percona Server (GPL), Release 91.0, Revision b59139e

Copyright (c) 2009-2021 Percona LLC and/or its affiliates
Copyright (c) 2000, 2021, Oracle and/or its affiliates. All rights reserved.

Oracle is a registered trademark of Oracle Corporation and/or its
affiliates. Other names may be trademarks of their respective
owners.

Type 'help;' or '\h' for help. Type '\c' to clear the current input statement.

mysql> show databases;
+--------------------+
| Database           |
+--------------------+
| information_schema |
| mysql              |
| performance_schema |
+--------------------+
3 rows in set (0.00 sec)


# 创建数据库sonar
mysql> create database sonar;
Query OK, 1 row affected (0.00 sec)

mysql> show databases;
+--------------------+
| Database           |
+--------------------+
| information_schema |
| mysql              |
| performance_schema |
| sonar              |
| sys                |
+--------------------+
5 rows in set (0.00 sec)
1
2
3
4
5
# 数据库连接

172.17.243.237
13306
root/root
1.2.下载安装包
1
2
3
https://www.sonarqube.org/downloads/

apache-maven-3.6.2-bin.tar.gz
1.3.安装SonarQube
1
2
3
4
5
6
7
8
9
10
11
12
13
14
15
16
# 安装 unzip
[root@aliyun-8g ~]# yum install unzip -y


# 解压
[root@aliyun-8g ~]# unzip sonarqube-6.7.4.zip


[root@aliyun-8g ~]# mkdir /opt/sonar
[root@aliyun-8g ~]# mv sonarqube-6.7.4/* /opt/sonar


# 创建sonar用户,必须sonar用于启动,否则报错
[root@aliyun-8g ~]# useradd sonar
# 更改sonar目录及文件权限
[root@aliyun-8g ~]# chown -R sonar. /opt/sonar
1
2
3
4
5
6
7
8
9
10
11
12
13
14
# 修改sonar配置文件


# 修改配置
[root@aliyun-8g ~]# vim /opt/sonar/conf/sonar.properties

sonar.jdbc.username=root
sonar.jdbc.password=root

#----- MySQL 5.6 or greater
sonar.jdbc.url=jdbc:mysql://localhost:13306/sonar?useUnicode=true&characterEncoding=utf8&rewriteBatchedStatements=true&useConfigs=maxPerformance&useSSL=false

sonar.web.port=19000
# 注意:sonar默认监听9000端口,如果9000端口被占用,需要更改。
1
2
3
4
5
6
7
8
9
10
11
12
13
14
15
16
# 启动sonar

[root@aliyun-8g ~]# cd /opt/sonar
[root@aliyun-8g sonar]# su sonar ./bin/linux-x86-64/sonar.sh start
Starting SonarQube...
Started SonarQube.


# 查看日志
[root@aliyun-8g sonar]# tail -f logs/sonar.log

cd /opt/sonar
su sonar ./bin/linux-x86-64/sonar.sh start 启动
su sonar ./bin/linux-x86-64/sonar.sh status 查看状态
su sonar ./bin/linux-x86-64/sonar.sh stop 停止
tail -f logs/sonar.log 查看日志
1
2
3
4
5
# 访问sonar

http://182.92.210.65:19000/
admin
admin
2.Docker安装SonarQube
2.1.安装PostgreSQL
1
2
3
4
5
6
7
8
9
10
11
12
13
14
15
16
17
18
19
20
21
22
1.创建目录
# mkdir -p /devops/pg/data/psql

2.运行容器
docker run -d --network host --name pg12 --restart=always \
-e LANG="C.UTF-8" \
-e 'TZ=Asia/Shanghai' \
-e "POSTGRES_DB=postgres" \
-e "POSTGRES_USER=postgres" \
-e "POSTGRES_PASSWORD=postgres" \
-v /devops/pg/data/psql:/var/lib/postgresql/data \
postgres:12

3.进入容器
# docker exec -it pg12 /bin/sh

切换用户
# su - postgres
$ psql
# \l

4.创建数据库:sonar
1
2
3
4
5
# 访问地址

182.92.210.65
5432
postgres/postgres
2.2.安装SonarQube
1
2
3
4
5
6
7
# 运行sonarqube容器

docker run -d --name sonarqube --restart=always --network host \
-e sonar.jdbc.username=postgres \
-e sonar.jdbc.password=postgres \
-e sonar.jdbc.url=jdbc:postgresql://172.17.243.237:5432/sonar \
sonarqube:7.6-community
1
2
3
4
# 访问地址

http://182.92.210.65:9000/
admin/admin
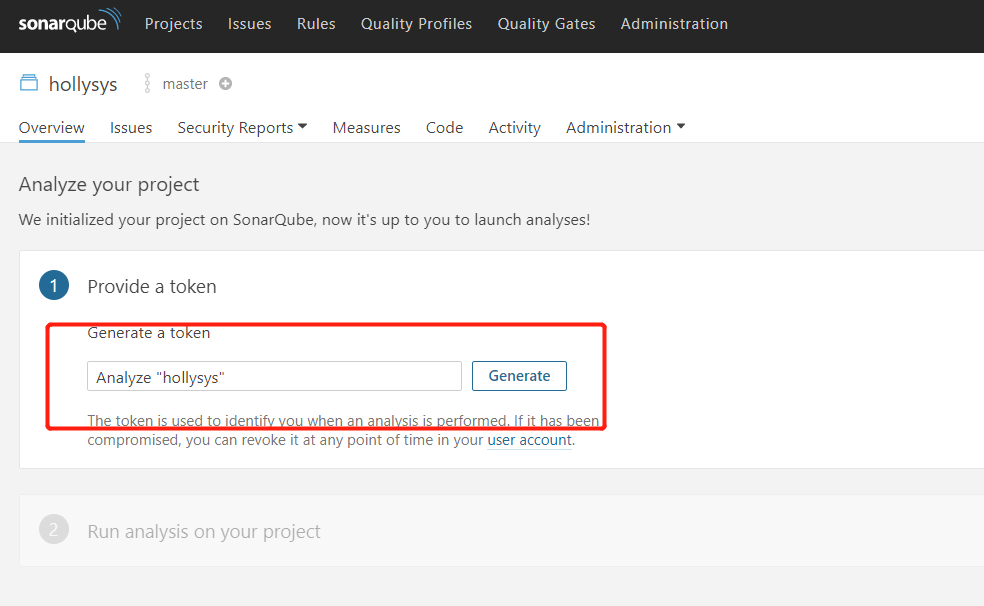
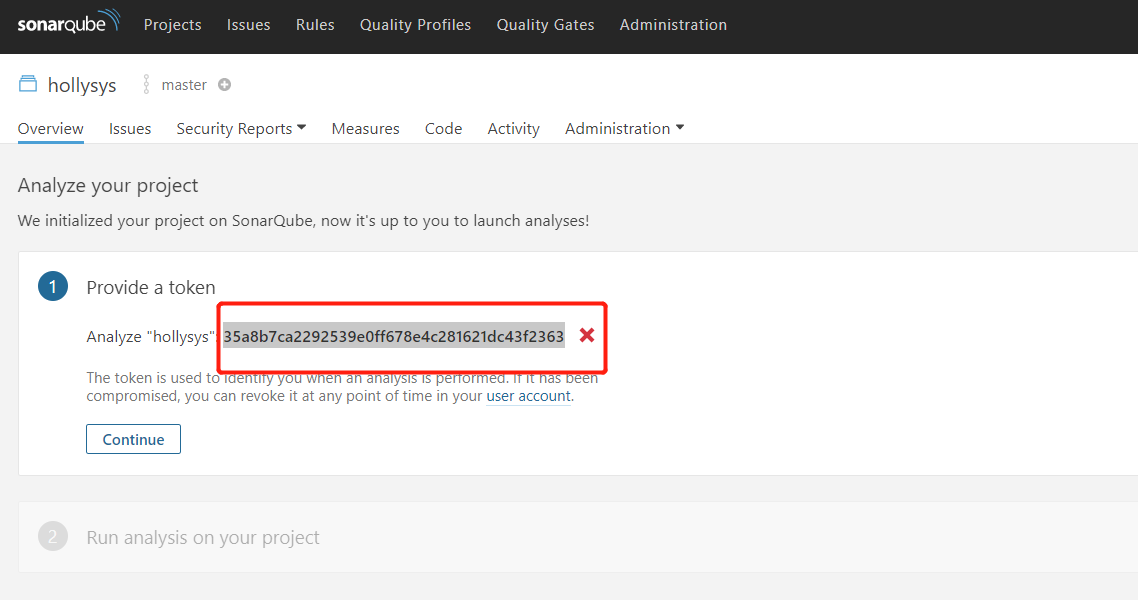
2.3.访问SonarQube
1
2
3
4
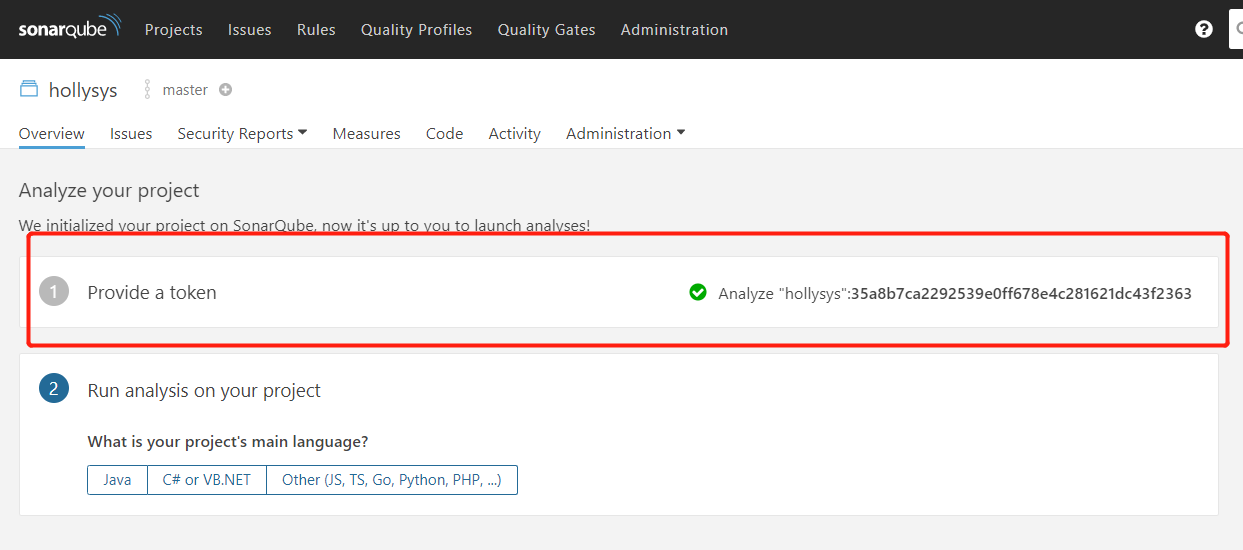
# token
# token要记下来后面要使用

35a8b7ca2292539e0ff678e4c281621dc43f2363
