一、概述
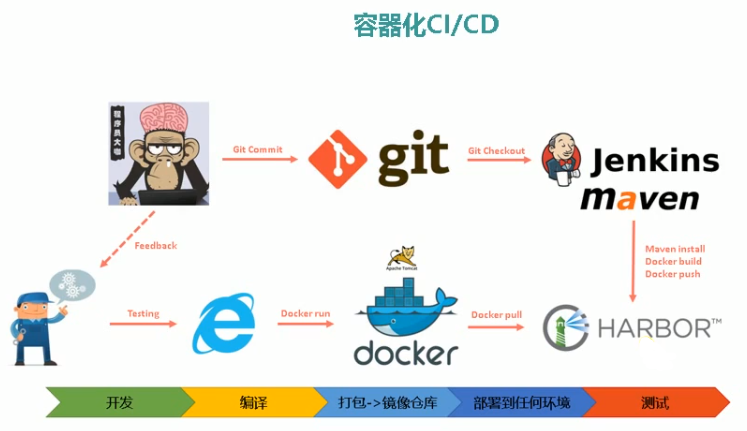
1.持续集成规划
持续集成方案: Jenkins + GitLab + Maven + Docker + SonarQube + Harbor
-
Jenkins:开源持续集成工具,用于项目开发,具有自动化构建、测试和部署等功能
- GitLab:源代码仓库,使用Git作为代码管理工具
-
SonarQube:用于管理代码质量的开放平台,可以快速的定位代码中潜在的或者明显的错误
- Harbor:开源的企业级DockerRegistry项目,搭建企业级的Dockerregistry服务
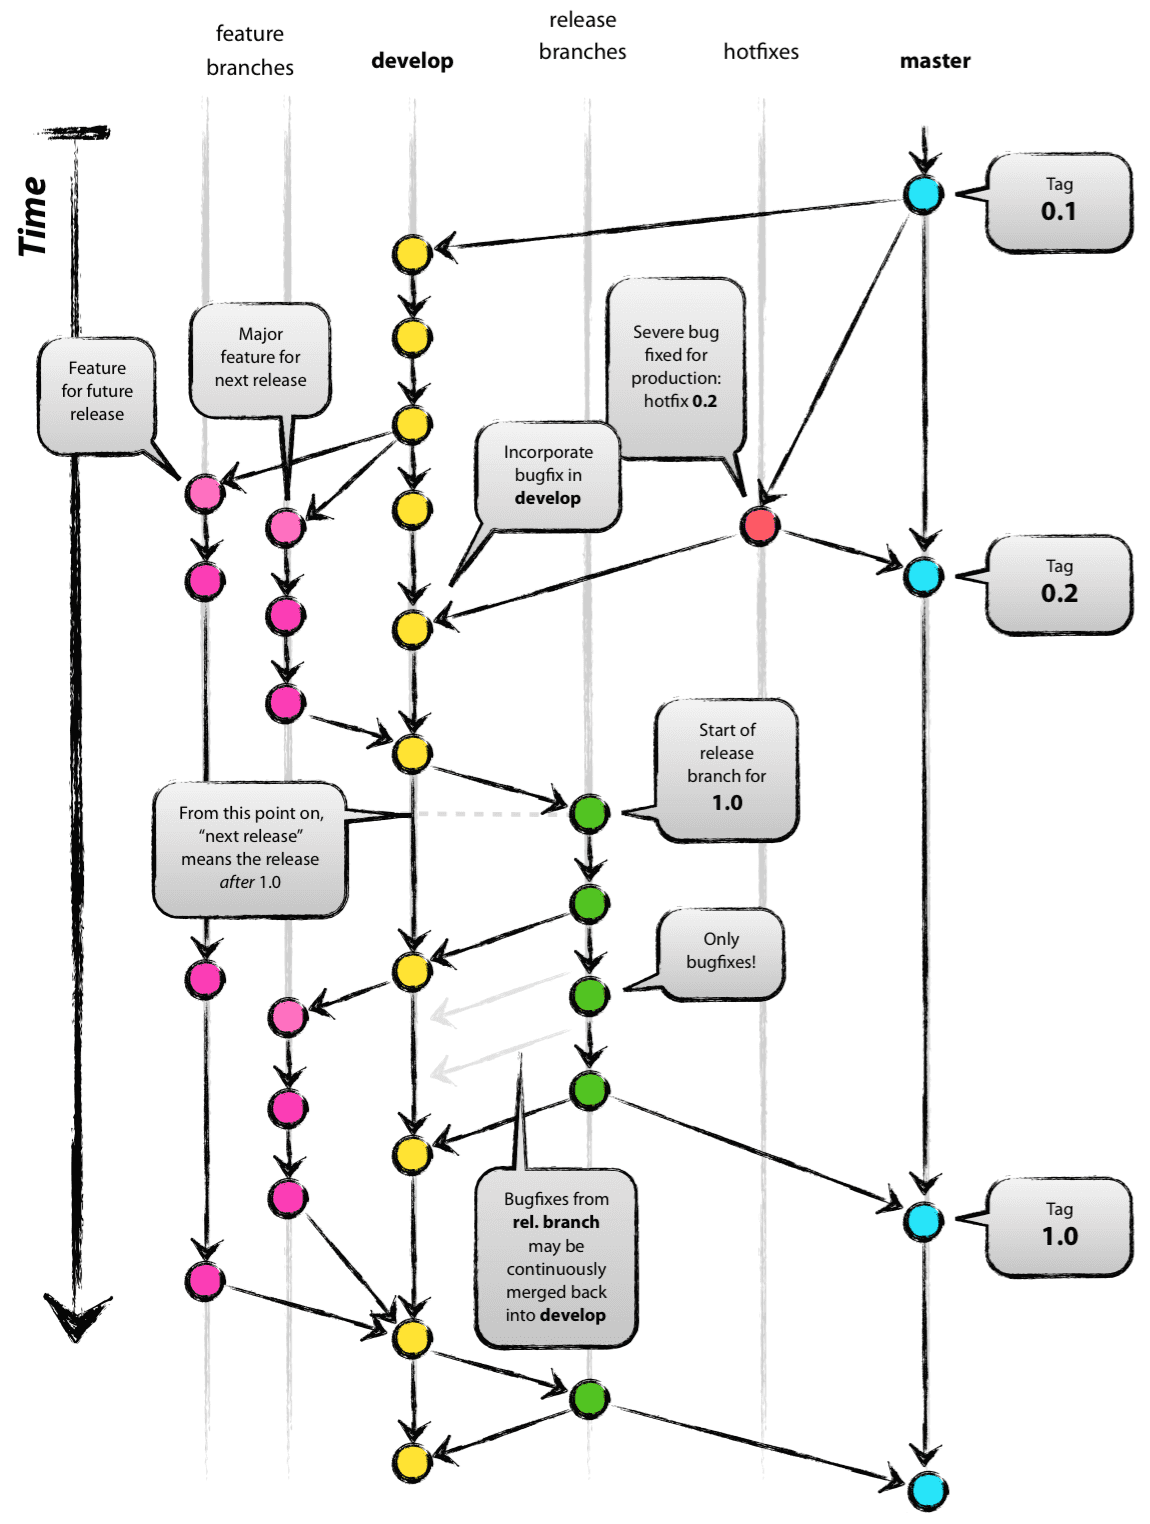
2.Git分支管理
下面是Git Flow的流程图
根据生命周期区分
- 主分支:master,develop
- 临时分支:feature/,release/,hotfix/*
根据用途区分
- 发布/预发布分支:master,release/*
- 开发分支:develop
- 功能分支:feature/*
- 热修复分支:hotfix/*
3.容器镜像管理
容器镜像构建:
- 发布镜像: 是稳定版本,运行于生产环境、灰度环境,从master分支构建,使用master分支tag作为标签,镜像标签命名规则 xxx.xxx.xxx,例如 eureka:1.0.0,eureka:1.5.0
- 测试镜像: 是临时镜像,使用完成删除,运行于开发环境、测试环境,是从master以外的分支构建的, 镜像标签是发布镜像对应的版本标签加后缀 -xxx,例如 eureka:1.0.0-release1.1,eureka:1.5.0-dev1.5,eureka:1.5.0-hotfix1.0
容器运行环境:
- 发布镜像: 生产环境(pro)、灰度环境(pre)
- 测试镜像: 开发环境(dev)、测试环境(test)
4.持续集成流水线
- 生产CI流水线: 创建发布镜像,从master分支构建,使用master分支tag作为标签构建镜像
- 测试CI流水线: 创建测试镜像,从master以外分支构建,镜像标签是发布镜像对应的版本标签加后缀 -xxx构建镜像
二、持续集成中间件
1.Jenkins
1.1.Jenkins凭证管理
1.1.1.凭据管理介绍
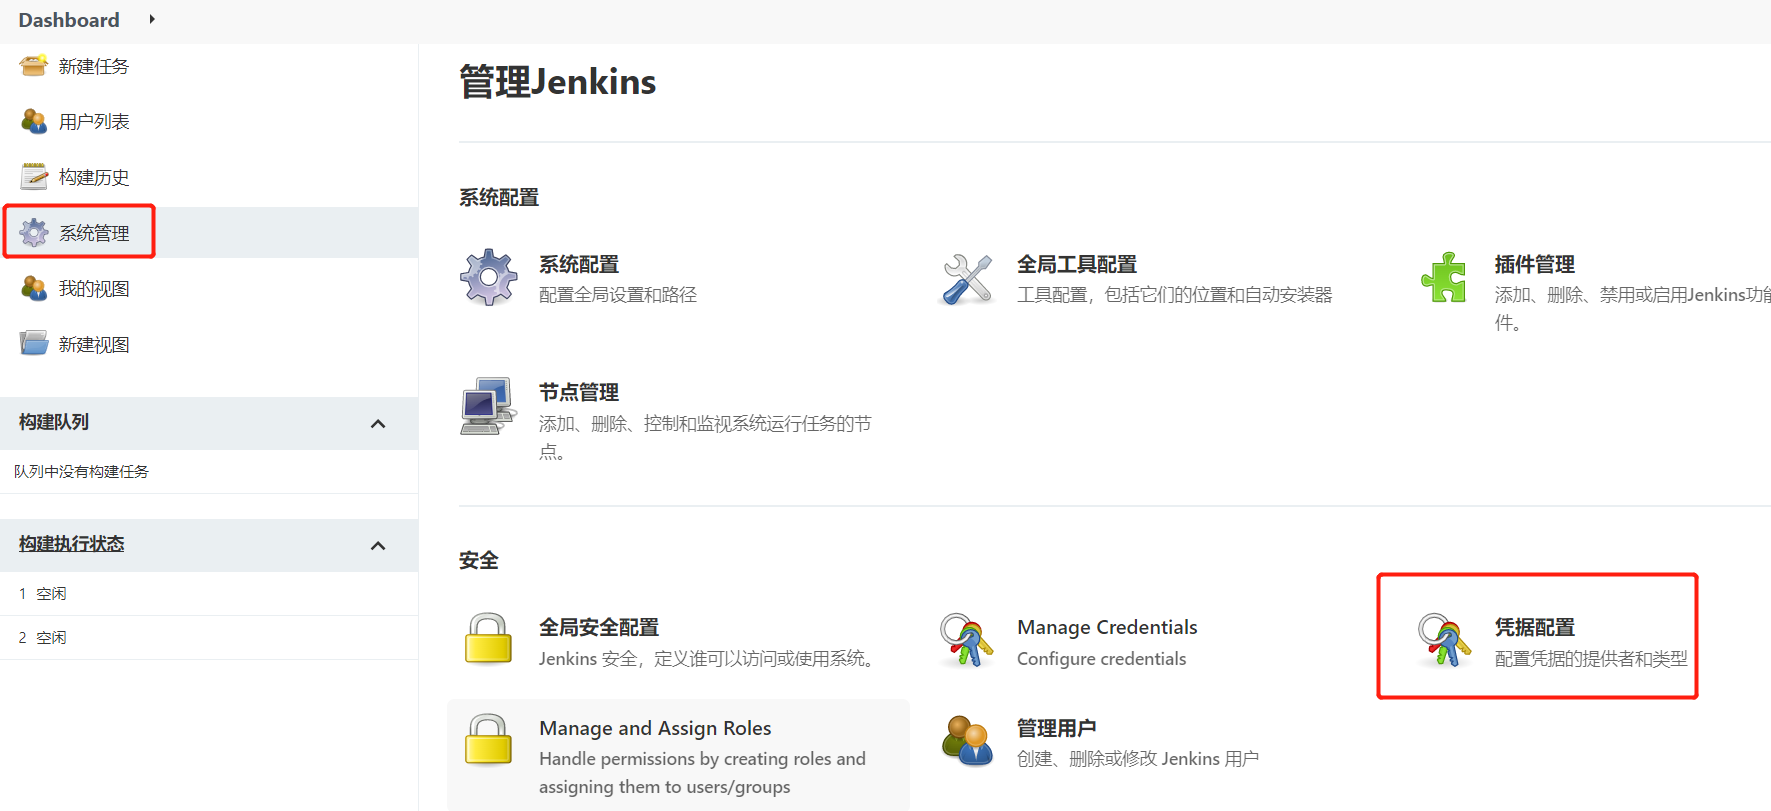
凭据可以用来存储需要密文保护的数据库密码、Gitlab密码信息、Docker私有仓库密码等,以便Jenkins可以和这些第三方的应用进行交互。
1.安装Credentials Binding插件 要在Jenkins使用凭证管理功能,需要安装Credentials Binding插件
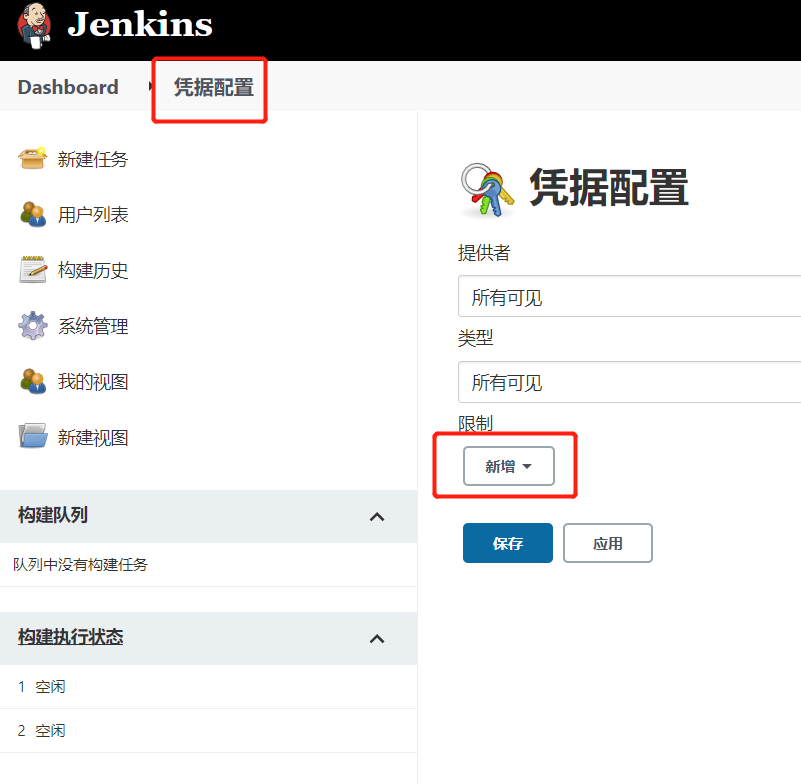
2.安装插件后,在这里管理所有凭证
1.1.2.GitLab SSH密码类型凭据

1.使用root用户生成公钥和私钥
1
2
3
4
5
ssh-keygen -t rsa
在/root/.ssh/目录保存了公钥和使用

id_rsa:私钥文件
id_rsa.pub:公钥文件
1
2
3
4
5
6
7
8
9
10
11
12
13
14
15
16
17
18
19
20
21
22
23
24
25
26
27
28
29
30
31
32
33
34
35
36
37
38
39
40
41
42
43
44
45
46
47
48
49
50
51
52
53
54
55
56
57
58
59
60
61
62
63
64
65
66
# 生成秘钥
[root@aliyun-8g ~]# ssh-keygen -t rsa
Generating public/private rsa key pair.
Enter file in which to save the key (/root/.ssh/id_rsa):
Enter passphrase (empty for no passphrase):
Enter same passphrase again:
Your identification has been saved in /root/.ssh/id_rsa.
Your public key has been saved in /root/.ssh/id_rsa.pub.
The key fingerprint is:
SHA256:CMexw8KnhW1DgikxutHkA9OR2v2e4EjYHMjXEt4flLQ root@aliyun-8g
The key's randomart image is:
+---[RSA 2048]----+
|=oo=. +..        |
|oB=o B =.        |
|+==.O &E         |
|o+o=.@ =         |
|.+..o.o S        |
|. + . ..         |
| . o o .         |
|  . . o          |
|                 |
+----[SHA256]-----+


[root@aliyun-8g ~]# cd .ssh/
[root@aliyun-8g .ssh]# ll
total 8
-rw------- 1 root root    0 Jan 13 10:20 authorized_keys
-rw------- 1 root root 1679 Jan 13 16:31 id_rsa
-rw-r--r-- 1 root root  396 Jan 13 16:31 id_rsa.pub


# 查看公钥
[root@aliyun-8g .ssh]# cat id_rsa.pub
ssh-rsa AAAAB3NzaC1yc2EAAAADAQABAAABAQDCzDVndhIWuz0lnSPC9KH/8f1d3SJnByU9hyx/RJiM9vBDtBTcFl6ivMJMNe0Vez5cPva9KgEjNWBGT3M4rcLSypVFTdjTZqtj26dCgdgf3cdf6QdRjoce6fDL9Flw4muFCyS5XDY7DYpZK/nnTuv2v/VyaIhLeDAb5LVExwl6eKWGk07cMol6t2djd0pOUeey/4mH4STLPBb+oVFHVOe4R9JoMliEODN1zl4LU/zz+BcdFE6VvDYrZS7Xlhd3uouT2XY5PRELOq6yUTRbYUK4gLFU48kfFR2hX0GiZF+Hg+7d/mImvEJwFkHEEnnXBTQy7i5hQ5O21jHh3oVEMlYB root@aliyun-8g


# 查看私钥
[root@aliyun-8g .ssh]# cat id_rsa
-----BEGIN RSA PRIVATE KEY-----
MIIEpQIBAAKCAQEAwsw1Z3YSFrs9JZ0jwvSh//H9Xd0iZwclPYcsf0SYjPbwQ7QU
3BZeorzCTDXtFXs+XD72vSoBIzVgRk9zOK3C0sqVRU3Y02arY9unQoHYH93HX+kH
UY6HHunwy/RZcOJrhQskuVw2Ow2KWSv5507r9r/1cmiIS3gwG+S1RMcJenilhpNO
3DKJerdnY3dKTlHnsv+Jh+EkyzwW/qFRR1TnuEfSaDJYhDgzdc5eC1P88/gXHRRO
lbw2K2Uu15YXd7qLk9l2OT0RCzquslE0W2FCuICxVOPJHxUdoV9BomRfh4Pu3f5i
JrxCcBZBxBJ51wU0Mu4uYUOTttYx4d6FRDJWAQIDAQABAoIBAQCYU3evX/TlMaWv
NCIy4XmM2351V+b/CedlJb72Bn4EPVXEm510PUnjmBeX4NN0aNtq5xGq+p3JGoQe
dyJyv+4JR8FSYH2dUjvT6n/w0fhfct3lciP28q1WzzktQ/Zs/6F0eDJPgHwn0X7O
HEVfS6fZXGJjBLsPyPxV05KsJbiTu0bopZTkYmpzWvvNoZx/S8lViZ3gDj/VRi2f
j0kMgy6UuzGJWy2/sio+RY8kdlCvhz22pMszG8UgqihnERS0gg3Zm+HLSTto6U1x
gtjB3Yfmx50B4djxGBOZHe0wbor5b5DW/GeXQQRYFVDuhcJ58uBLWphr2SvowycH
1xvSmEABAoGBAOL195ih3n5+mlxhMT7pl8N15ULNnsN+A/emCPQK+2pP7rwKO3ET
N7RKHLds3lkTV3gshcNd/Oq2p3yzh1UyiSUZSz7eN4WMGex/a6cKlFE8BcLvQskm
WJpFsxE2SrhTqzq0zM5OvSm02FxxKlc2jB4uo63TFj9n7RWS8rwLjFlhAoGBANu4
v4fSTyxdWujCBtplFdo4sShjPYFVgFw4ZpuZKVHPFTMeCnNBhuGOZwOFk1i3/GN8
acTiWjpzJWSv9YYPDMhomowzPmsJS3ycKBQLtsFZjiycdpXleCdbvrNEjwGO1BjA
/DHWWt9hMqlH7HI70hJE5WDK/fmVaMB/2C+jAiChAoGASwDyNBS6TJ9WL9VGyv2z
U7rwauU85GoOsZbDOrMuZvHHeYkAH9wz+nbLiqqFyHYl3+cGxYuX+5ElRIan4LX0
sLftL/eL7axhHND3KJrMbRQi60rajVMI0OLbzIJeqw+rdJkvXbaTuOa04cfcMDos
kATlvpoVrhqQNSL86LwAQ8ECgYEAnjGw7Ig16ro4JtbzejBHgHtKycpR0RmPNlaB
QcwPXNBc8hXR7lOiWild78IvaTPmanZ77H4P+n9Gz+yEOIYDbRMrGoAWk5f4mnoP
vQcGCMWCwInSM3AohyXd8lINKFD+Ueg4a2VqvePMRub6zPBW+kJSZ9Me8qBo8Bfb
vch+UqECgYEApp69ozFpV942sWUiX2wJwOeXJQct+UbkI8JPYvGZHNa2psJZ5MGT
AF+pd5pqvCs77X0gDRYuMZSy2y/UaledQBM7FCqcF78jbEYm4JVY5/gocYvOWOxM
NuRQc/5mV7324bV9EUGweBJHIhHWyR+v/jtS4rDRHdslmRkyfOcL4jw=
-----END RSA PRIVATE KEY-----
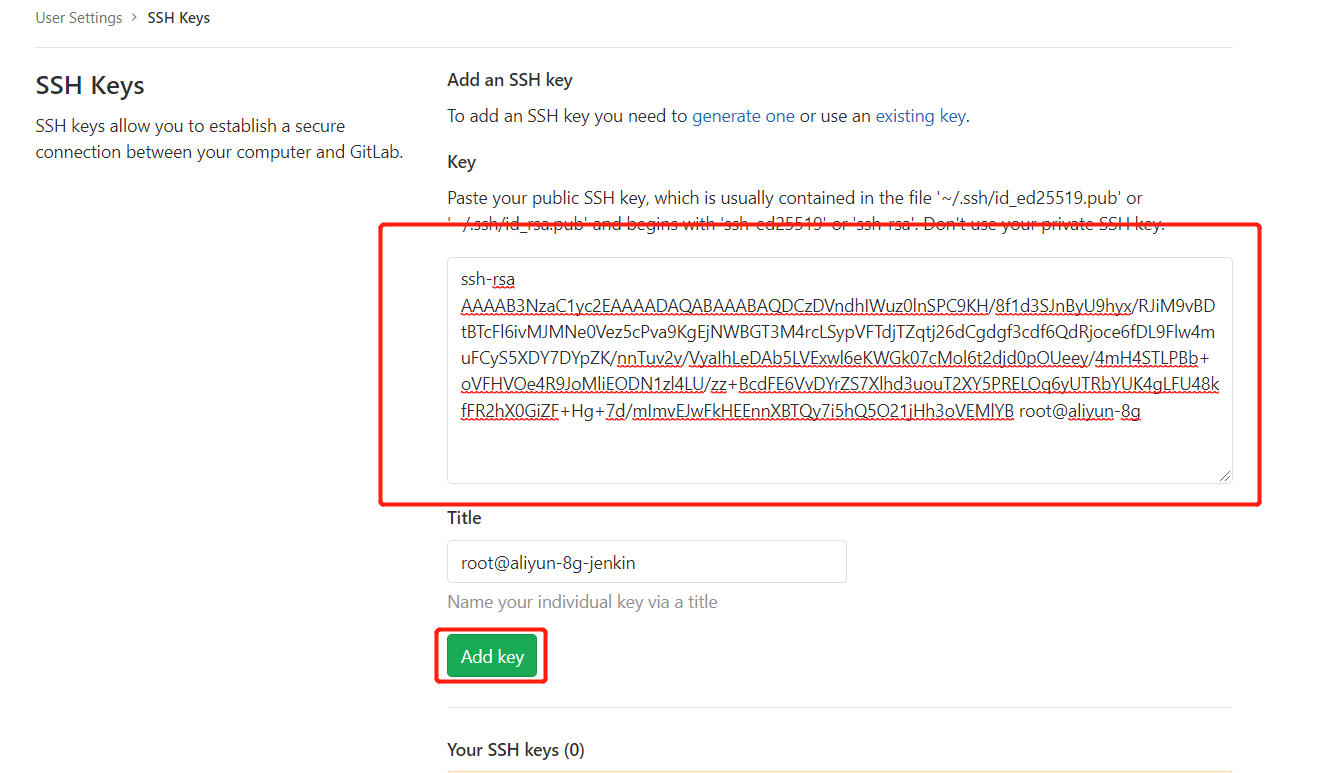
2.把生成的公钥放在Gitlab中 以root账户登录->点击头像->Settings->SSH Keys 复制刚才id_rsa.pub文件的内容到这里,点击”Add Key”
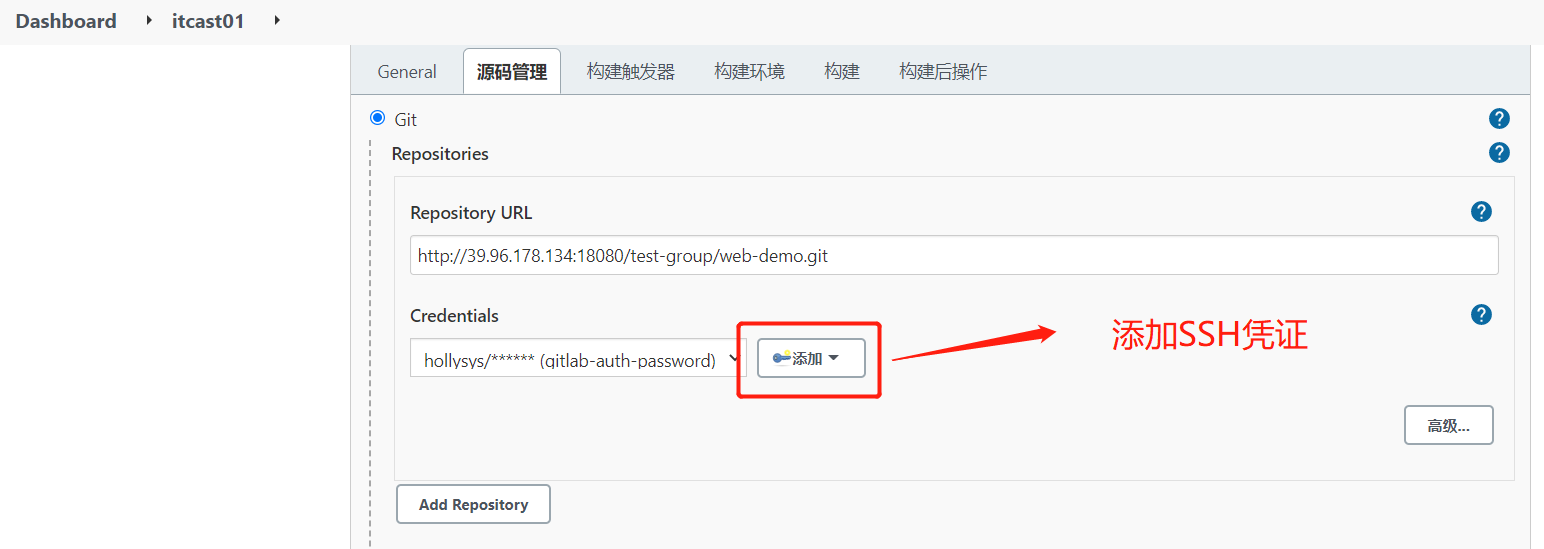
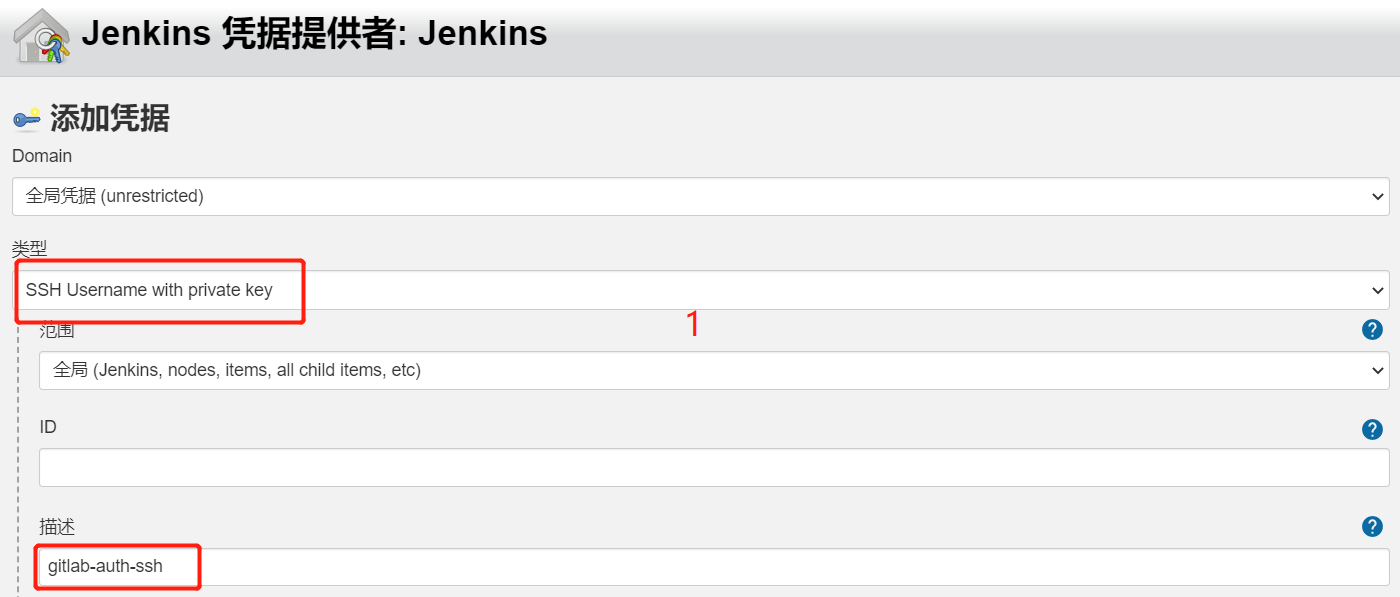
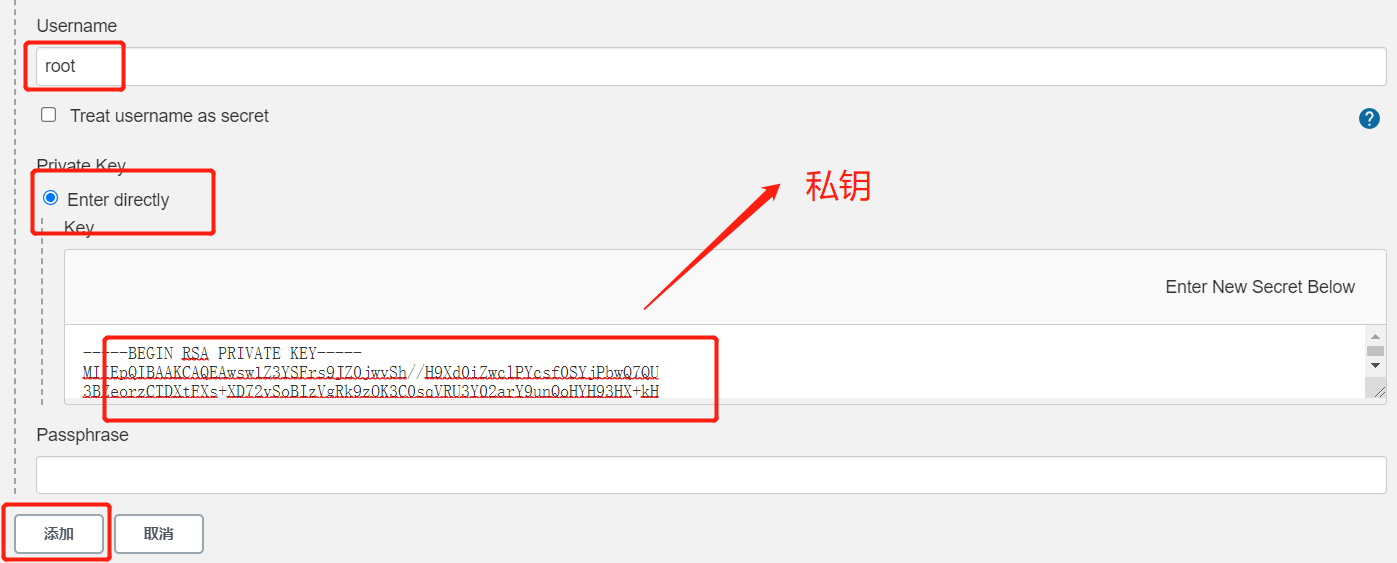
3.在Jenkins中添加凭证,配置私钥 在Jenkins添加一个新的凭证,类型为”SSH Username with private key”,把刚才生成私有文件内容复制过来
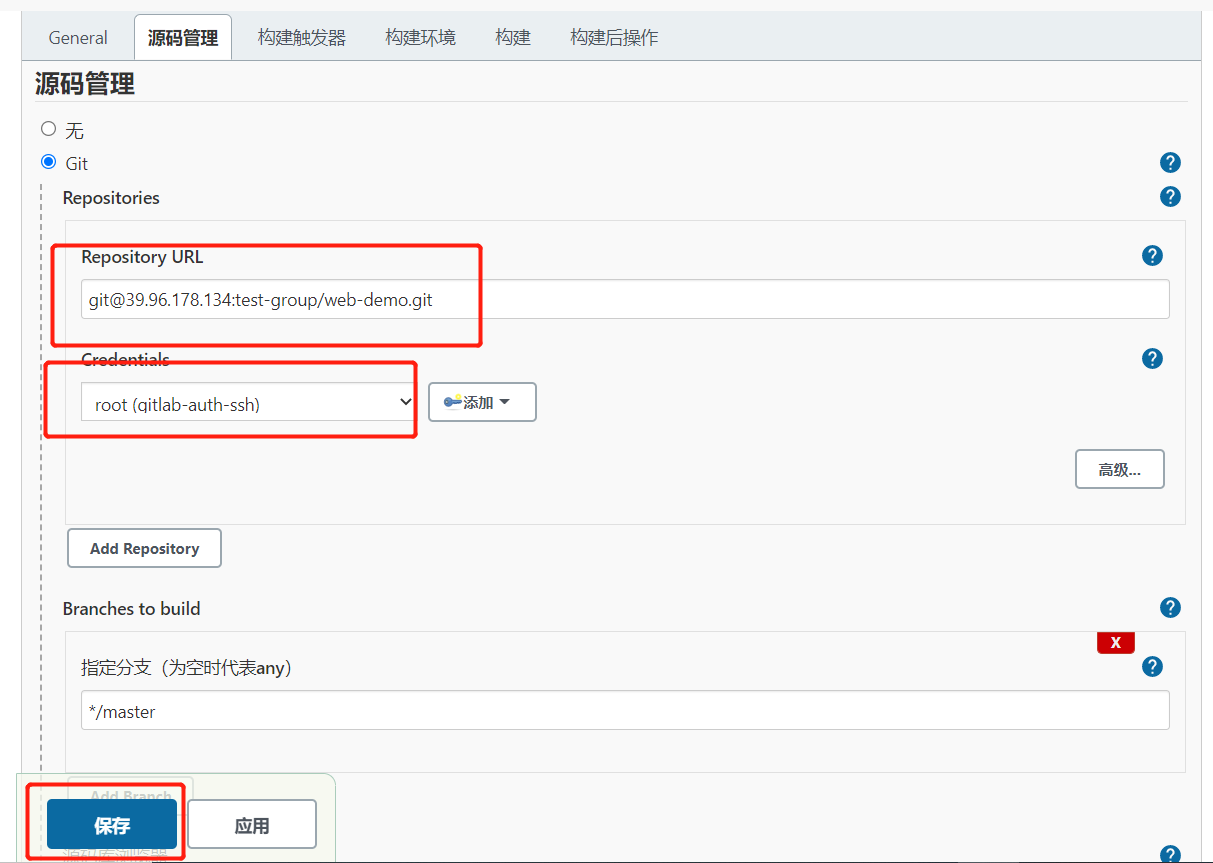
1.1.3.添加SonarQube凭证

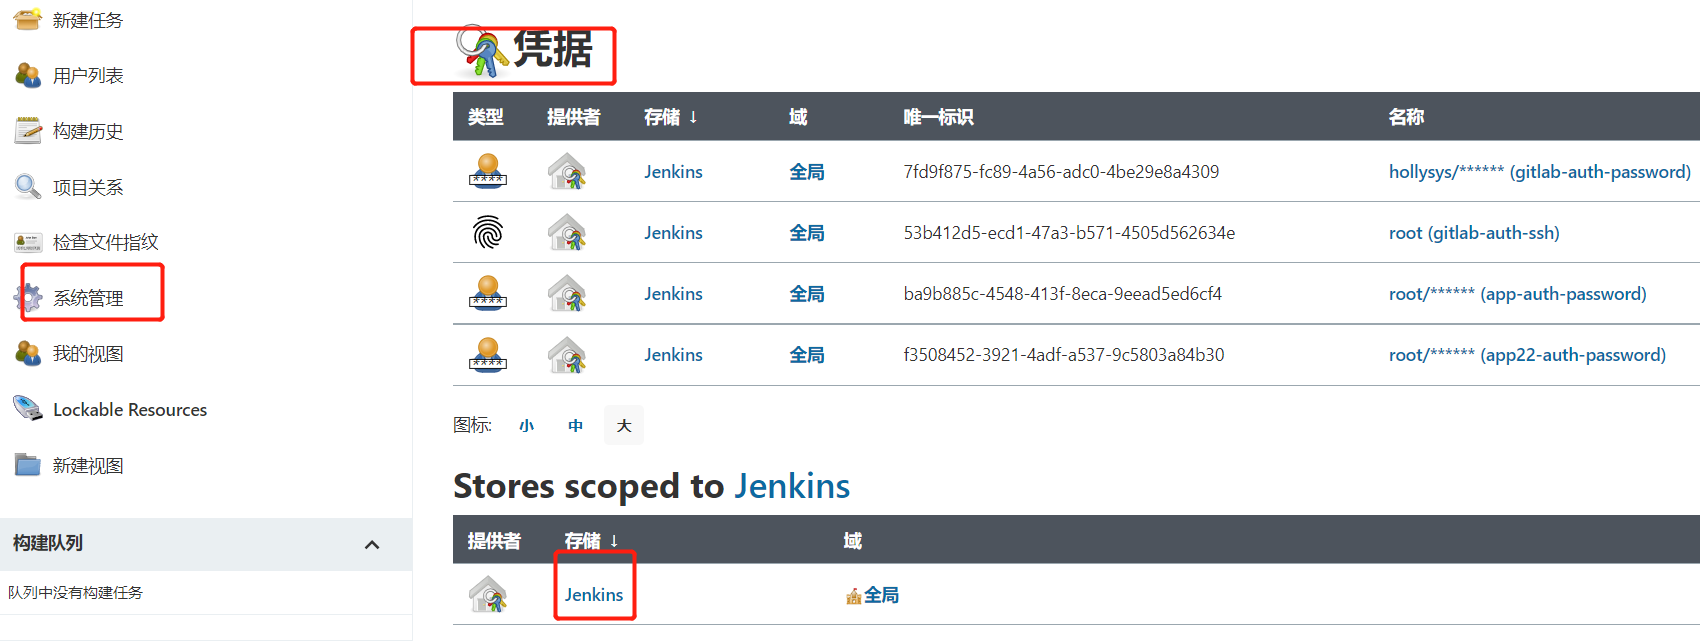

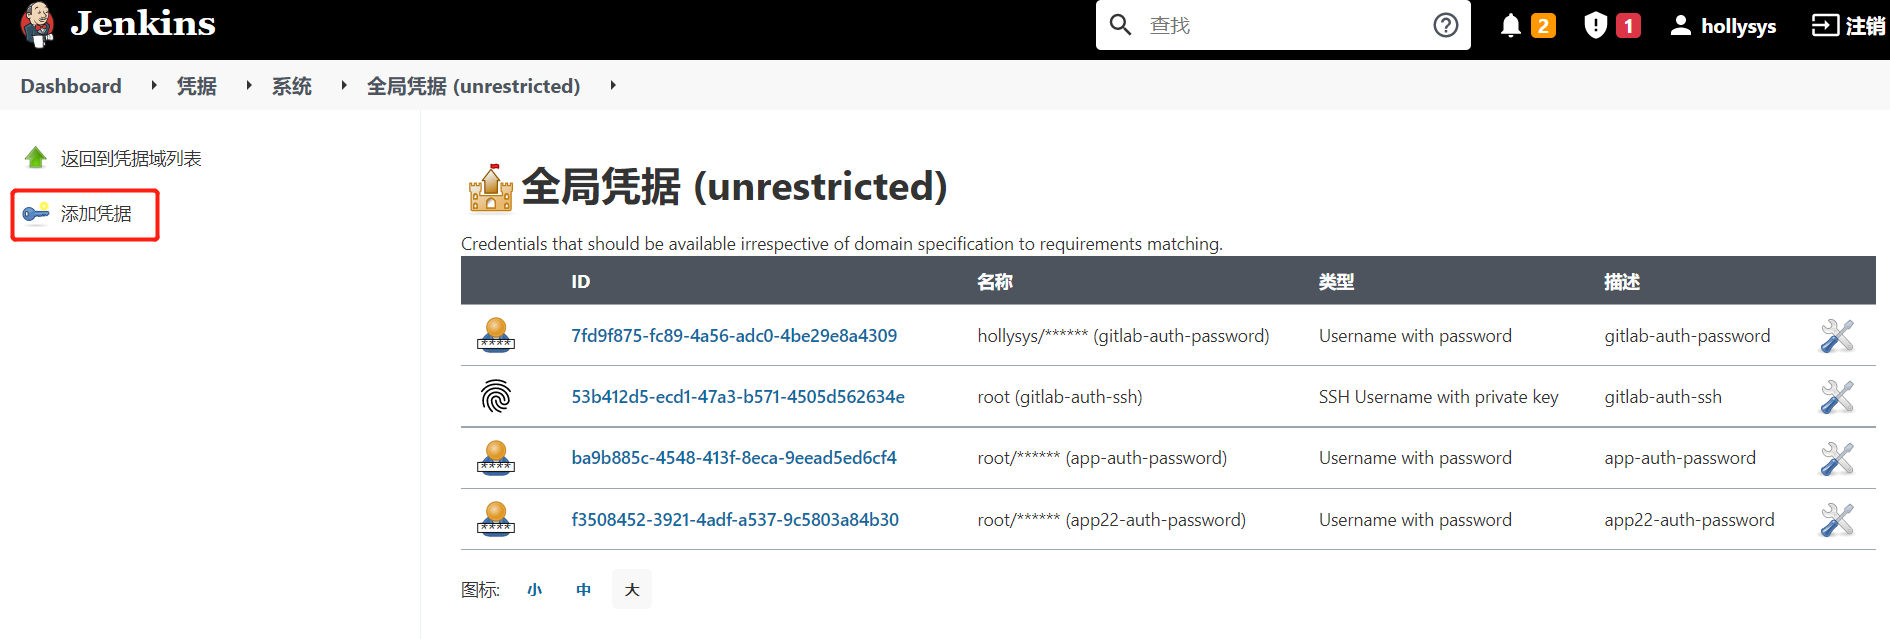
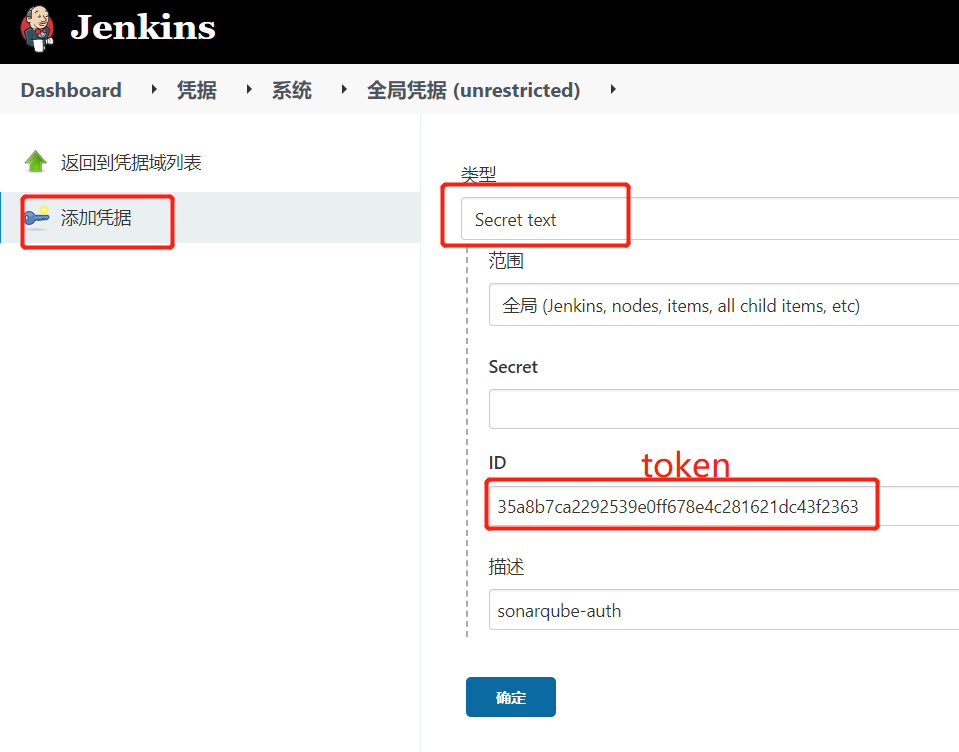
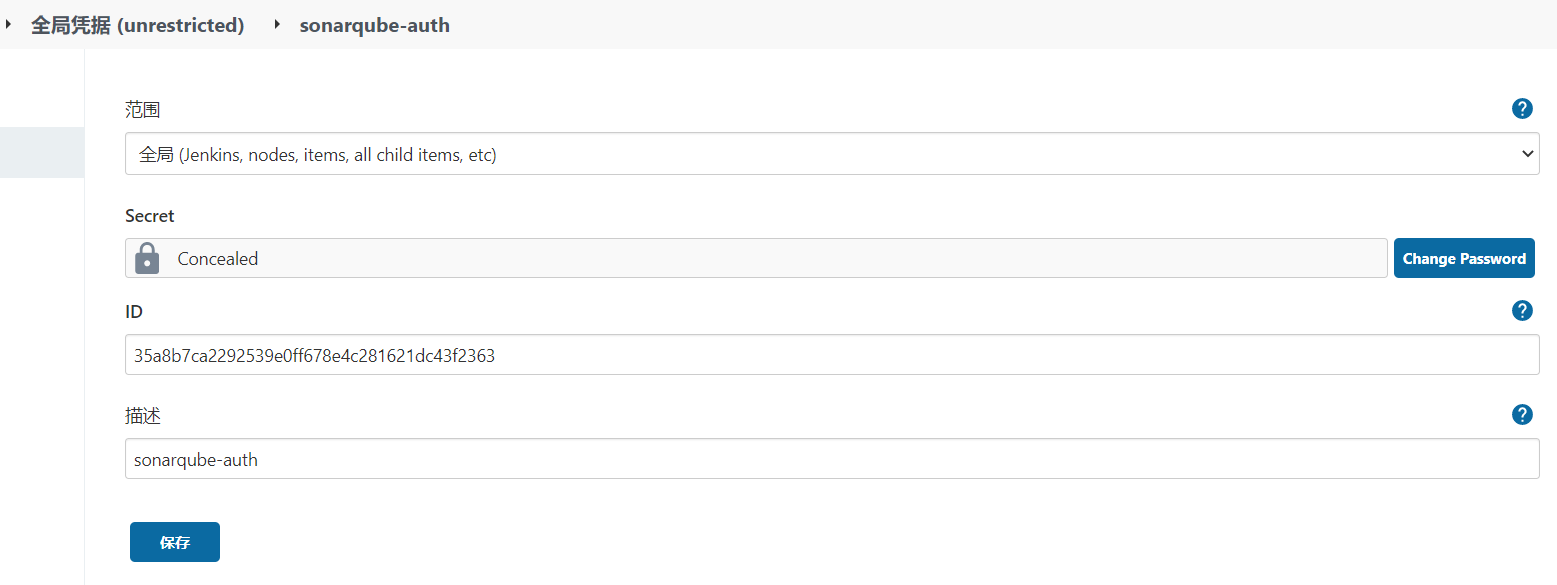
1.1.4.添加Harbor凭证
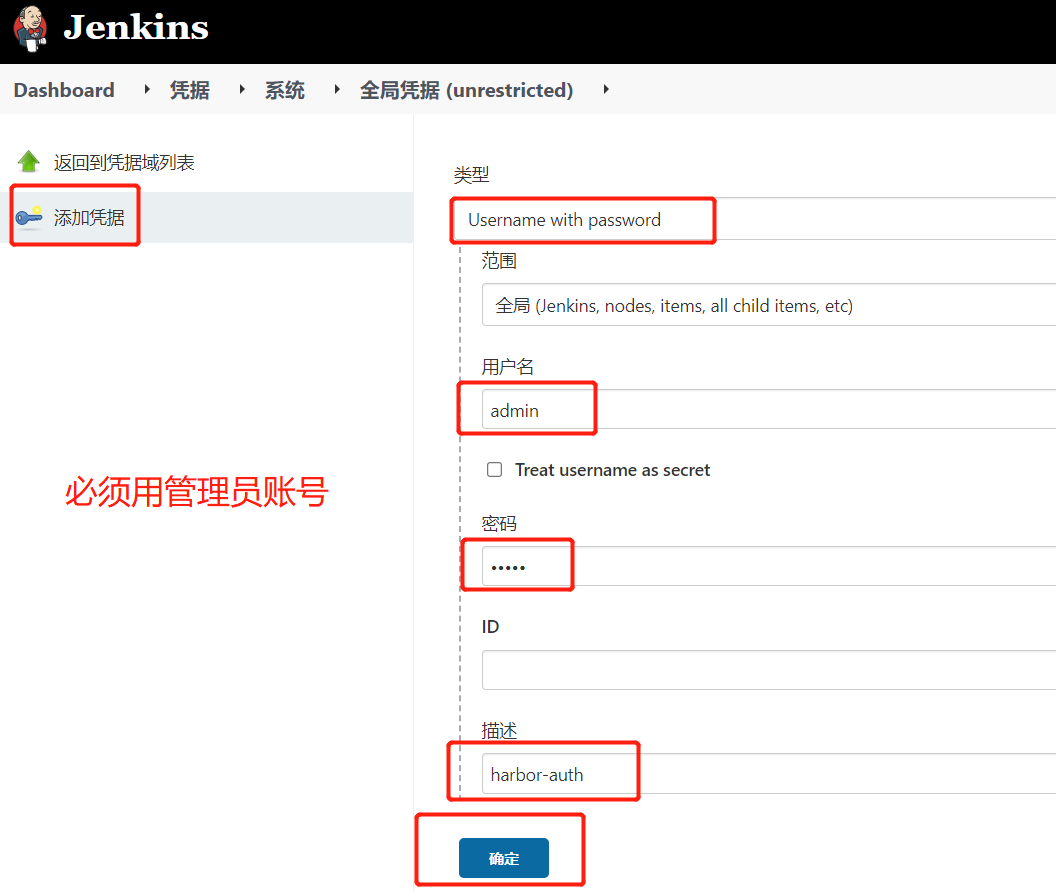

1.2.拉取Git代码
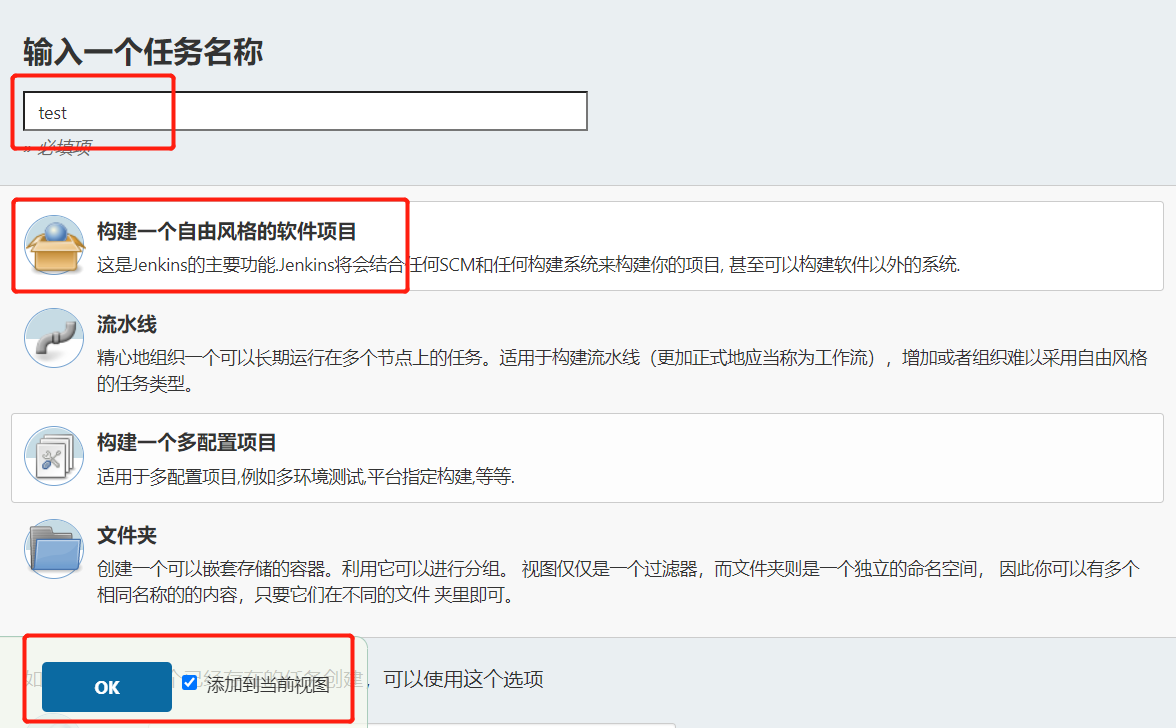
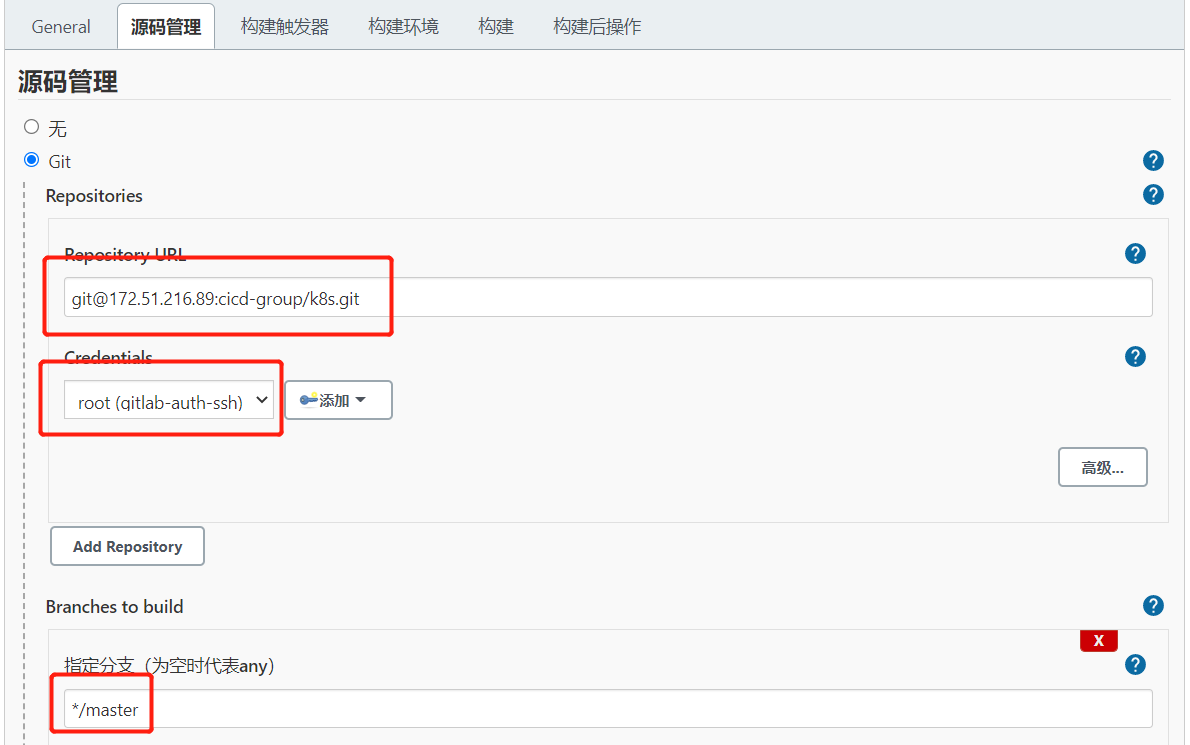
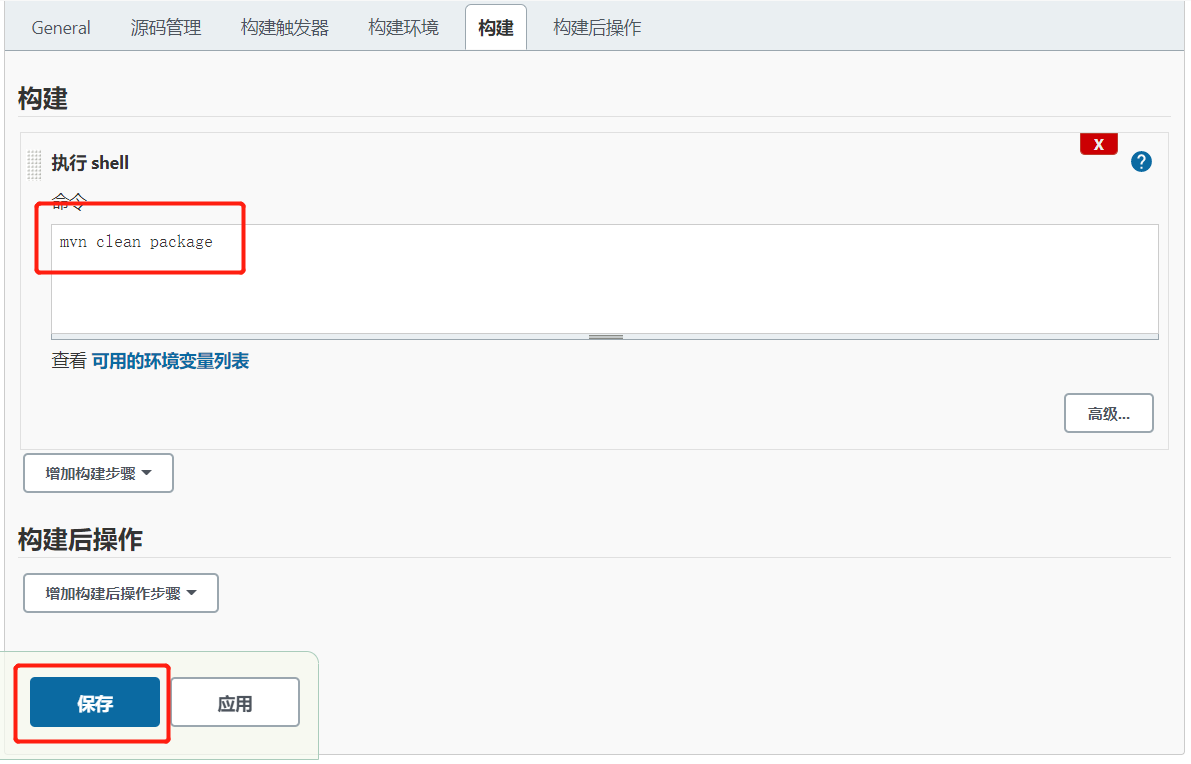
构建项目
1
2
3
4
5
6
7
8
9
10
11
12
13
14
15
16
17
18
19
20
21
22
23
24
25
26
27
28
29
30
31
32
33
34
[INFO] ------------------------------------------------------------------------
[INFO] Reactor Summary:
[INFO]
[INFO] k8s 1.0.0 .......................................... SUCCESS [  0.141 s]
[INFO] msa-eureka latest .................................. SUCCESS [  2.398 s]
[INFO] msa-eureka-client 1.0.0 ............................ SUCCESS [  0.492 s]
[INFO] msa-gateway latest ................................. SUCCESS [  0.427 s]
[INFO] msa-producer 1.0.0 ................................. SUCCESS [  1.420 s]
[INFO] msa-consumer 1.0.0 ................................. SUCCESS [  1.289 s]
[INFO] msa-admin 1.0.0 .................................... SUCCESS [  0.739 s]
[INFO] msa-admin-client 1.0.0 ............................. SUCCESS [  0.298 s]
[INFO] msa-zipkin-producer 1.0.1 .......................... SUCCESS [  1.342 s]
[INFO] msa-zipkin-consumer 1.0.0 .......................... SUCCESS [  1.458 s]
[INFO] msa-ext-postgresql 1.0.0 ........................... SUCCESS [  1.206 s]
[INFO] msa-ext-mysql 1.0.0 ................................ SUCCESS [  1.317 s]
[INFO] msa-ext-redis 1.0.1 ................................ SUCCESS [  1.153 s]
[INFO] msa-ext-rabbitmq 1.0.0 ............................. SUCCESS [  0.129 s]
[INFO] msa-ext-elk 1.0.0 .................................. SUCCESS [  1.084 s]
[INFO] msa-ext-prometheus 1.0.0 ........................... SUCCESS [  0.147 s]
[INFO] msa-ext-job 1.0.0 .................................. SUCCESS [  1.080 s]
[INFO] msa-sentinel-producer 1.0.0 ........................ SUCCESS [  1.384 s]
[INFO] msa-sentinel-consumer 1.0.0 ........................ SUCCESS [  1.356 s]
[INFO] msa-deploy-producer latest ......................... SUCCESS [  1.376 s]
[INFO] msa-deploy-consumer latest ......................... SUCCESS [  1.438 s]
[INFO] msa-deploy-job 2.0.0 ............................... SUCCESS [  1.279 s]
[INFO] msa-k8s-redis 0.0.1-SNAPSHOT ....................... SUCCESS [  1.272 s]
[INFO] msa-k8s-rabbitmq 1.0.0 ............................. SUCCESS [  0.174 s]
[INFO] ------------------------------------------------------------------------
[INFO] BUILD SUCCESS
[INFO] ------------------------------------------------------------------------
[INFO] Total time:  24.867 s
[INFO] Finished at: 2022-02-09T09:50:05+08:00
[INFO] ------------------------------------------------------------------------
Finished: SUCCESS
查看/var/lib/jenkins/workspace/目录,发现已经从Gitlab成功拉取了代码到Jenkins中。
1
2
3
4
5
6
7
8
9
10
11
12
13
14
15
16
17
18
19
20
21
22
23
24
25
26
27
28
29
30
31
32
33
34
35
36
37
[root@localhost ~]# cd /var/lib/jenkins/workspace/
[root@localhost workspace]# ll
total 4
drwxr-xr-x 26 root root 4096 Feb  9 09:49 test
drwxr-xr-x  2 root root    6 Feb  9 09:49 test@tmp


[root@localhost workspace]# cd test
[root@localhost test]# ll
total 16
-rw-r--r-- 1 root root 1131 Feb  9 09:49 deploy.sh
-rw-r--r-- 1 root root  719 Feb  9 09:49 Dockerfile
-rw-r--r-- 1 root root 2482 Feb  9 09:49 Jenkinsfile
drwxr-xr-x 4 root root   64 Feb  9 09:49 msa-admin
drwxr-xr-x 4 root root   64 Feb  9 09:49 msa-admin-client
drwxr-xr-x 4 root root   64 Feb  9 09:49 msa-consumer
drwxr-xr-x 4 root root  114 Feb  9 09:50 msa-deploy-consumer
drwxr-xr-x 4 root root   46 Feb  9 09:50 msa-deploy-job
drwxr-xr-x 4 root root  114 Feb  9 09:49 msa-deploy-producer
drwxr-xr-x 4 root root  136 Feb  9 09:49 msa-eureka
drwxr-xr-x 4 root root   82 Feb  9 09:49 msa-eureka-client
drwxr-xr-x 4 root root   64 Feb  9 09:49 msa-ext-elk
drwxr-xr-x 4 root root   64 Feb  9 09:49 msa-ext-job
drwxr-xr-x 4 root root   85 Feb  9 09:49 msa-ext-mysql
drwxr-xr-x 4 root root   85 Feb  9 09:49 msa-ext-postgresql
drwxr-xr-x 4 root root   64 Feb  9 09:49 msa-ext-prometheus
drwxr-xr-x 4 root root   64 Feb  9 09:49 msa-ext-rabbitmq
drwxr-xr-x 4 root root   64 Feb  9 09:49 msa-ext-redis
drwxr-xr-x 4 root root  114 Feb  9 09:49 msa-gateway
drwxr-xr-x 4 root root   64 Feb  9 09:50 msa-k8s-rabbitmq
drwxr-xr-x 4 root root   64 Feb  9 09:50 msa-k8s-redis
drwxr-xr-x 4 root root   64 Feb  9 09:49 msa-producer
drwxr-xr-x 4 root root   64 Feb  9 09:49 msa-sentinel-consumer
drwxr-xr-x 4 root root   64 Feb  9 09:49 msa-sentinel-producer
drwxr-xr-x 4 root root   64 Feb  9 09:49 msa-zipkin-consumer
drwxr-xr-x 4 root root   64 Feb  9 09:49 msa-zipkin-producer
-rw-r--r-- 1 root root 3442 Feb  9 09:49 pom.xml
1.3.流水线项目代码审查
1.3.1.创建流水线项目
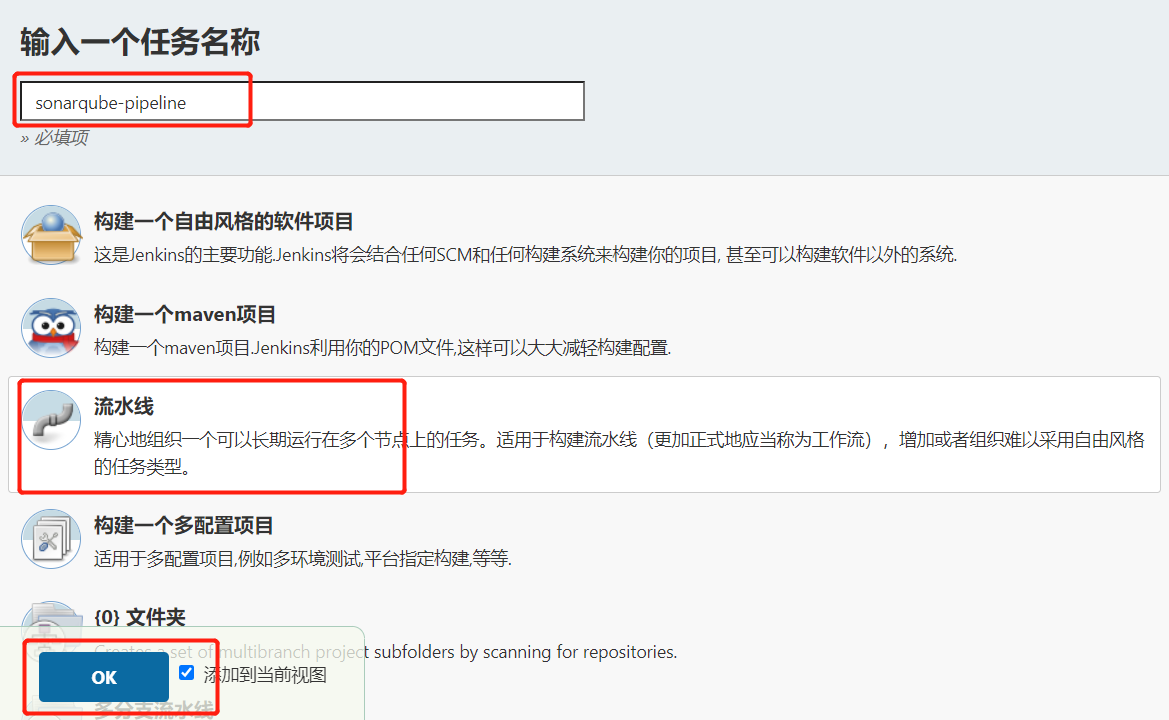
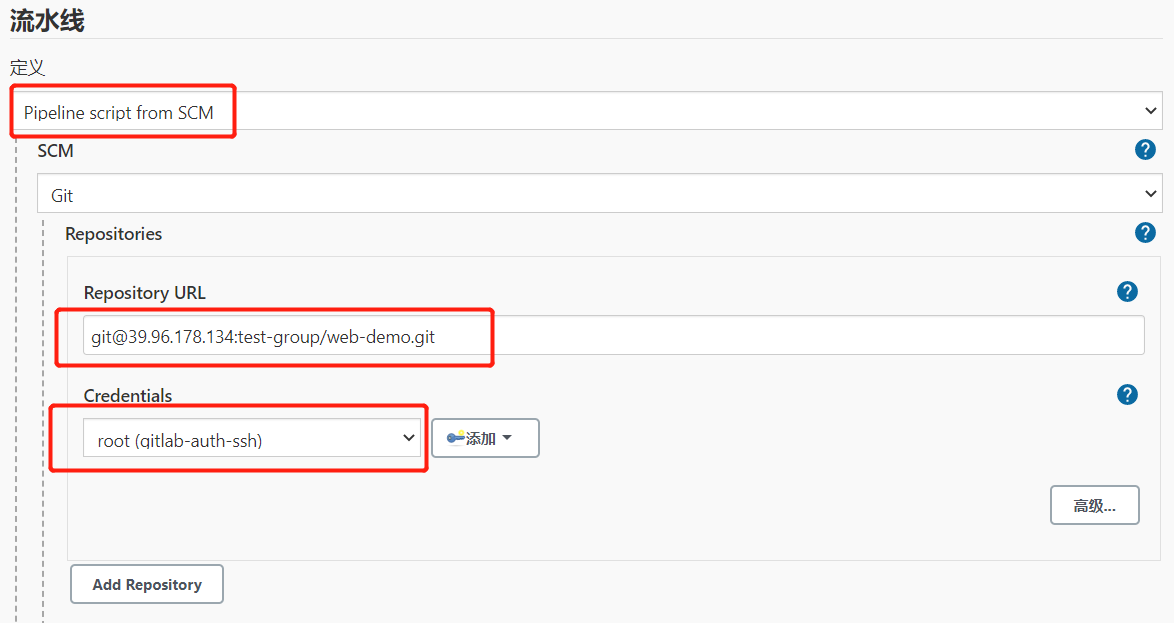
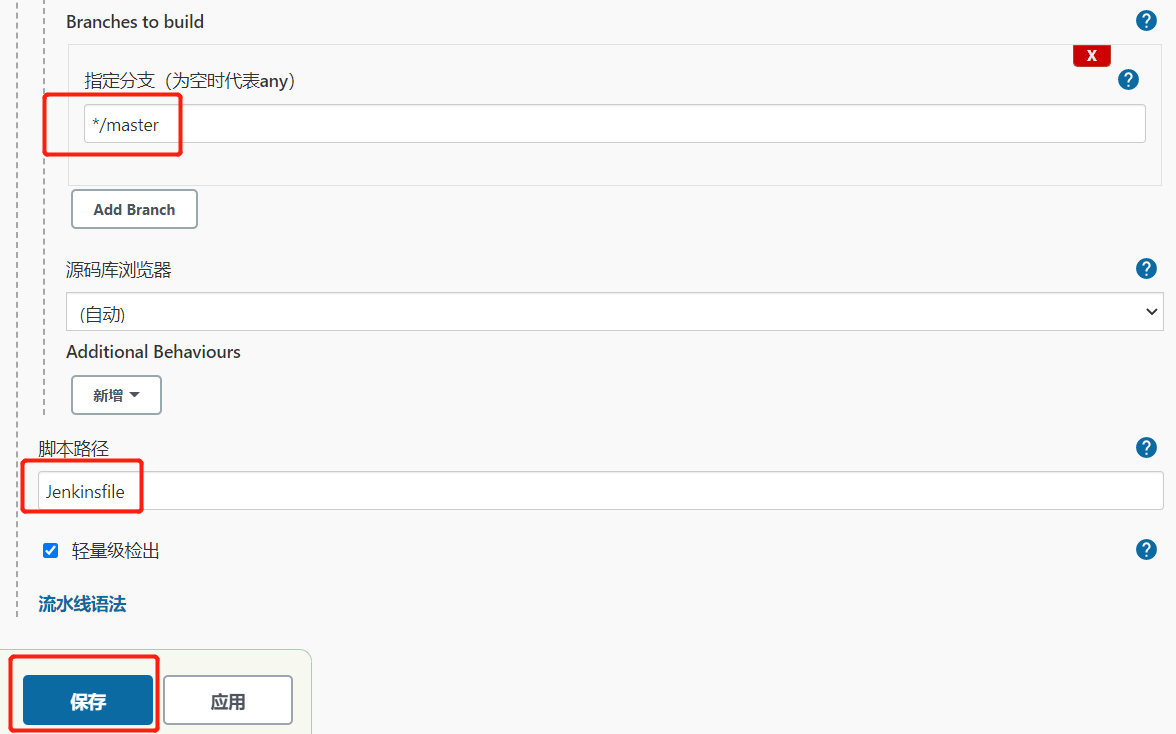
1.3.2.修改项目源码
1.项目根目录下,创建sonar-project.properties文件
1
2
3
4
5
6
7
8
9
10
11
12
13
14
15
16
17
18
# must be unique in a given SonarQube instance
sonar.projectKey=sonarqube-pipeline

# this is the name and version displayed in the SonarQube UI. Was mandatoryprior to SonarQube 6.1.
sonar.projectName=sonarqube-pipeline
sonar.projectVersion=1.0

# Path is relative to the sonar-project.properties file. Replace "\" by "/" on Windows.
# This property is optional if sonar.modules is set.
sonar.sources=.
sonar.exclusions=**/test/**,**/target/**
sonar.java.binaries=.

sonar.java.source=1.8
sonar.java.target=1.8

# Encoding of the source code. Default is default system encoding
sonar.sourceEncoding=UTF-8
2.修改Jenkinsfile,加入SonarQube代码审查阶段
Jenkinsfile
1
2
3
4
5
6
7
8
9
10
11
12
13
14
15
16
17
18
19
20
21
22
23
24
25
26
27
28
29
30
31
32
33
34
pipeline {
    agent any

    stages {
        stage('pull code') {
            steps {
                checkout([$class: 'GitSCM', branches: [[name: '*/master']], extensions: [], userRemoteConfigs: [[credentialsId: '53b412d5-ecd1-47a3-b571-4505d562634e', url: 'git@39.96.178.134:test-group/web-demo.git']]])
            }
        }
      stage('code checking') {
         steps {

            script {
                 //引入SonarQubeScanner工具
                scannerHome = tool 'SonarQube-Scanner'
            }
            //引入SonarQube的服务器环境
            withSonarQubeEnv('SonarQube7.6') {
                sh "${scannerHome}/bin/sonar-scanner"
            }
         }
      }
        stage('build project') {
            steps {
                echo 'build project'
            }
        }
        stage('publish project') {
            steps {
                echo 'publish project'
            }
        }
    }
}
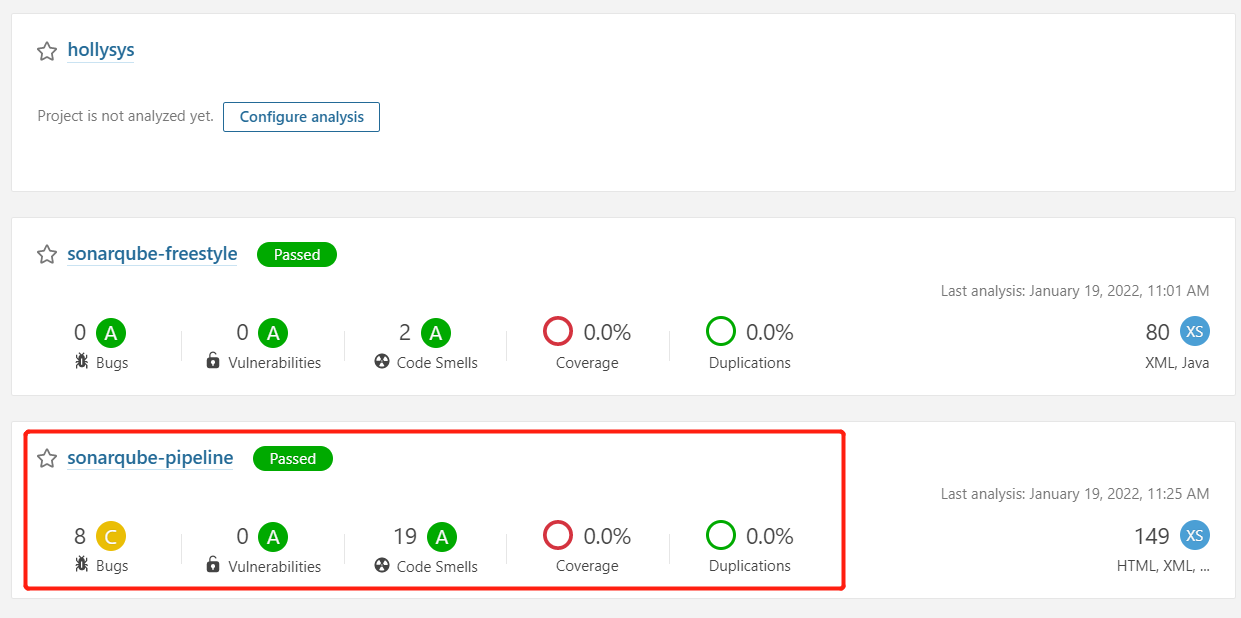
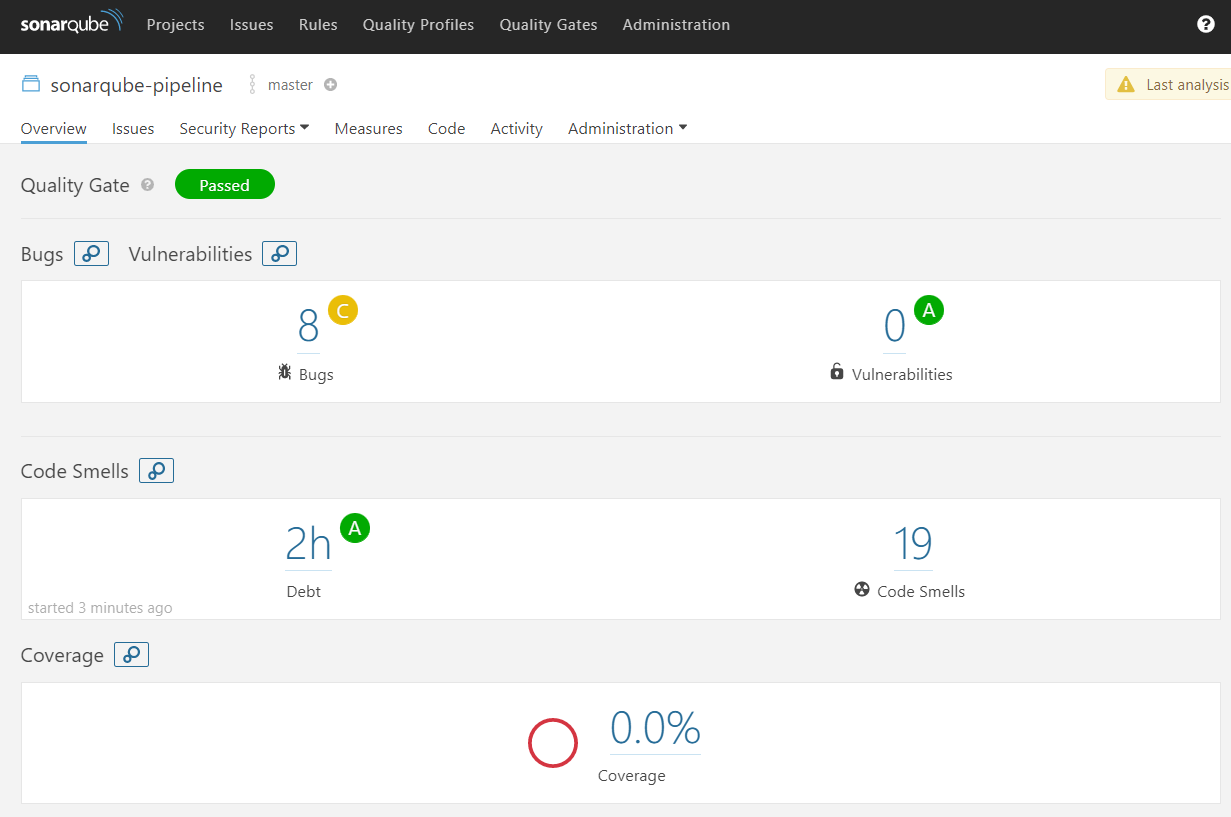
1.3.3.测试
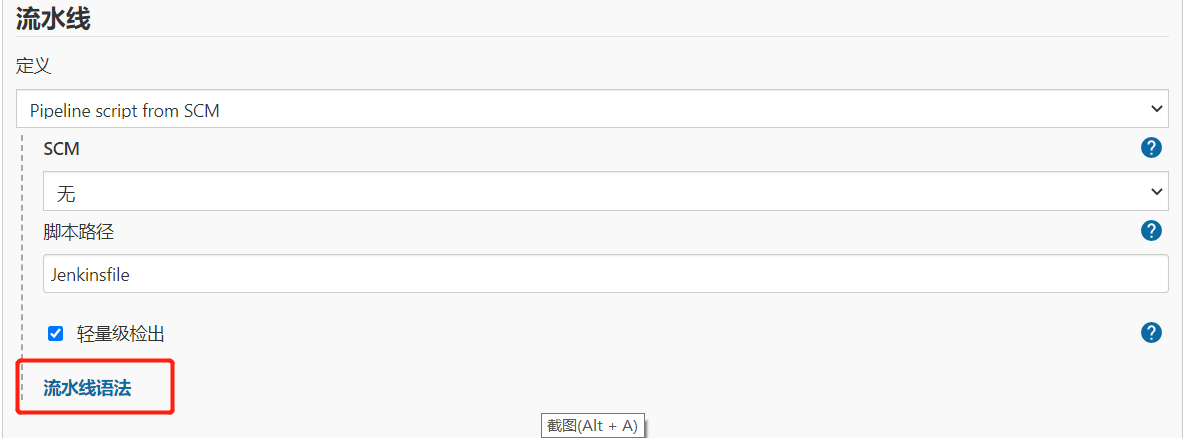
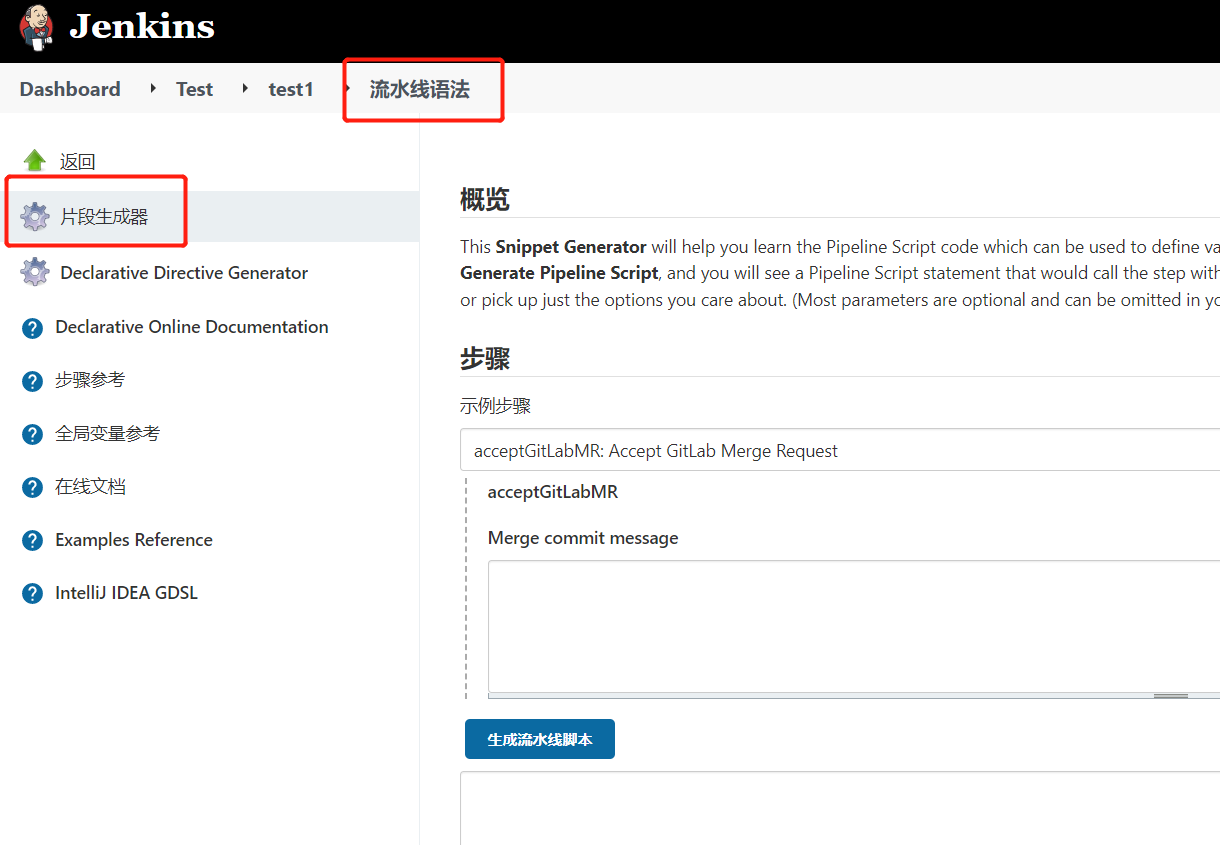
1.4.Harbor认证
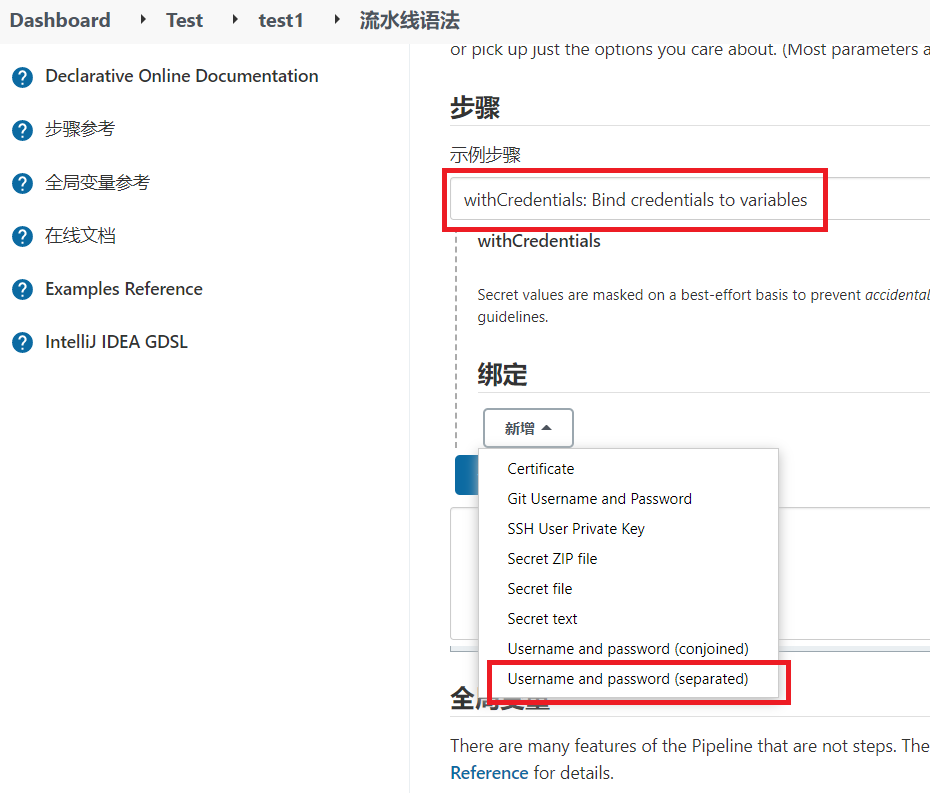
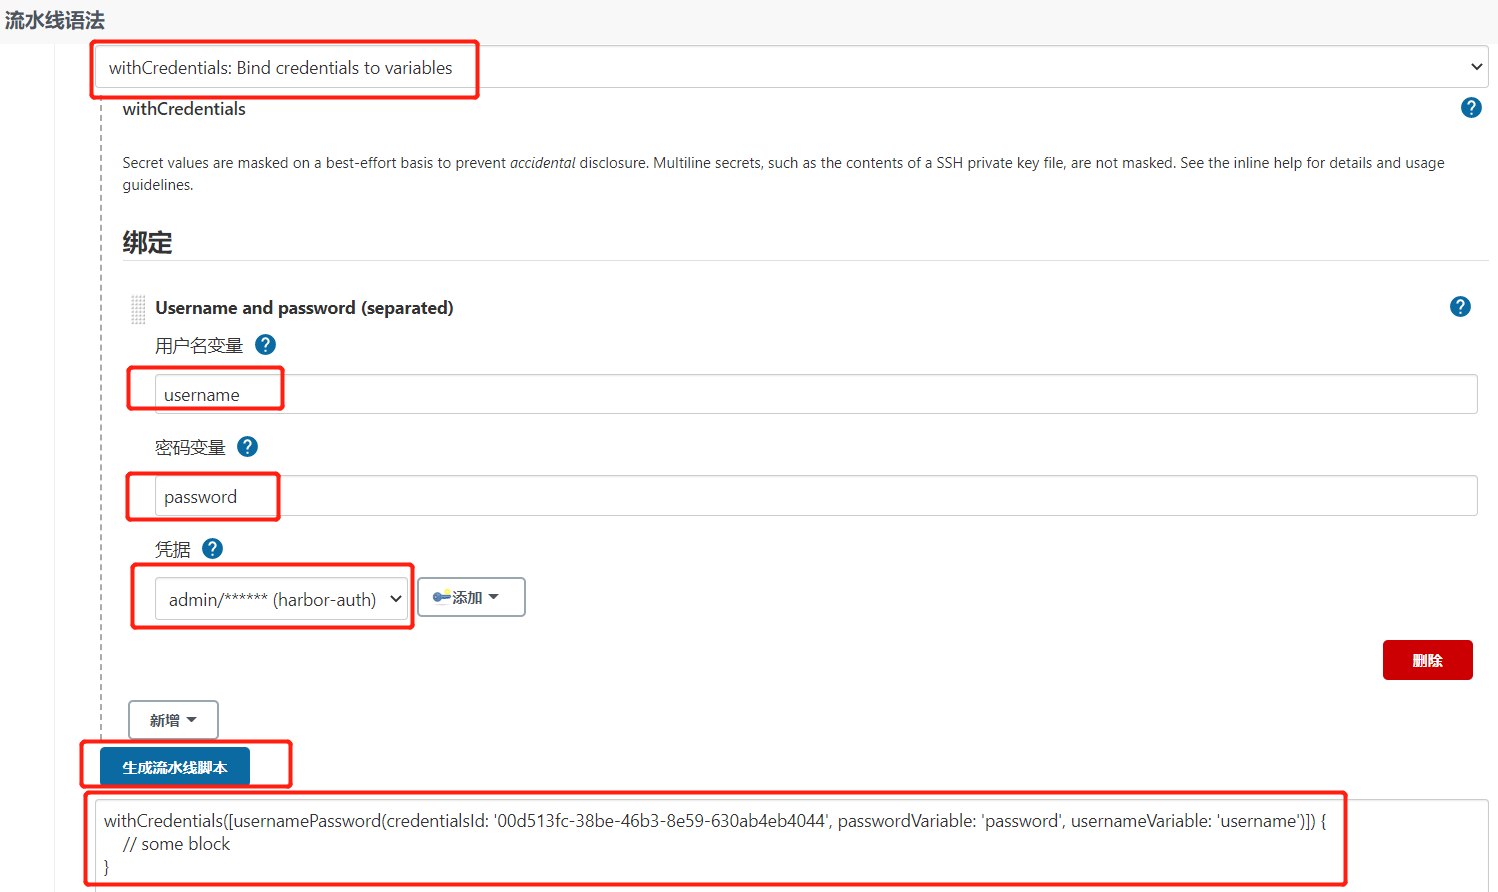
1
2
3
4
5
# 生成的脚本

withCredentials([usernamePassword(credentialsId: '00d513fc-38be-46b3-8e59-630ab4eb4044', passwordVariable: 'password', usernameVariable: 'username')]) {
    // some block
}
Jenkinsfile
1
2
3
4
5
6
7
8
9
10
11
12
13
14
15
16
17
18
19
20
21
22
23
24
25
26
27
28
29
30
31
32
33
34
35
36
37
38
39
40
41
42
43
44
45
46
47
48
49
50
51
52
53
54
55

//gitlab的凭证
def git_auth = "187cbba0-9691-4d60-aa50-34f0af93ee8c"

//构建版本的名称
def build_tag = "latest"

//阿里云镜像仓库地址
def harbor_url = "172.51.216.89:16888"

//镜像库项目名称
def harbor_project = "springcloud"

//Harbor的登录凭证ID
def harbor_auth = "00d513fc-38be-46b3-8e59-630ab4eb4044"


node {

    //获取当前选择的项目名称数组
    def selectedProjectNames = "${project_name}".split(",")


    stage('拉取源码') {
        checkout([$class: 'GitSCM', branches: [[name: 'refs/tags/${git_tag}']], extensions: [], userRemoteConfigs: [[credentialsId: "${git_auth}", url: 'git@172.51.216.89:cicd-group/k8s.git']]])
    }

    stage('代码审查') {

    }

    stage('编译,安装公共子工程') {

    }

    stage('编译,构建镜像,上传镜像') {
        for(int i=0;i<selectedProjectNames.length;i++){


            //把镜像推送到Harbor
            withCredentials([usernamePassword(credentialsId: "${harbor_auth}", passwordVariable: 'password', usernameVariable: 'username')]) {

                //登录镜像仓库
                sh "docker login -u ${username} -p ${password} ${harbor_url}"

                //上传镜像
                sh "docker push ${harbor_url}/${harbor_project}/${pushImageName}"

                sh "echo 镜像上传成功"
            }

        }
    }

}
2.GitLab
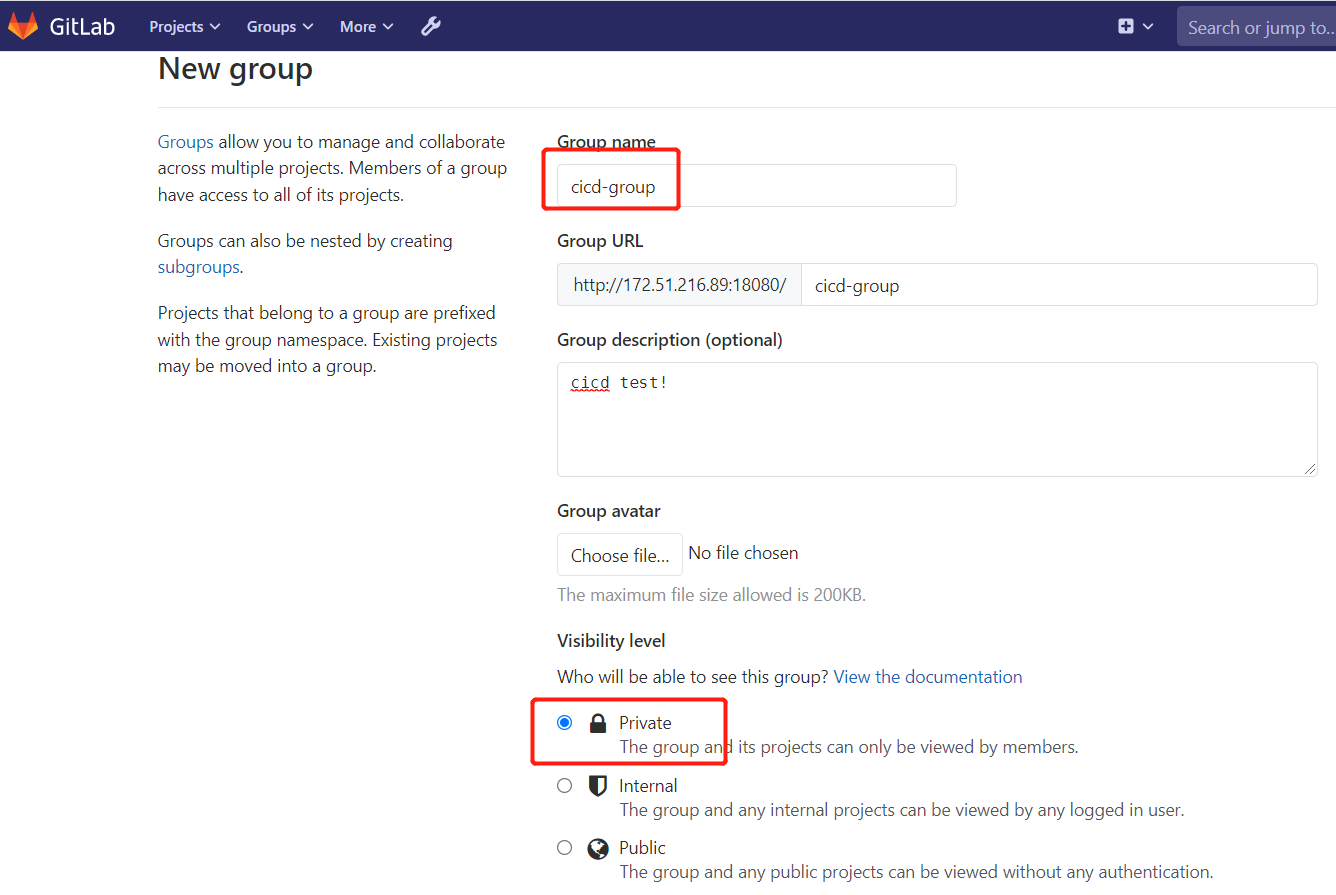
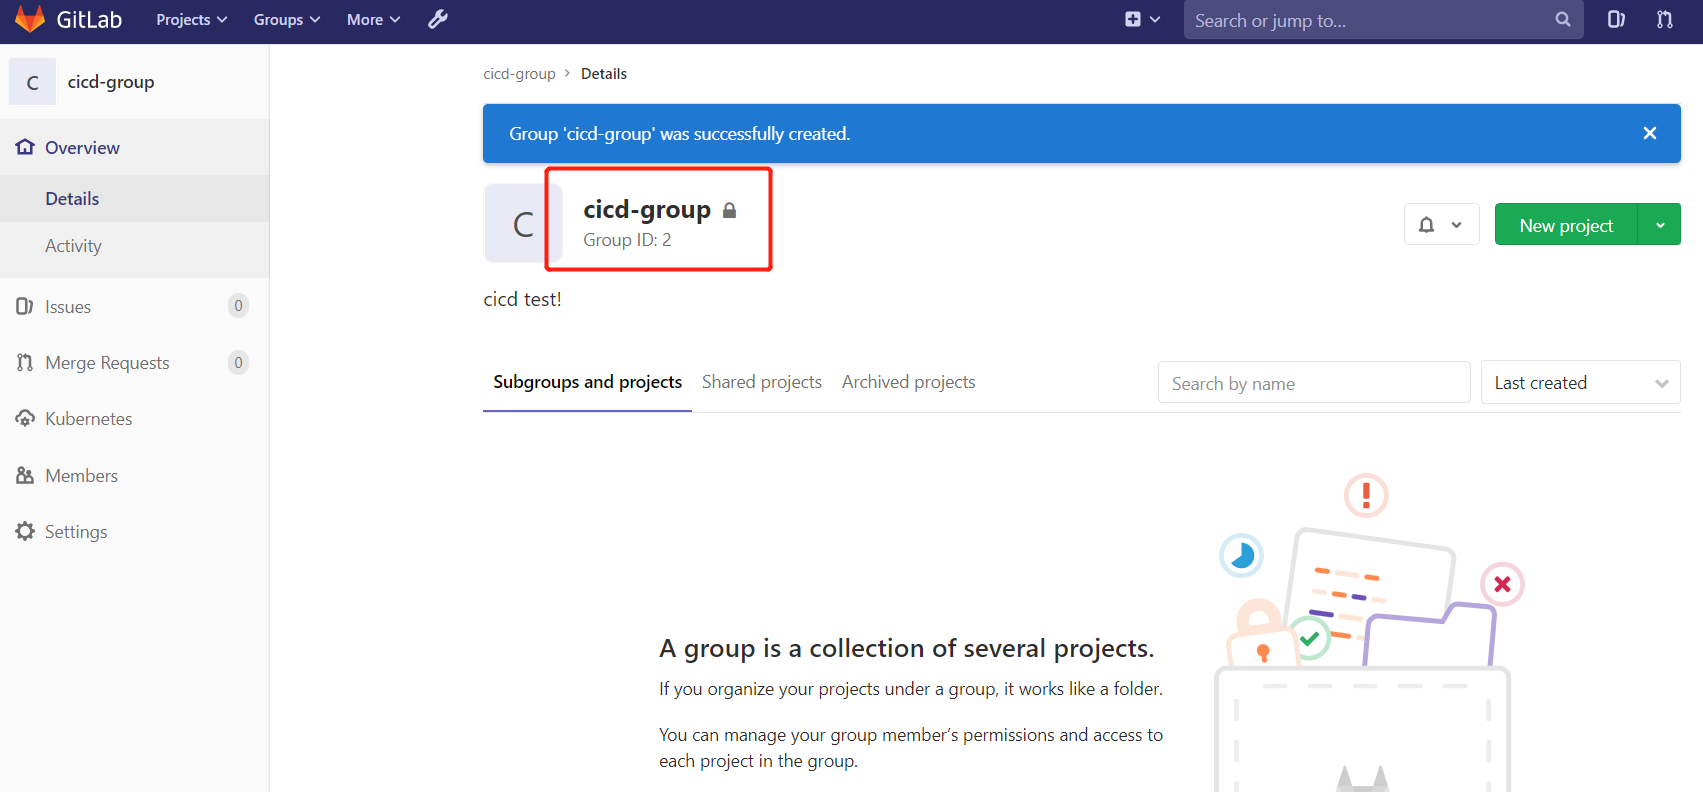
2.1.创建组
创建组 cicd-group
2.2.创建用户
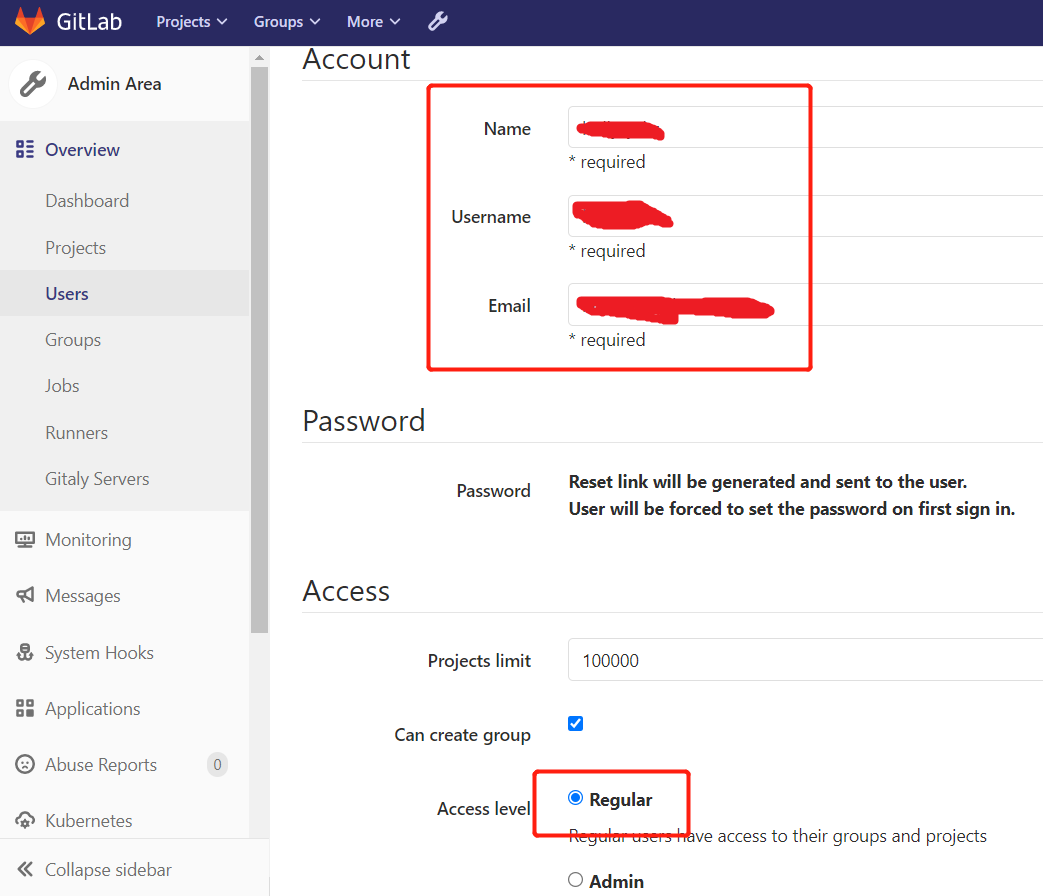
创建用户的时候,可以选择Regular或Admin类型。
- 普通用户:只能访问属于他的组和项目
- 管理员:可以访问所有组和项目
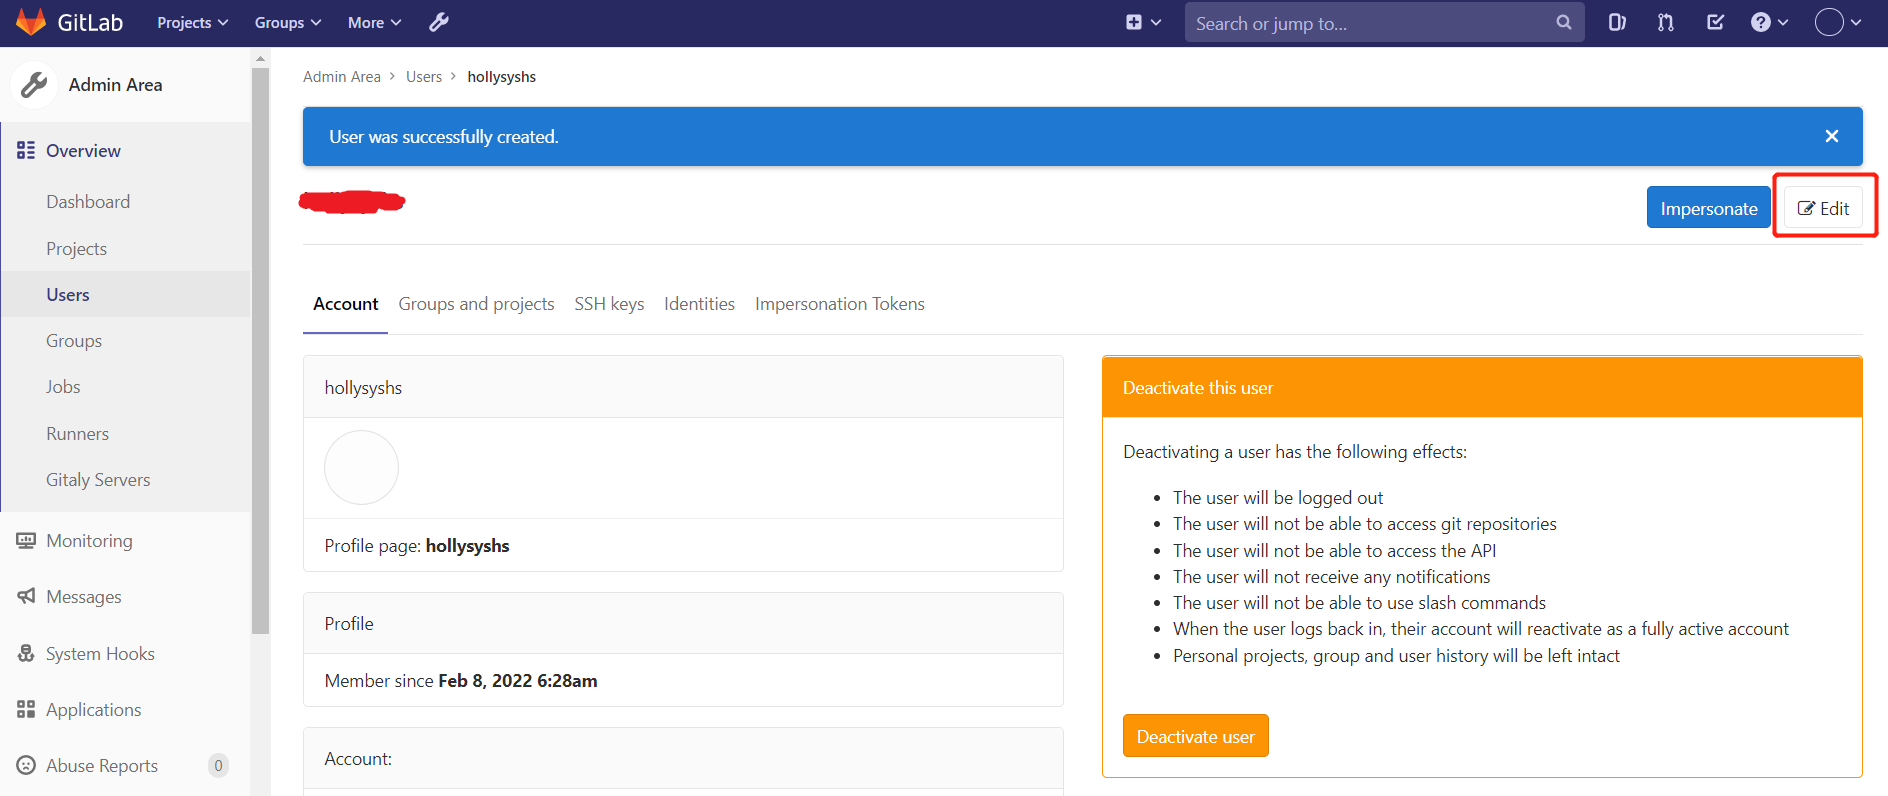
创建用户hollysyshs
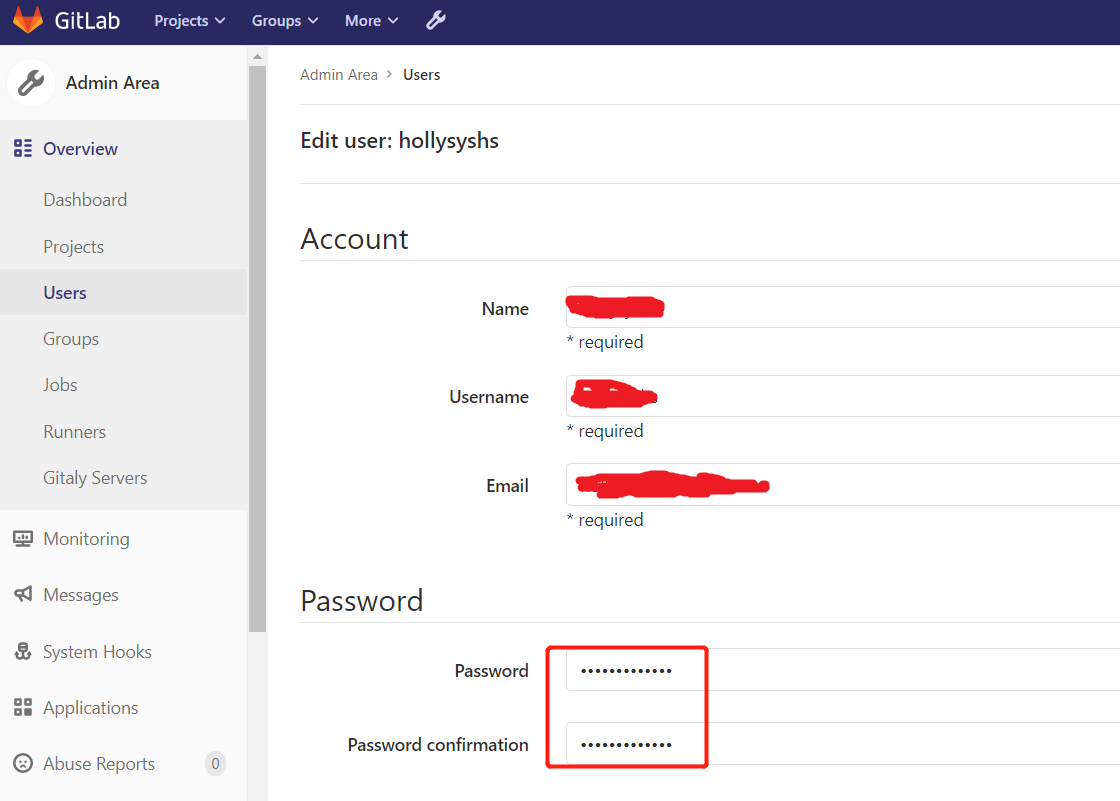
创建完用户后,立即修改密码 hollysyshs123
2.3.用户添加到组
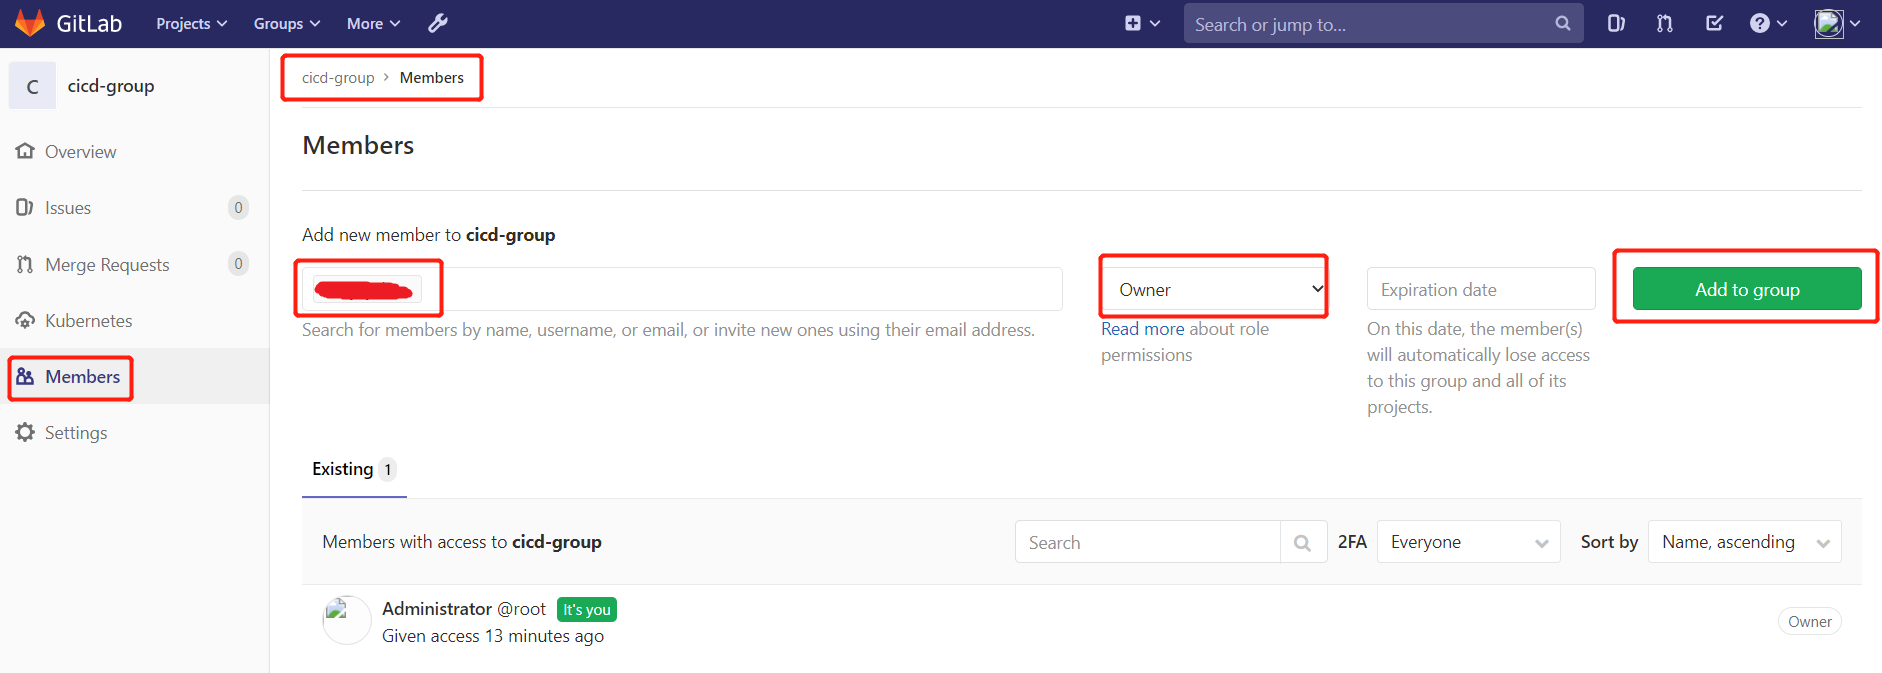
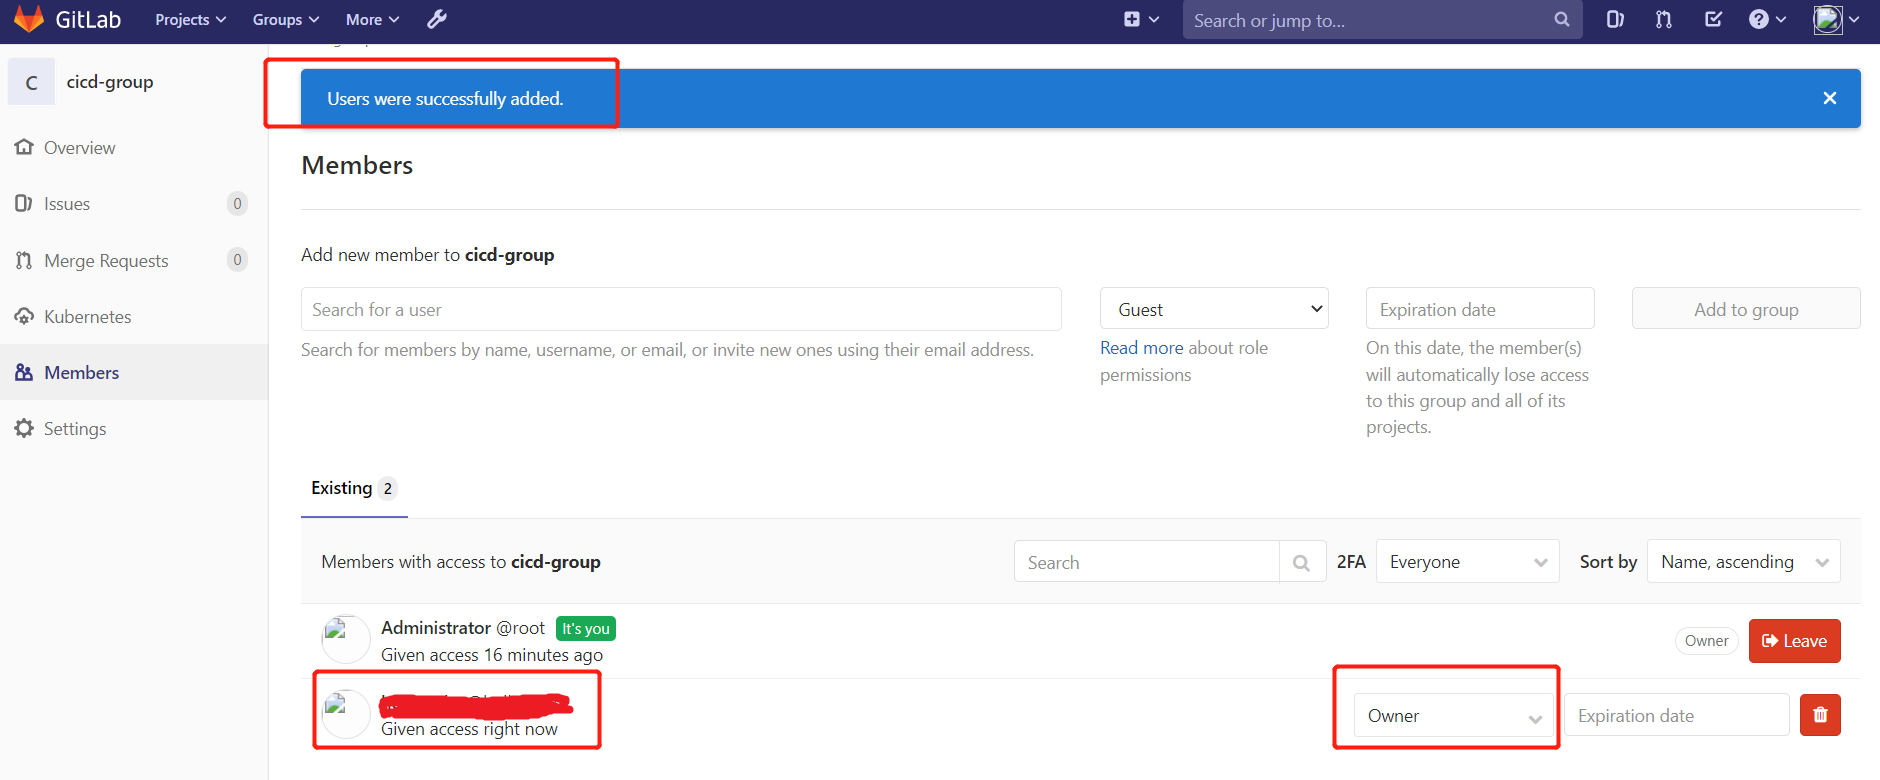
Gitlab用户在组里面有5种不同权限:
- Guest:可以创建issue、发表评论,不能读写版本库
- Reporter:可以克隆代码,不能提交,QA、PM可以赋予这个权限
- Developer:可以克隆代码、开发、提交、push,普通开发可以赋予这个权限
- Maintainer:可以创建项目、添加tag、保护分支、添加项目成员、编辑项目,核心开发可以赋予这个
- 权限 Owner:可以设置项目访问权限 - Visibility Level、删除项目、迁移项目、管理组成员,开发组组长可以赋予这个权限
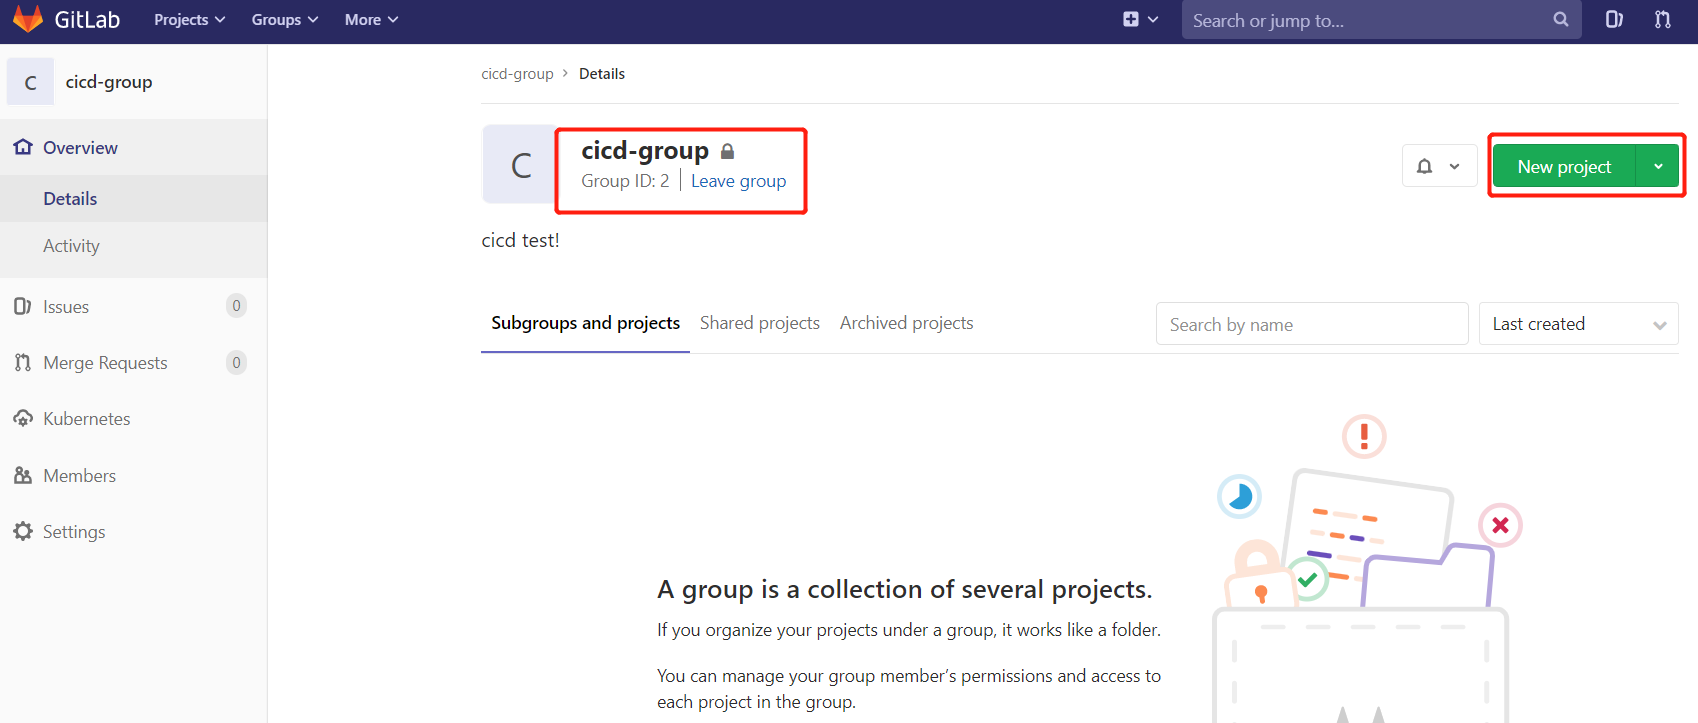
2.4.创建项目
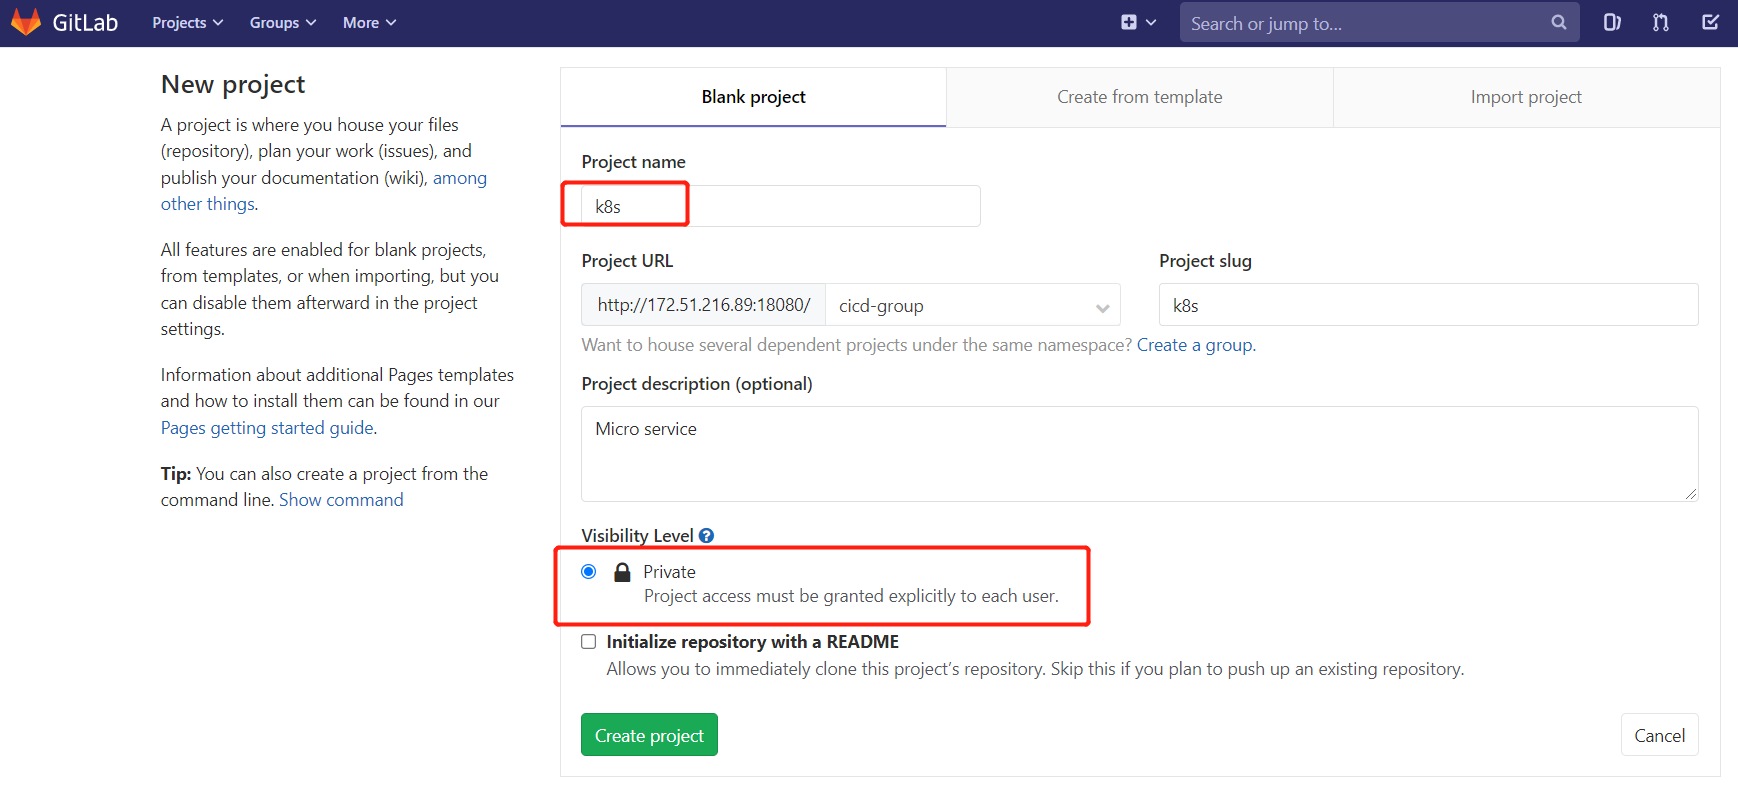
在用户组中创建项目
以刚才创建的新用户身份 hollysyshs 登录到Gitlab,然后在用户组中创建新的项目。
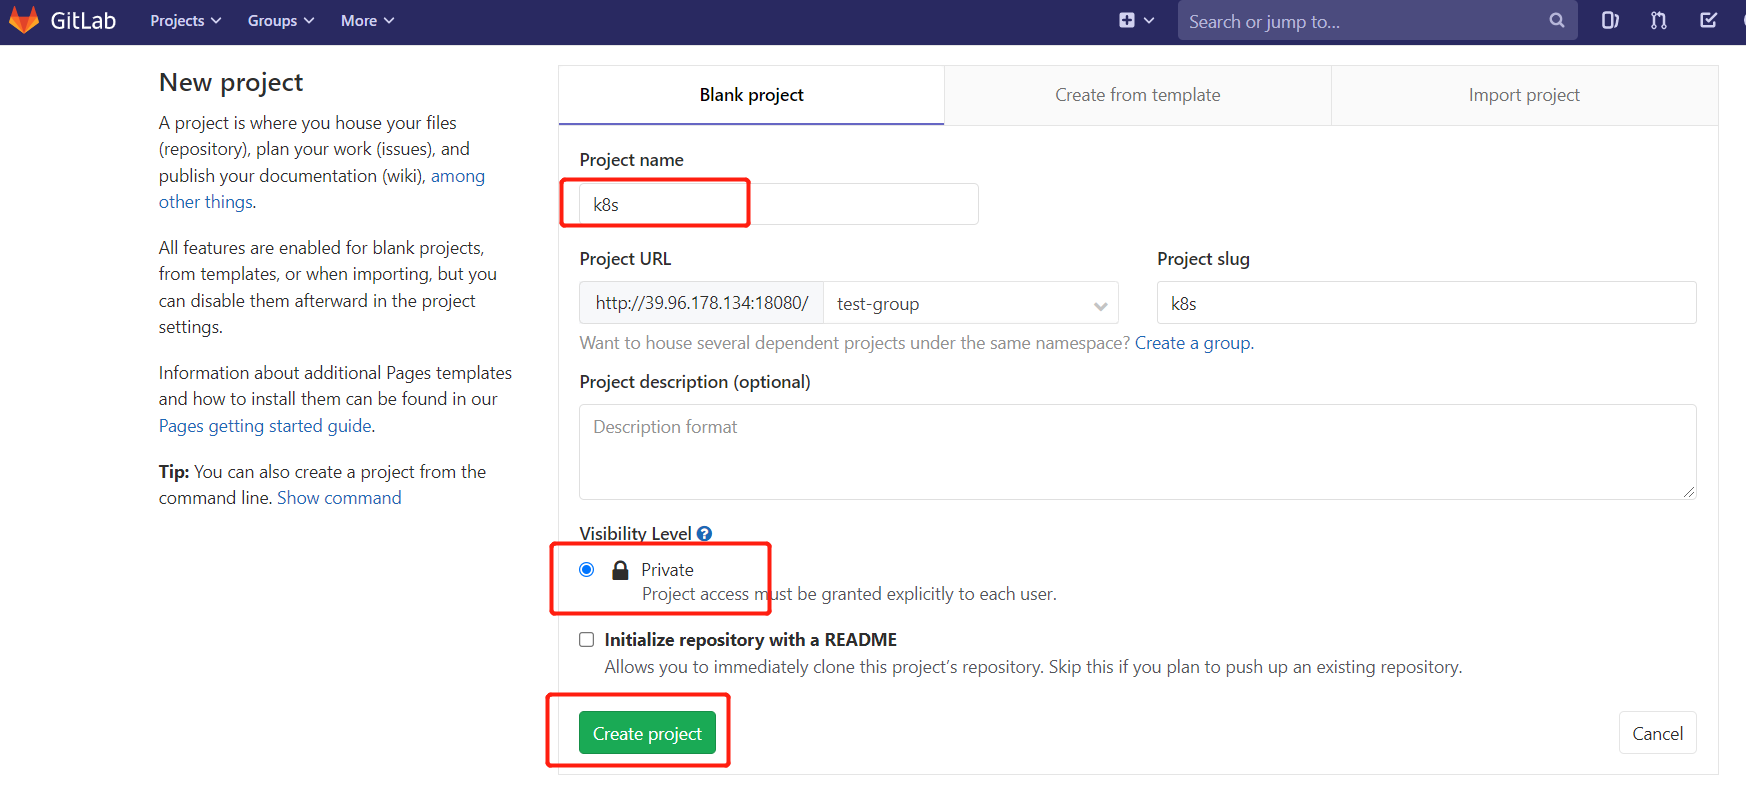
创建项目 k8s
2.5.SSH免密登录
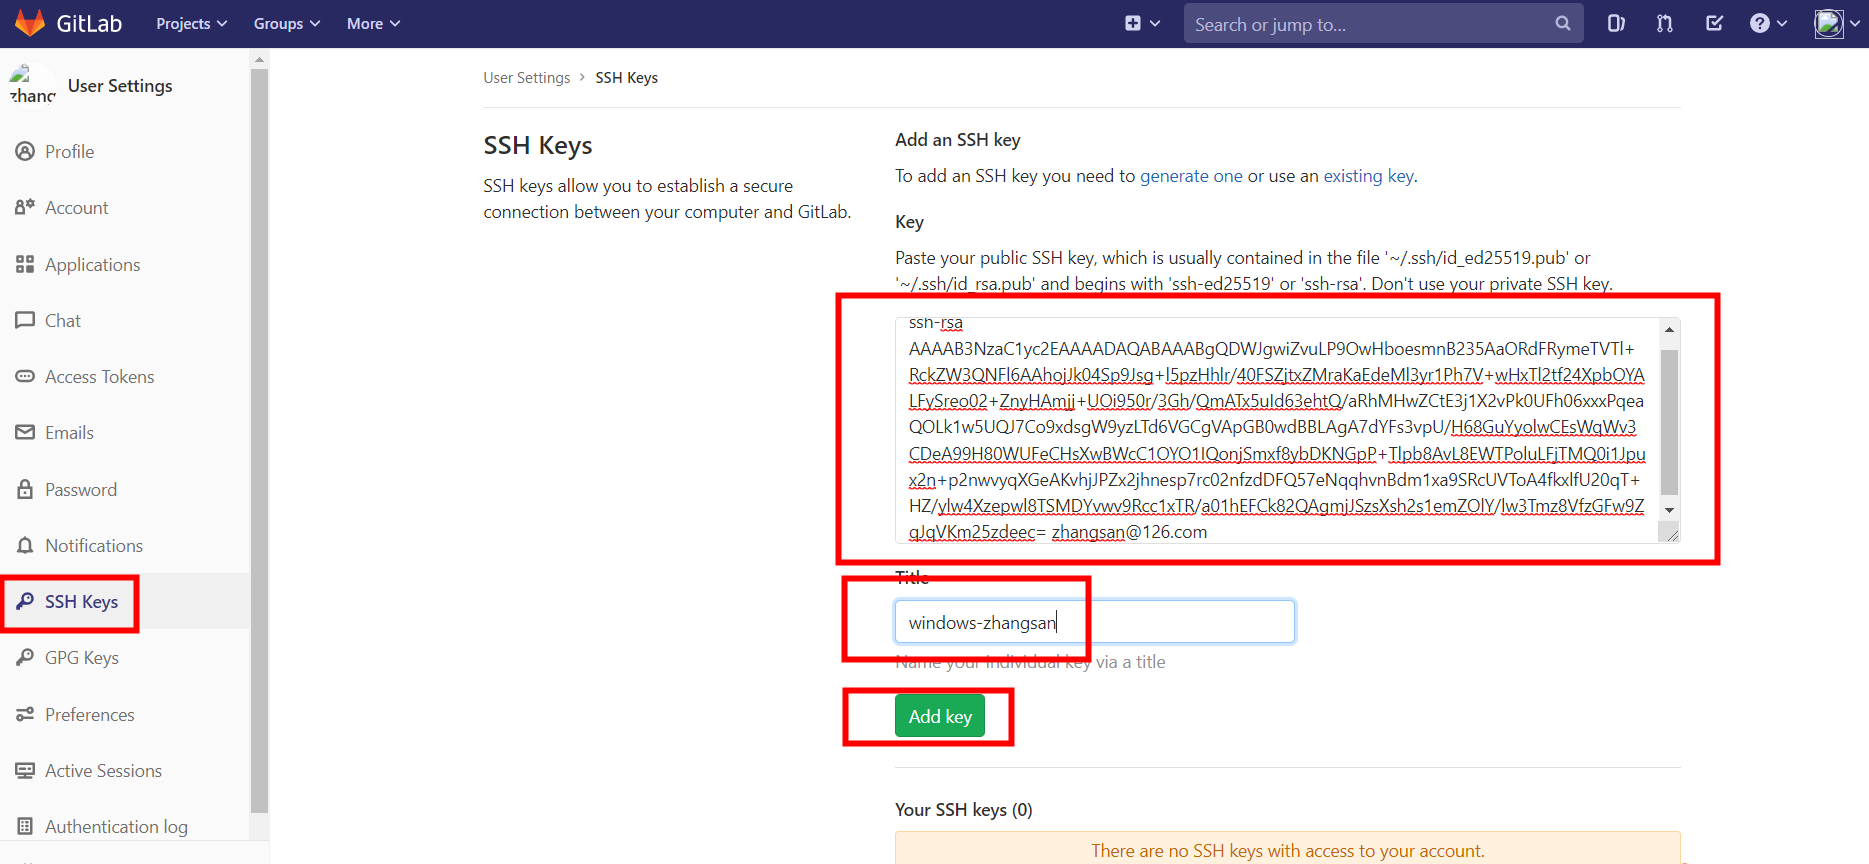
1.查看你生成的公钥:
vim id_rsa.pub
就可以查看到你的公钥
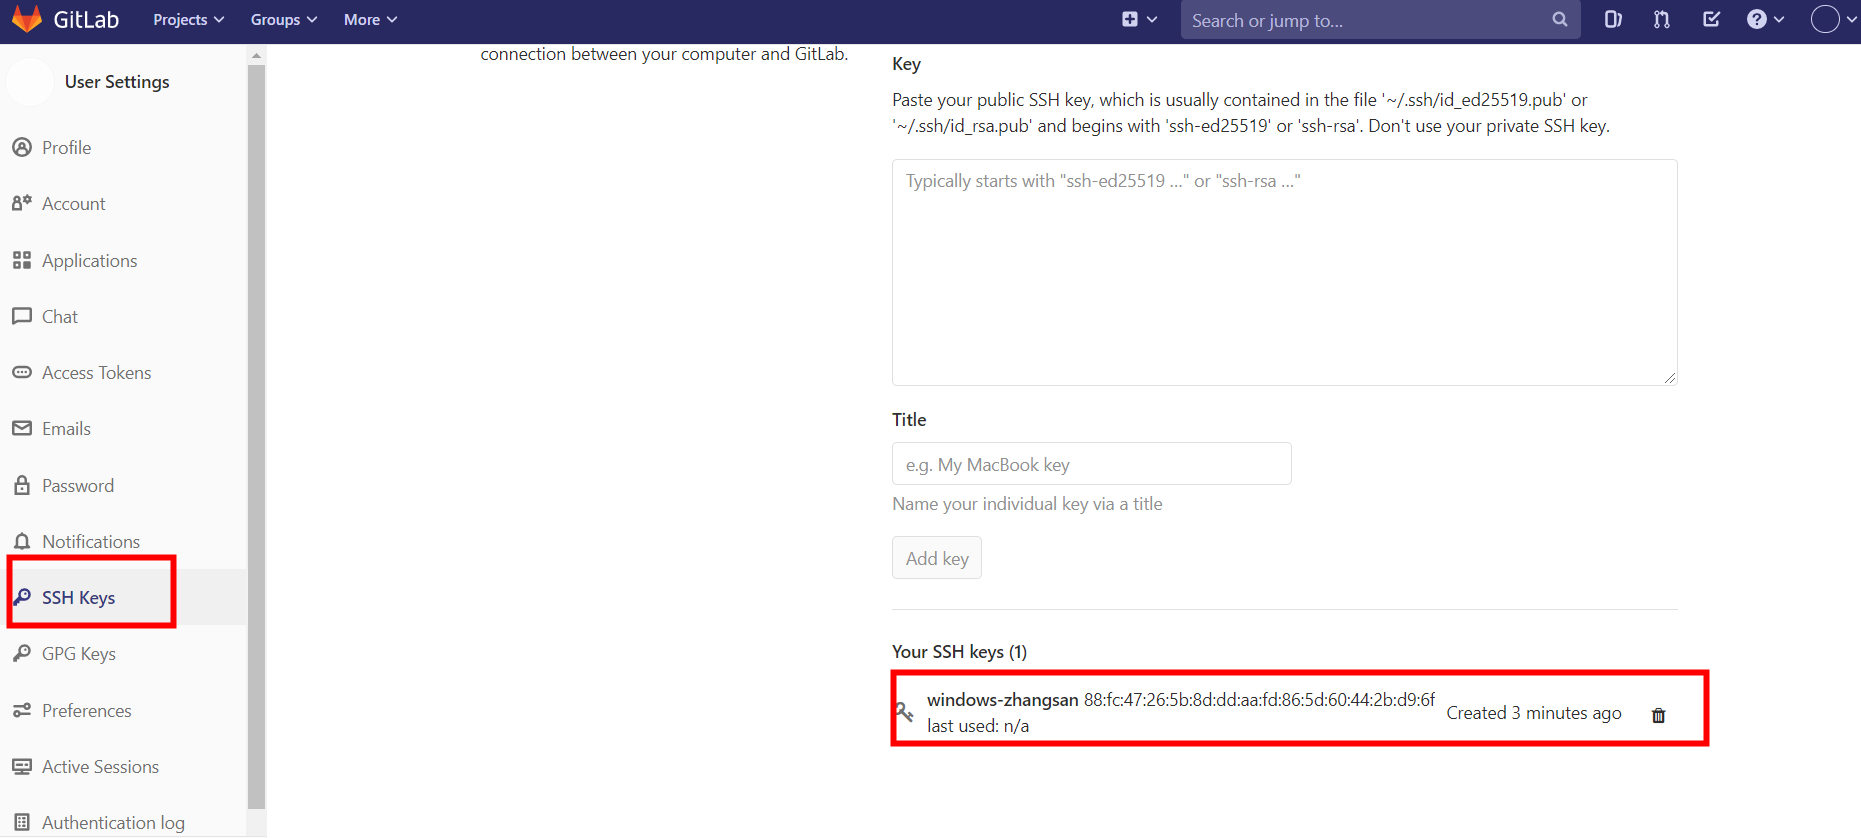
2.登陆GitLab账号,点击用户图像,然后 Settings -> 左栏点击 SSH keys

3.复制公钥内容,粘贴进“Key”文本区域内,取名字
4.点击Add Key
2.6.微服务源码上传GitLab
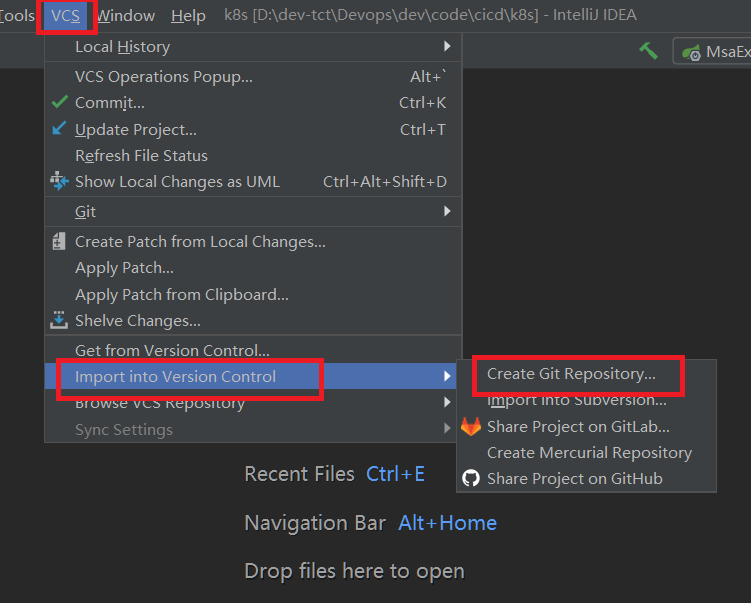
1.初始化本地仓库
选择要创建 Git 本地仓库的工程。
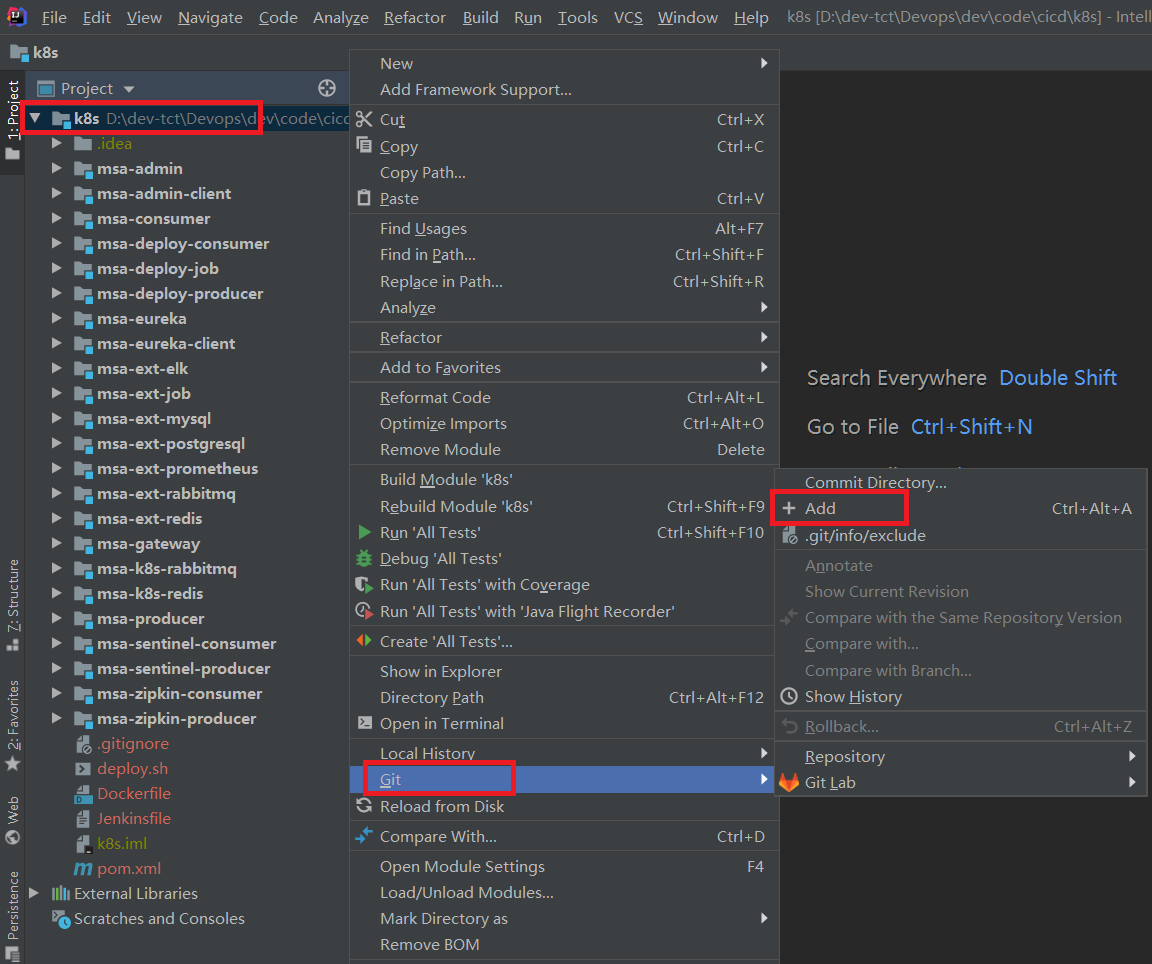
2.添加到暂存区
右键点击项目选择 Git -> Add 将项目添加到暂存区。
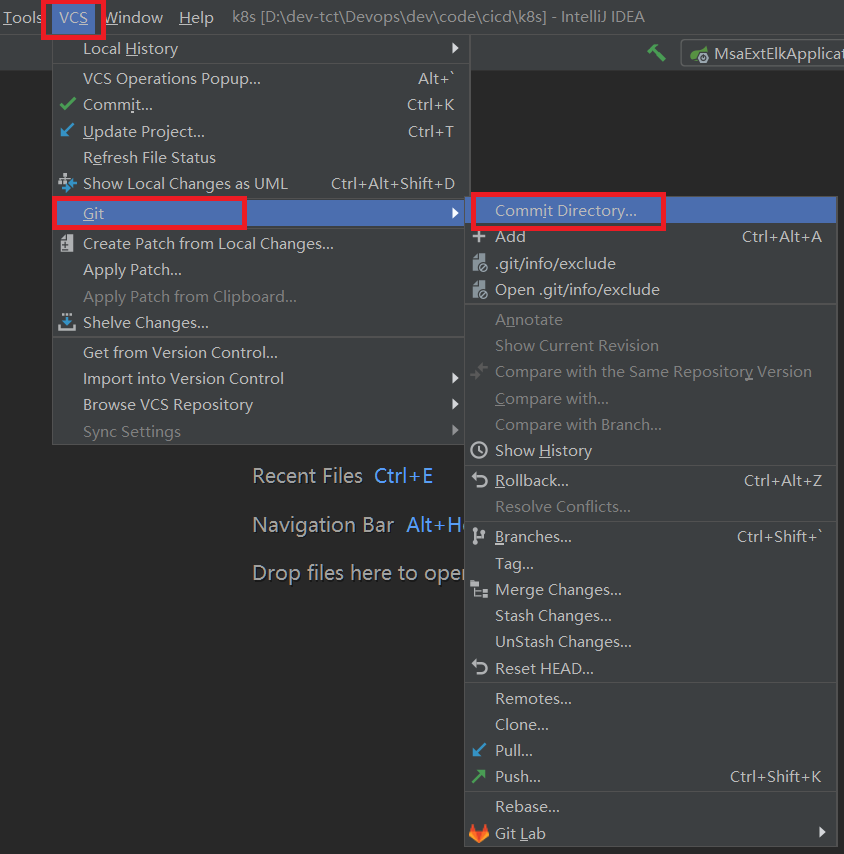
3.提交到本地仓库
4.推送本地库到远程库
1
2
3
# 远程仓库地址

git@172.51.216.89:cicd-group/k8s.git
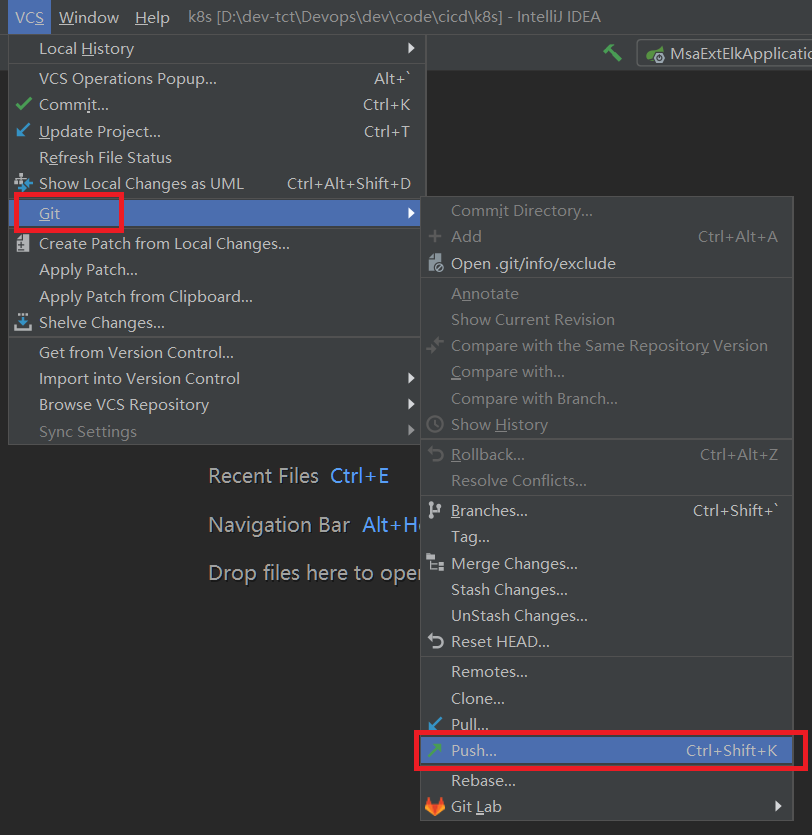
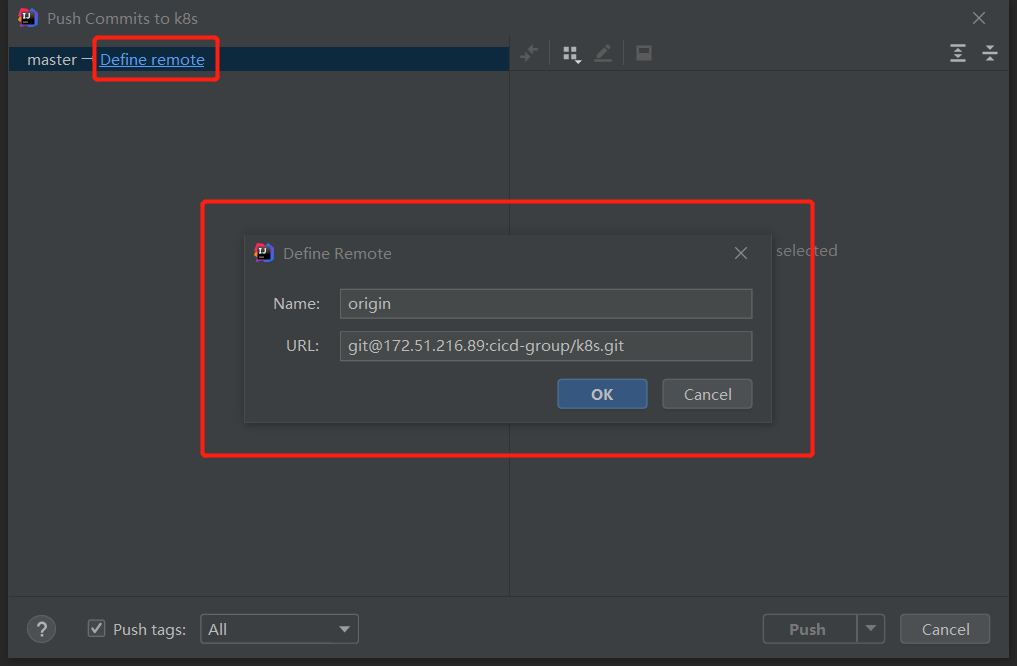
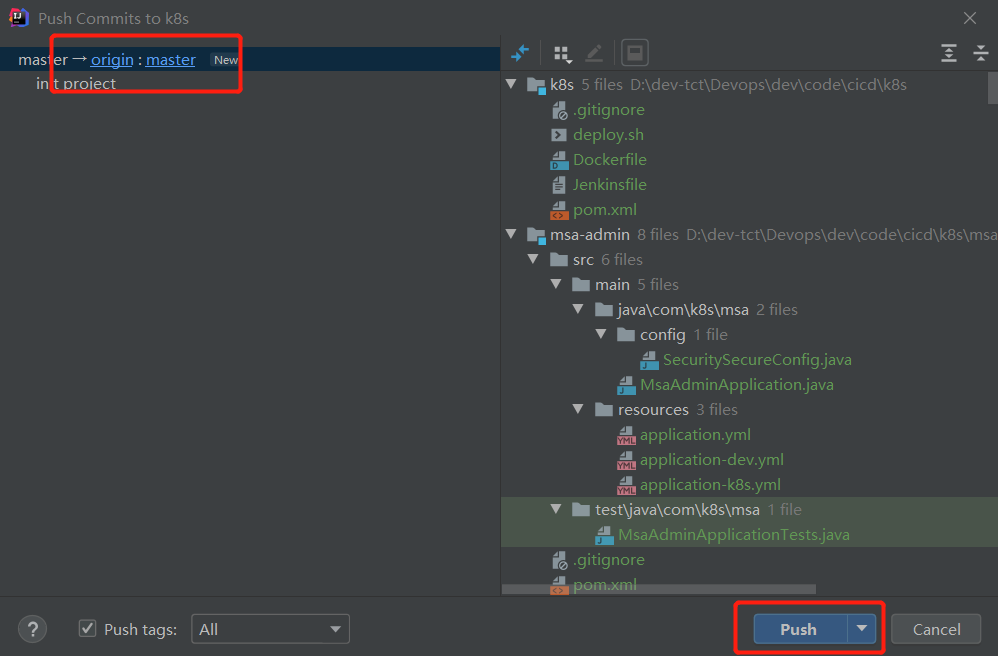
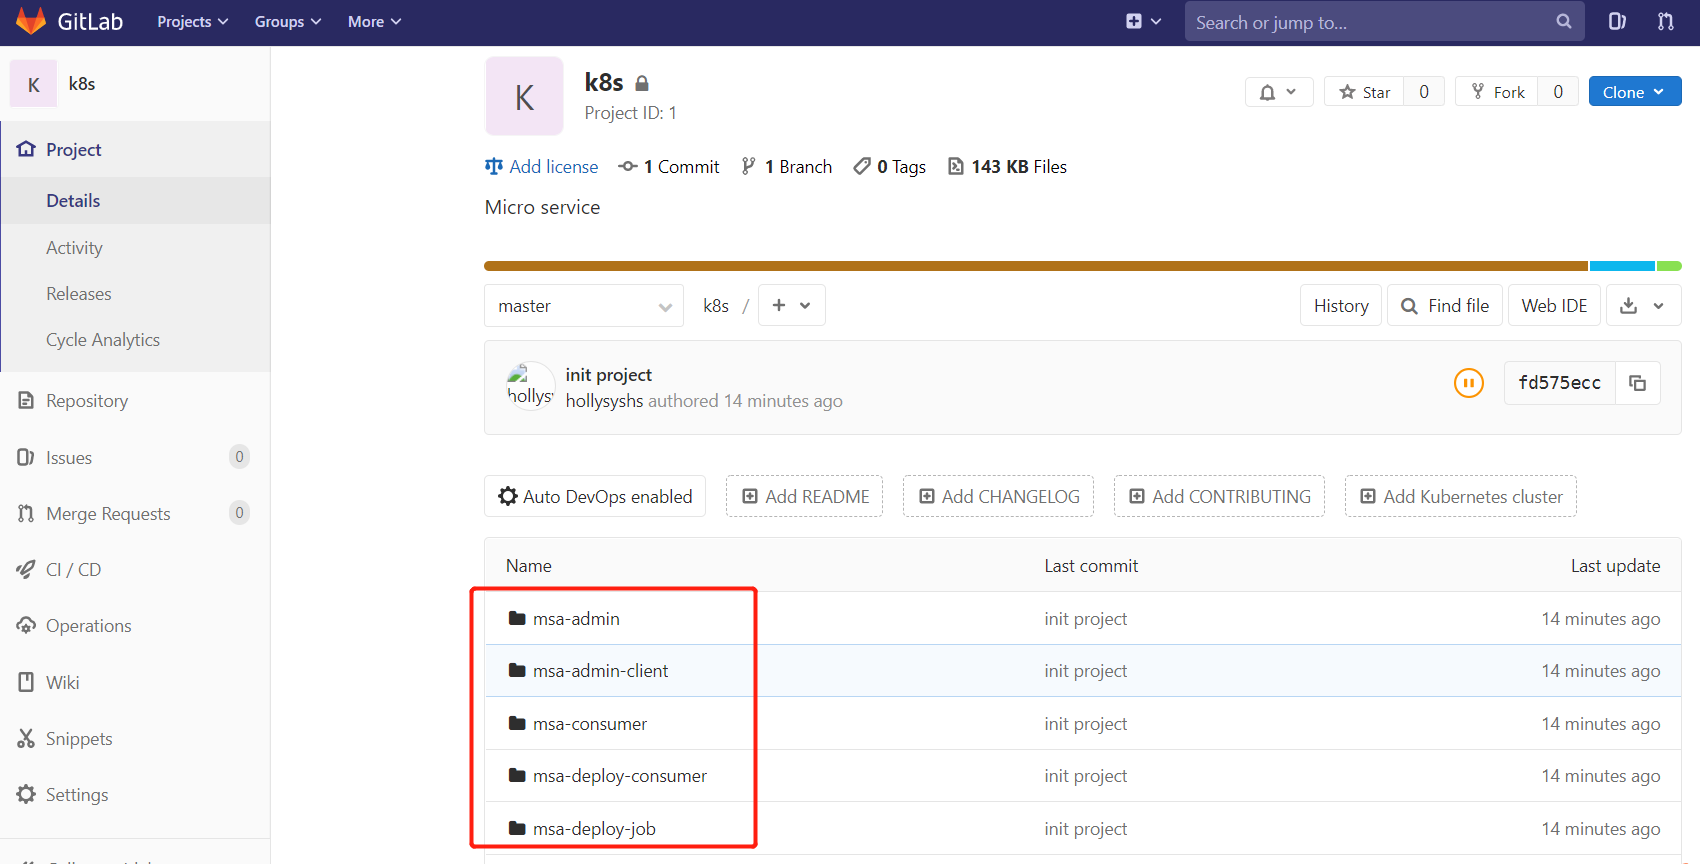
上传成功
3.SonarQube
SonarQube代码审查

3.1.Jenkins安装SonarQube Scanner插件
参考部署文档
3.2.jenkins添加SonarQube凭证
参考 1.1.3.添加SonarQube凭证
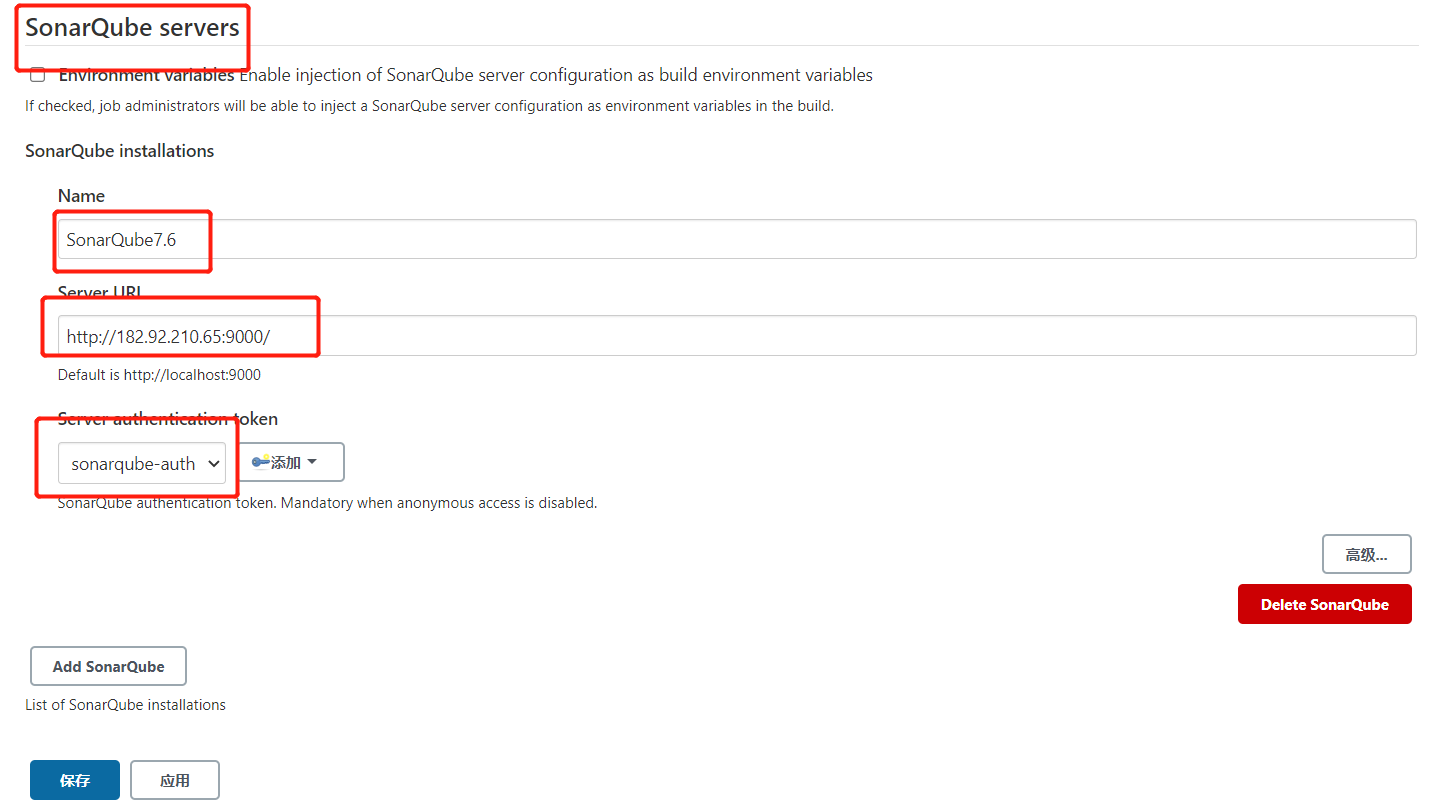
3.3.Jenkins进行SonarQube配置
Manage Jenkins->Configure System->SonarQube servers
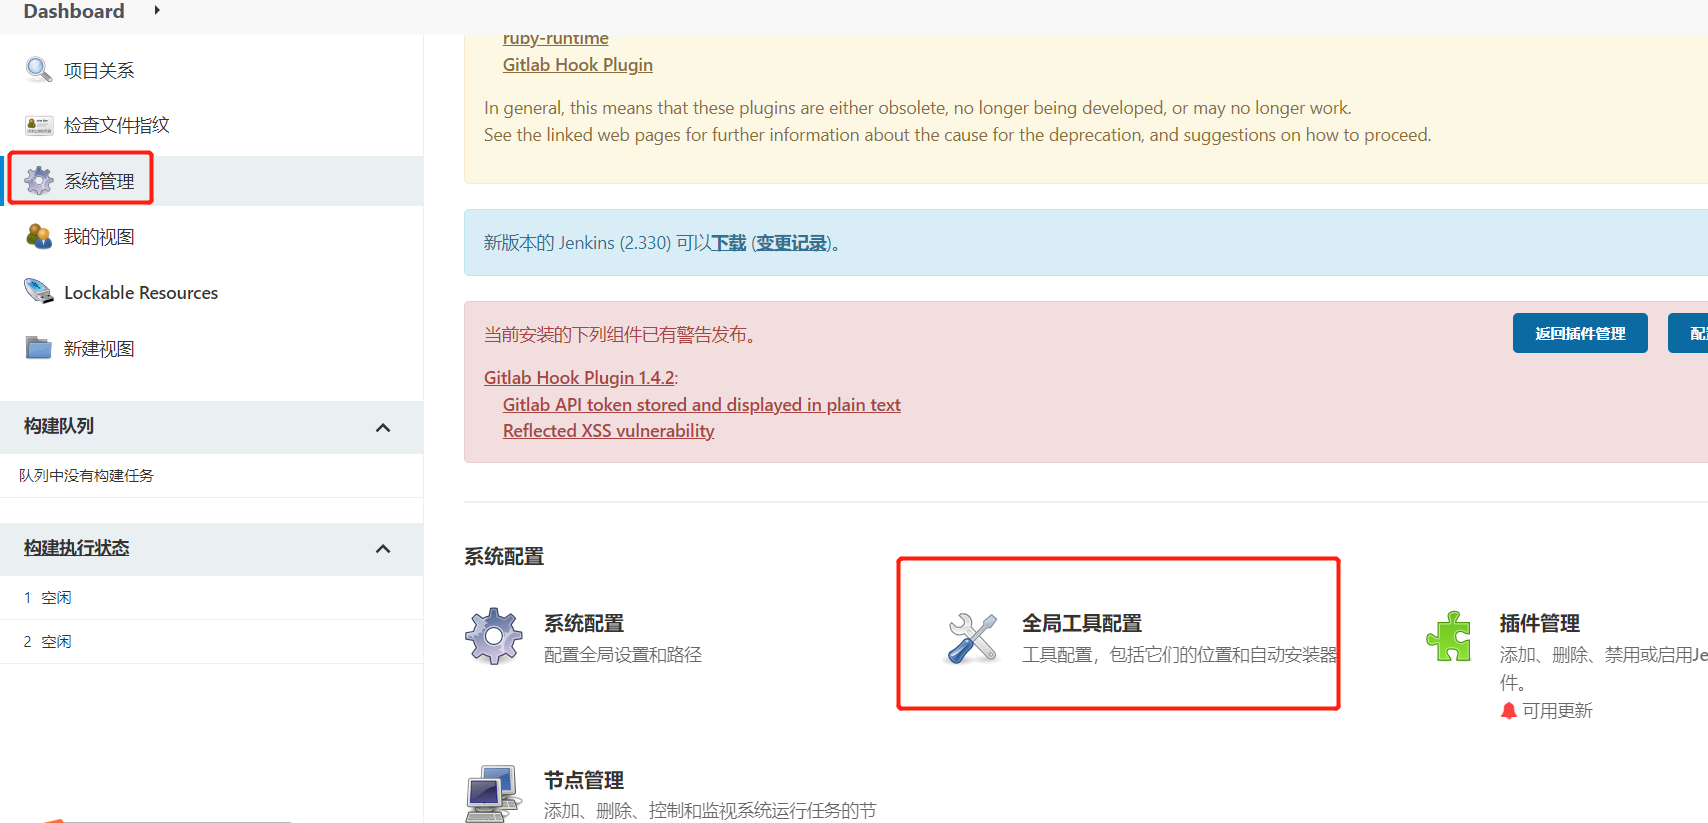
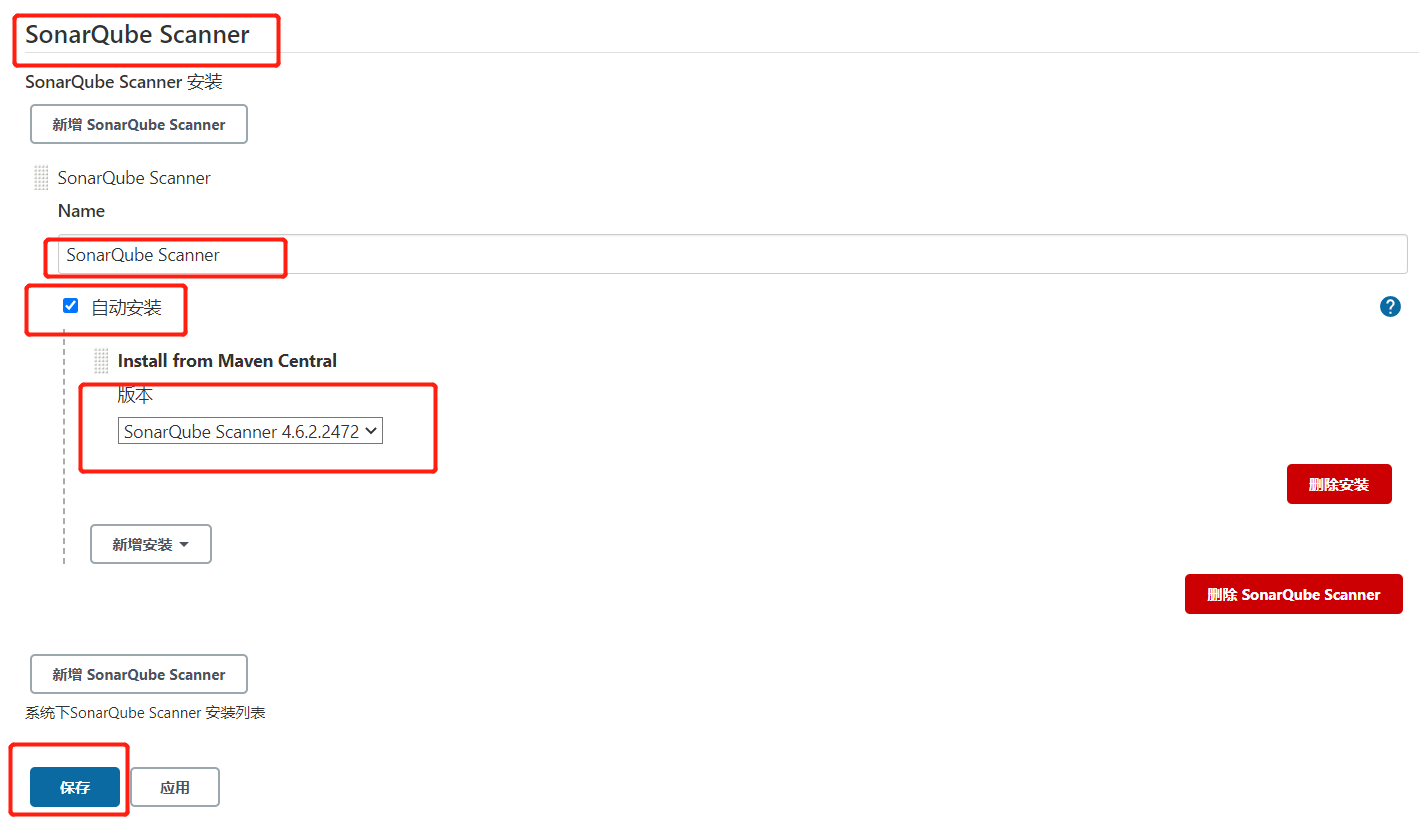
Manage Jenkins->Global Tool Configuration
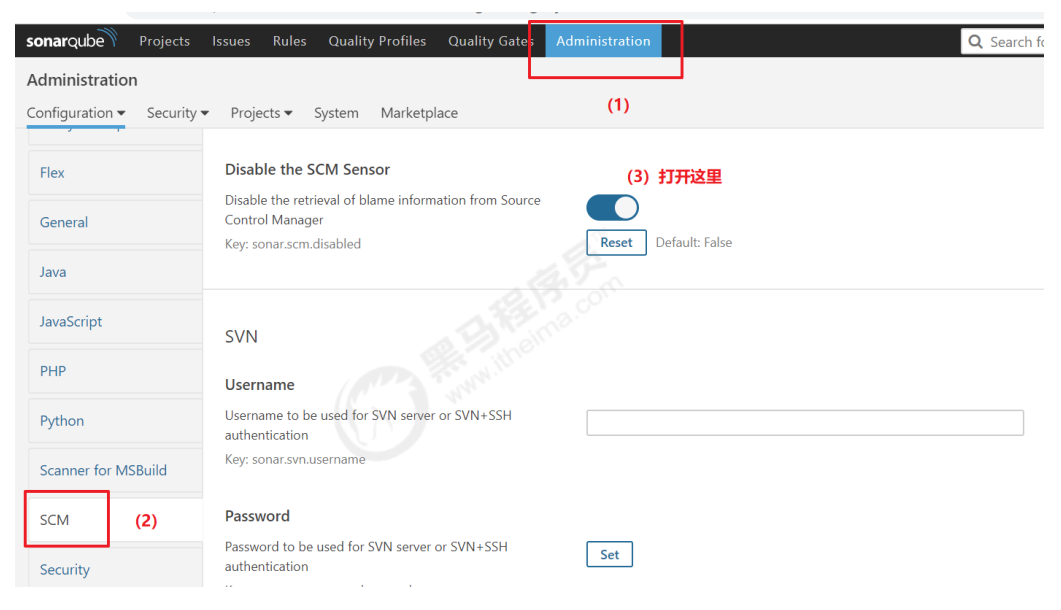
3.4.SonarQube关闭审查结果上传到SCM功能
4.Harbor
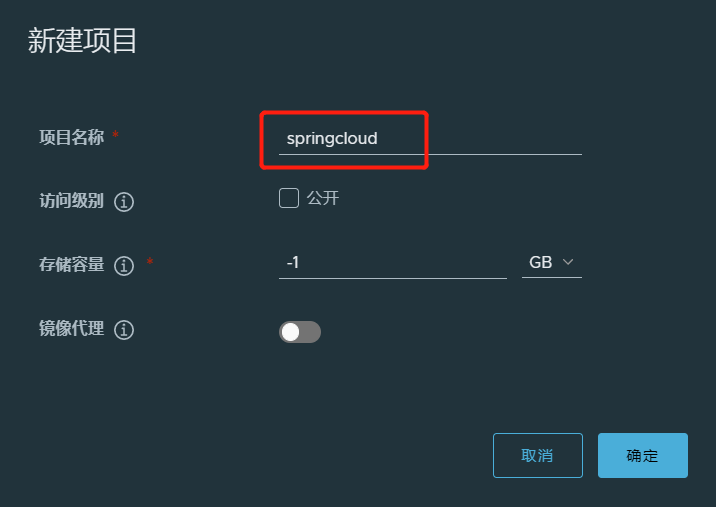
4.1.创建项目
4.2.创建用户
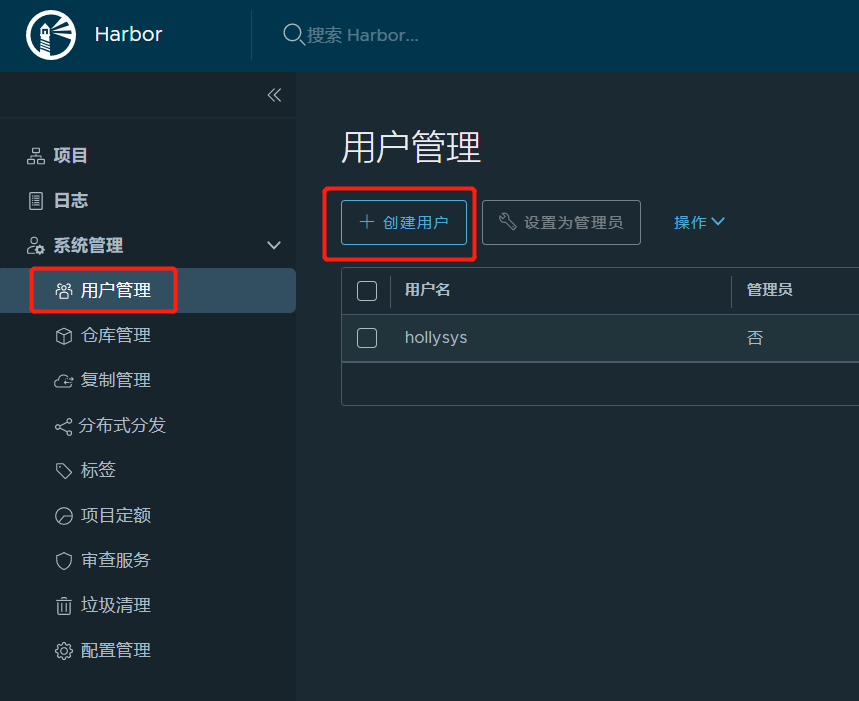
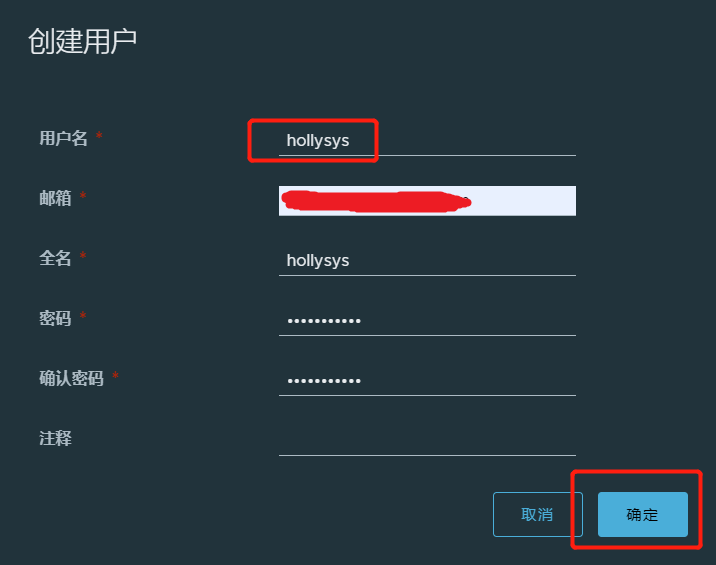
1
2
3
4
#  新建账号,此账号只能页面操作,可以分给各项目组使用

用户名:hollysys
密码:******
4.3.项目权限
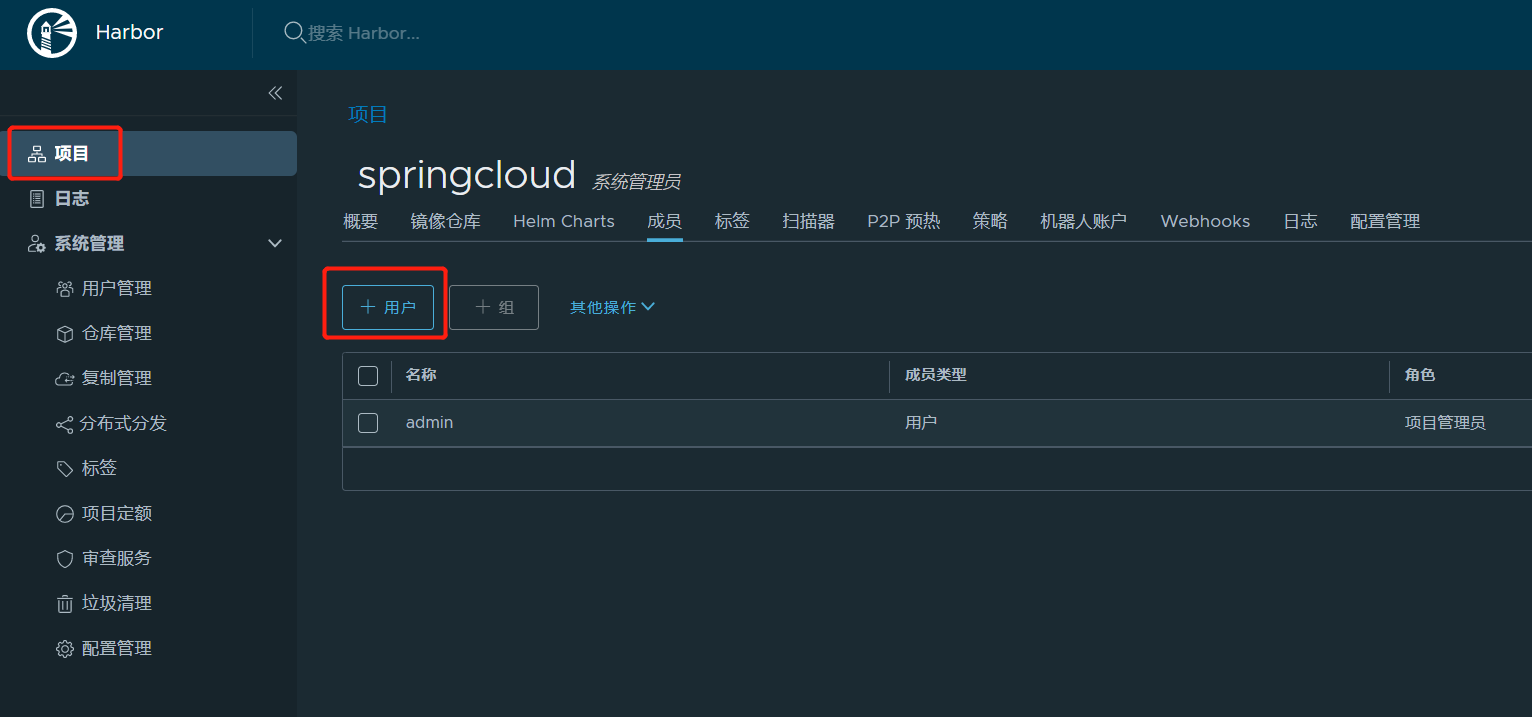
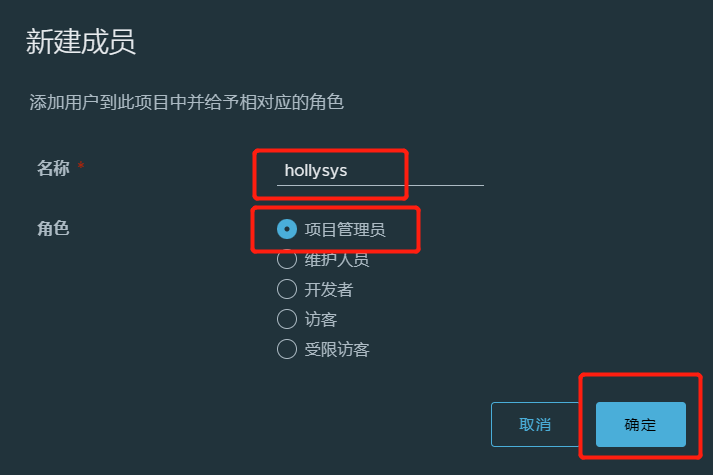
用户hollysys登录
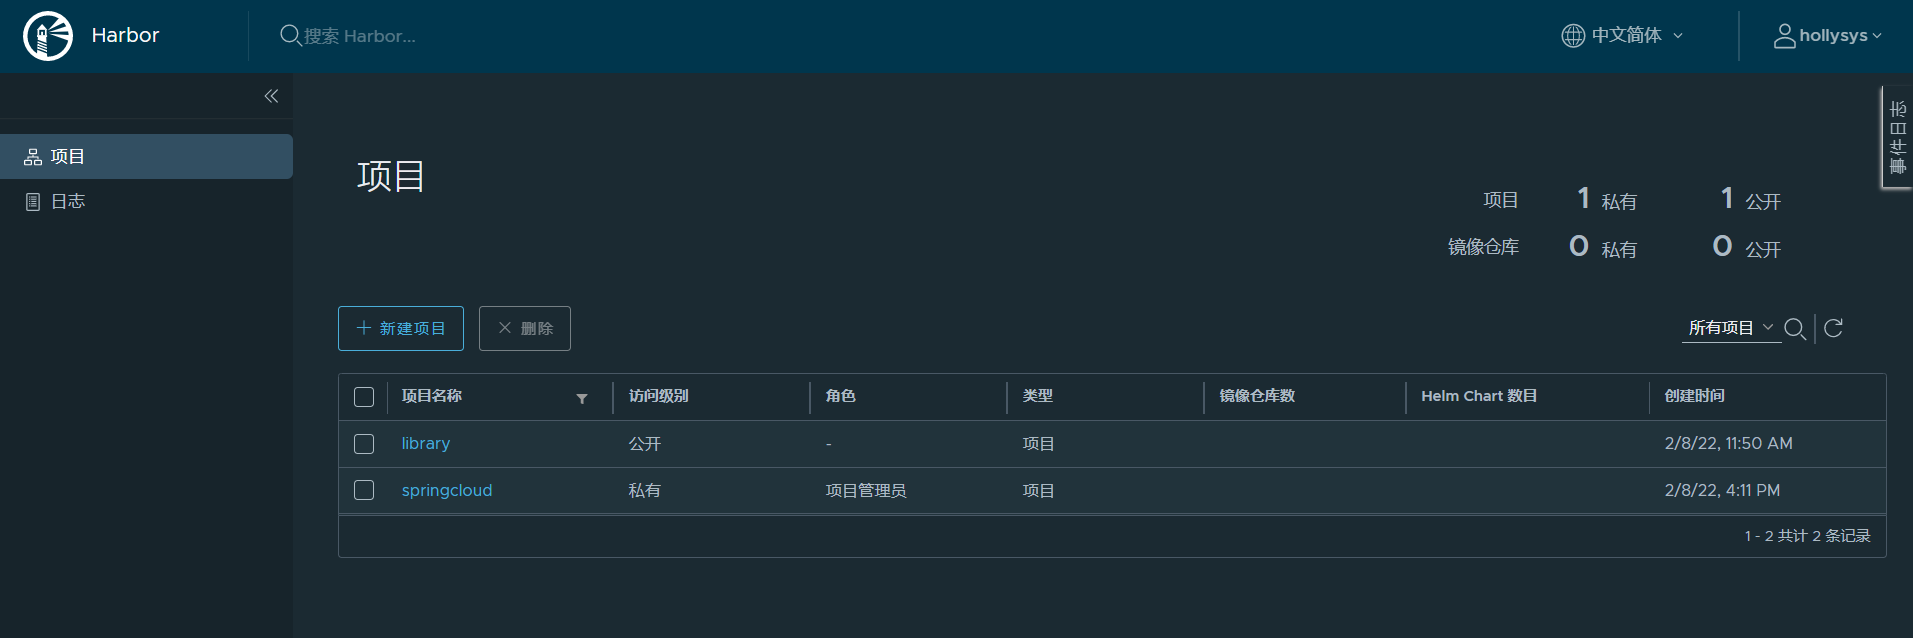
4.4.配置docker私有镜像源
devops节点配置docker私有镜像源
1
2
3
4
5
6
7
8
9
10
11
12
13
14
15
16
# 配置docker私有镜像源(172.51.216.88,172.51.216.89)

#把Harbor地址加入到Docker信任列表

vi /etc/docker/daemon.json
"insecure-registries": ["http://IP:端口"]

{
   "registry-mirrors": ["https://gcctk8ld.mirror.aliyuncs.com"],
   "insecure-registries": ["http://172.51.216.89:16888"]
}


#重启Docker
systemctl daemon-reload
systemctl restart docker
1
2
3
4
5
6
7
8
9
10
11
12
13
# 登陆harbor

# docker login -u 用户名 -p 密码 http://IP:端口
docker login -u admin -p admin http://172.51.216.89:16888

# 登出:
docker logout http://172.51.216.89:16888


# 外网地址:
http://172.51.216.89:16888
admin
******
5.SpringCloud
5.1.SpringCloud微服务源码
1.微服务项目结构
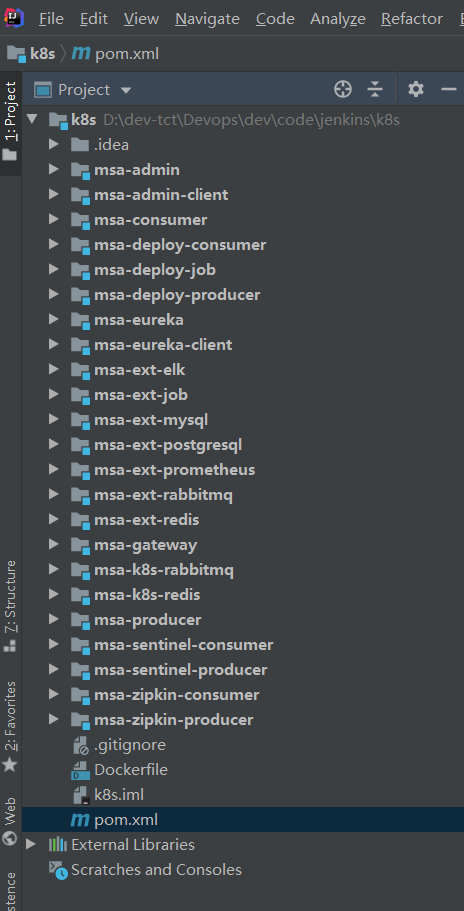
2.持续集成微服务
1
2
3
4
5
6
7
<!--  子模块  -->
<modules>
    <module>msa-eureka</module>
    <module>msa-gateway</module>
    <module>msa-deploy-producer</module>
    <module>msa-deploy-consumer</module>
</modules>
5.2.GitLab管理源码
1.GitLab平台创建项目
2.微服务源码上传GitLab仓库
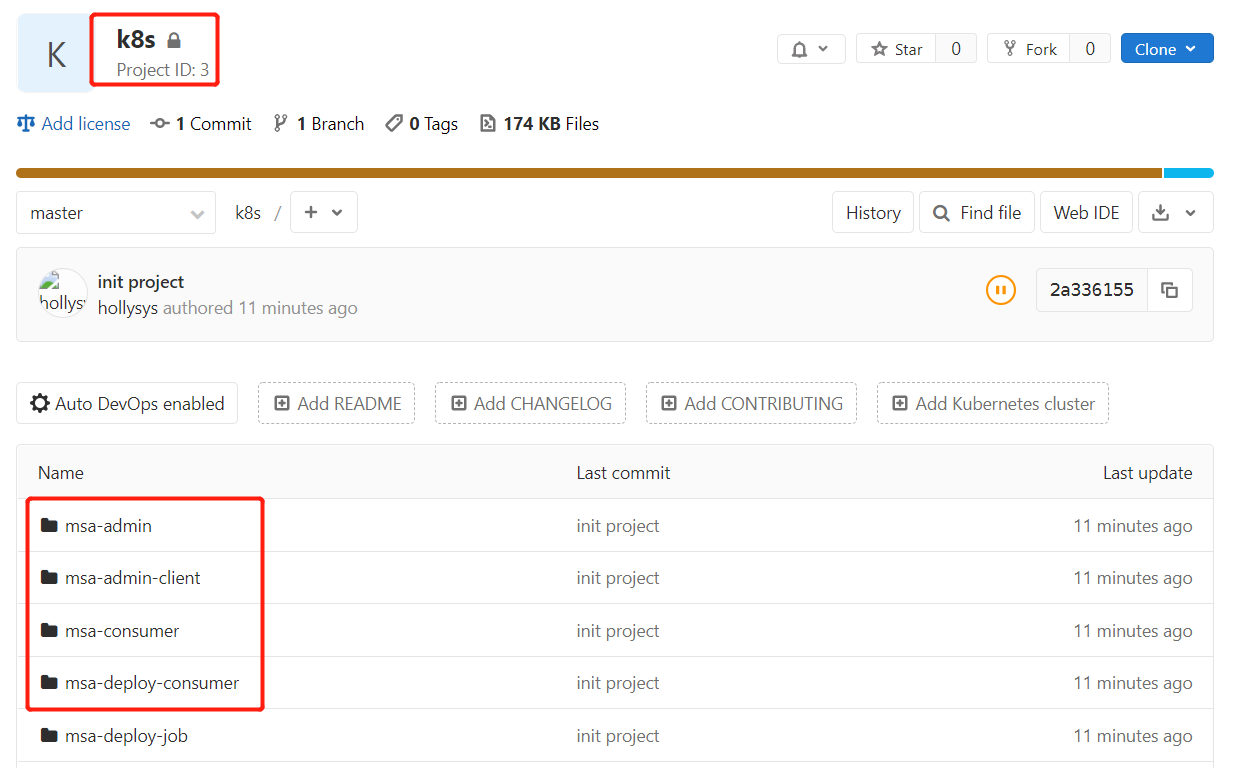
1
2
3
# 仓库地址

git@172.51.216.89:cicd-group/k8s.git
5.3.SonarQube代码审查
1.创建sonar-project.properties
每个项目的根目录下添加sonar-project.properties文件,上传GitLab仓库。
1
2
3
4
5
6
7
<!--  子模块  -->
<modules>
    <module>msa-eureka</module>
    <module>msa-gateway</module>
    <module>msa-deploy-producer</module>
    <module>msa-deploy-consumer</module>
</modules>
sonar-project.properties
1
2
3
4
5
6
7
8
9
10
11
12
13
14
15
16
17
18
# must be unique in a given SonarQube instance
sonar.projectKey=msa-eureka
# this is the name and version displayed in the SonarQube UI. Was mandatory prior to SonarQube 6.1.
sonar.projectName=msa-eureka
sonar.projectVersion=1.0

# Path is relative to the sonar-project.properties file. Replace "\" by "/" on Windows.
# This property is optional if sonar.modules is set.
sonar.sources=.
sonar.exclusions=**/test/**,**/target/**
sonar.java.binaries=.

sonar.java.source=1.8
sonar.java.target=1.8
#sonar.java.libraries=**/target/classes/**

# Encoding of the source code. Default is default system encoding
sonar.sourceEncoding=UTF-8
注意不同项目名称!
2.修改Jenkinsfile构建脚本
1
2
3
4
5
6
7
8
9
10
11
12
13
14
15
16
17
18
19
20
21
22
23
24
25
26
27
28
29
30
31
32
33
//gitlab的凭证
def git_auth = "68f2087f-a034-4d39-a9ff-1f776dd3dfa8"


pipeline {
    agent any

    stages {

        stage('拉取源码') {
            steps {
                checkout([$class: 'GitSCM', branches: [[name: '*/master']], extensions: [], userRemoteConfigs: [[credentialsId: "${git_auth}", url: 'git@39.96.178.134:test-group/k8s.git']]])
            }
        }

        stage('code checking') {
            steps {
                script {
                    //引入SonarQubeScanner工具
                    scannerHome = tool 'SonarQube-Scanner'
                }
                //引入SonarQube的服务器环境
                withSonarQubeEnv('SonarQube7.6') {
                     sh """
                         cd ${project_name}
                         ${scannerHome}/bin/sonar-scanner
                     """
                }
            }
        }

    }
}
5.4.Docker
使用Dockerfile编译、生成镜像,利用dockerfile-maven-plugin插件构建Docker镜像。
1.在每个微服务项目的pom.xml加入dockerfile-maven-plugin插件
1
2
3
4
5
6
7
8
9
10
11
12
13
14
15
16
17
18
19
20
21
22
23
24
    <build>
        <plugins>
            <plugin>
                <groupId>org.springframework.boot</groupId>
                <artifactId>spring-boot-maven-plugin</artifactId>
            </plugin>


            <plugin>
                <groupId>com.spotify</groupId>
                <artifactId>dockerfile-maven-plugin</artifactId>
                <version>1.3.6</version>
                <configuration>
                    <repository>${project.artifactId}</repository>
                    <tag>${project.version}</tag>
                    <buildArgs>
                        <JAR_FILE>target/${project.build.finalName}.jar</JAR_FILE>
                    </buildArgs>
                </configuration>
            </plugin>


        </plugins>
    </build>
2.在每个微服务项目根目录下建立Dockerfile文件
Dockerfile
1
2
3
4
5
6
7
8
9
10
11
12
13
14
15
FROM openjdk:8-jdk-alpine

VOLUME /temp

ENV JVM_OPS="-Xms256m -Xmx256m -XX:PermSize=512M -XX:MaxPermSize=512m"

ENV JAVA_POS=""

ARG JAR_FILE
COPY ${JAR_FILE} app.jar

ENTRYPOINT java -Djava.security.egd=file:/dev/./urandom -jar ${JVM_OPS} ${ACTIVE} app.jar ${JAVA_OPS}

ENV TZ=Asia/Shanghai
RUN ln -snf /usr/share/zoneinfo/$TZ /etc/localtime && echo $TZ > /etc/timezone
3.修改Jenkinsfile构建脚本
1
2
3
4
5
6
7
8
9
10
11
12
13
14
15
16
17
18
19
20
21
22
23
24
25
26
27
28
29
30
31
32
33
34
35
36
37
38
39
40
41
42
43
44
45
46
47
48
49
50
51
52
53
//gitlab的凭证
def git_auth = "68f2087f-a034-4d39-a9ff-1f776dd3dfa8"
//构建版本的名称
def tag = "latest"
//定义镜像名称
def imageName = "${project_name}:${tag}"


pipeline {
    agent any

    stages {

        stage('拉取源码') {
            steps {
                checkout([$class: 'GitSCM', branches: [[name: '*/master']], extensions: [], userRemoteConfigs: [[credentialsId: "${git_auth}", url: 'git@39.96.178.134:test-group/k8s.git']]])
            }
        }

        stage('代码审查') {
            steps {
                script {
                    //引入SonarQubeScanner工具
                    scannerHome = tool 'SonarQube-Scanner'
                }
                //引入SonarQube的服务器环境
                withSonarQubeEnv('SonarQube7.6') {
                     sh """
                         cd ${project_name}
                         ${scannerHome}/bin/sonar-scanner
                     """
                }
            }
        }

        stage('编译,安装公共子工程') {
            steps {
                 echo '编译,安装公共子工程'
                //编译,安装公共工程
                // sh "mvn -f tensquare_common clean install"
            }
        }

        stage('编译,构建微服务镜像') {
            steps {

                //编译,构建本地镜像
                sh "mvn -f ${project_name} clean package dockerfile:build"
            }
        }

    }
}
三、生产CI流水线
1.流水线设计
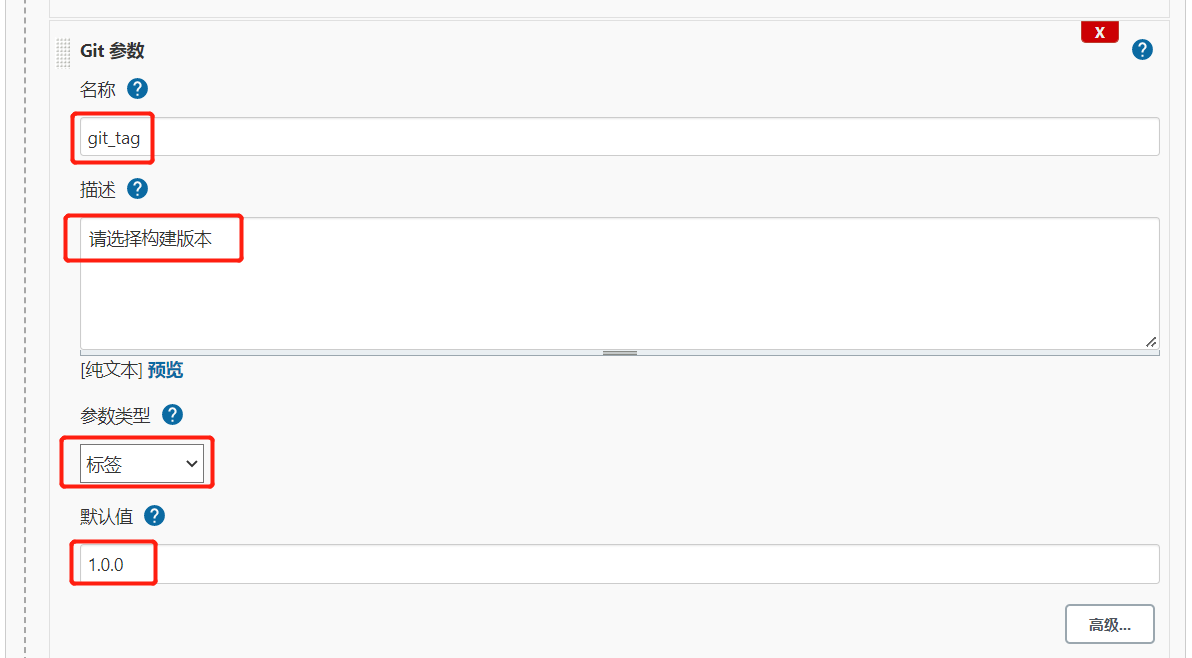
- 流水线构建生产环境镜像,上传的Harbor镜像仓库
- 从master分支构建镜像,使用master分支tag作为标签构建镜像
- 构建的微服务项目可以动态选择
- GitLab版本可直接选择
- 容器标签可动态设置,尽量与GitLab版本一致
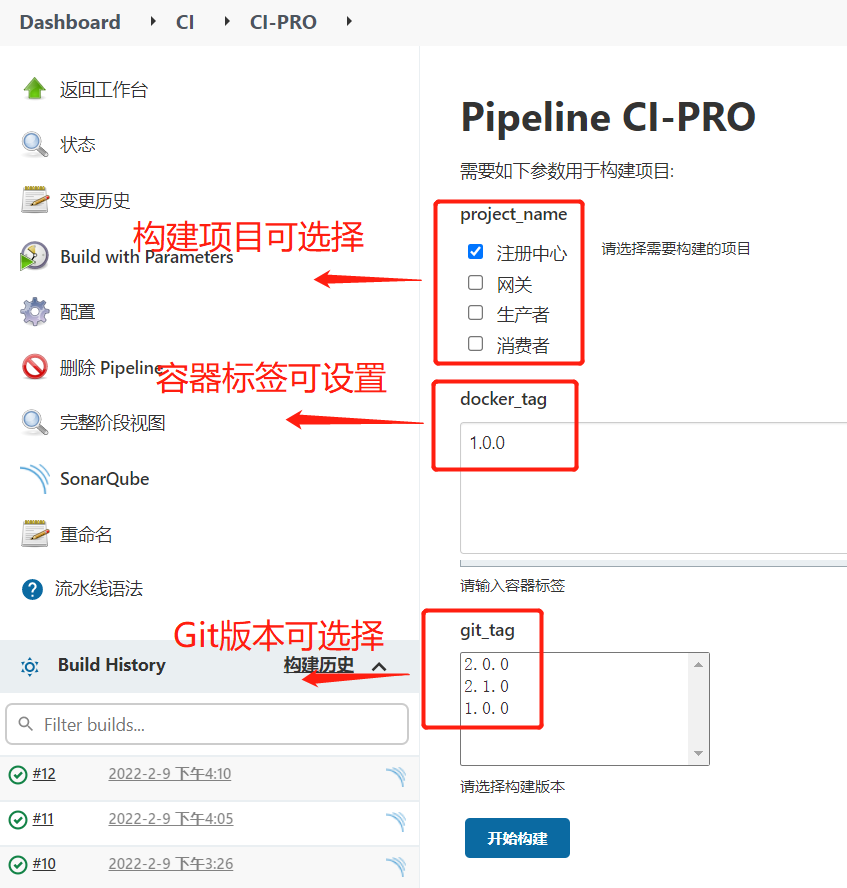
2.创建流水线项目
1.创建项目
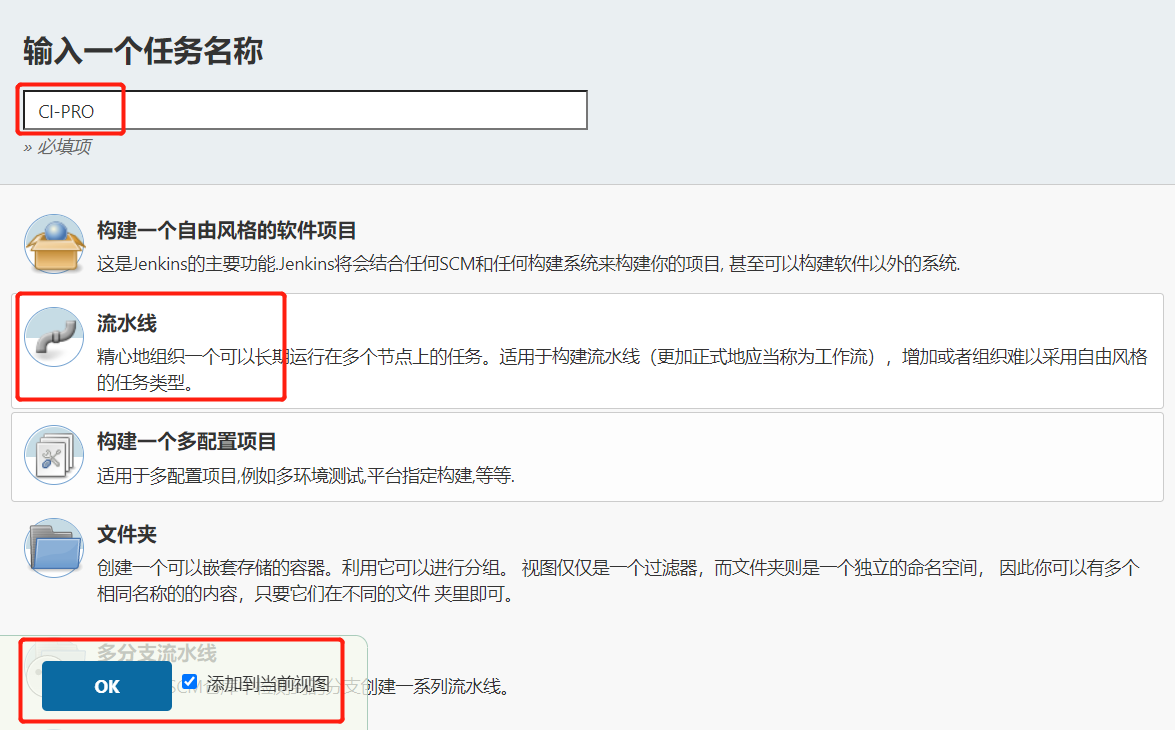
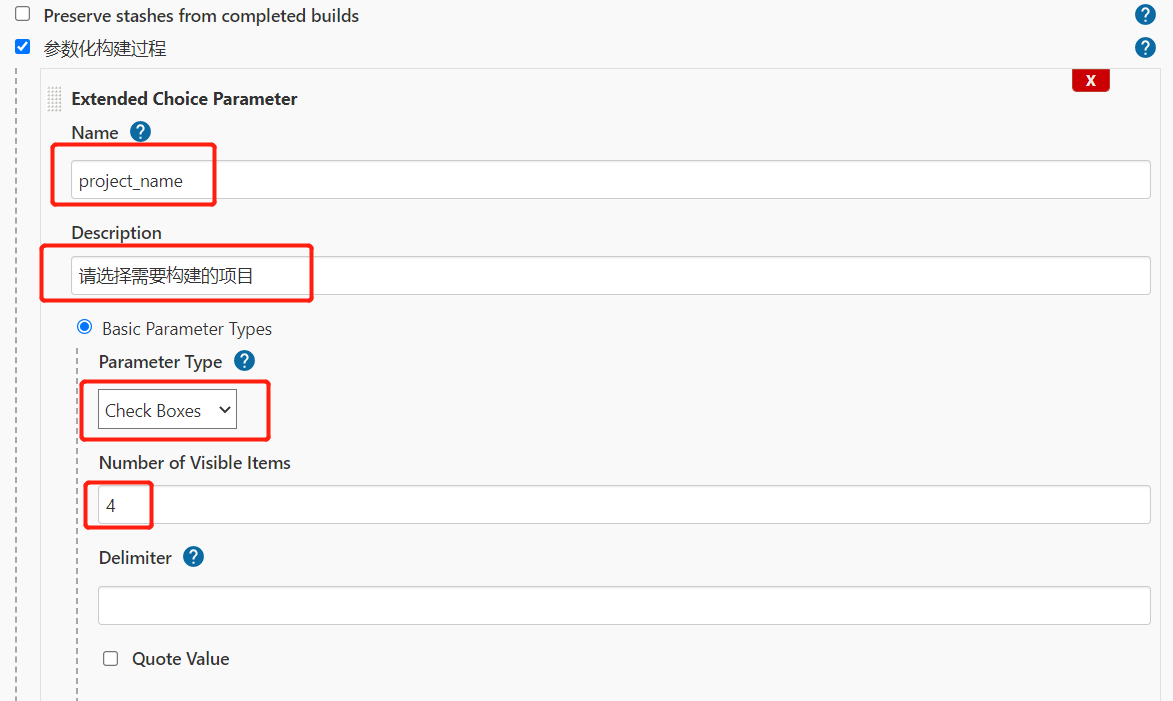
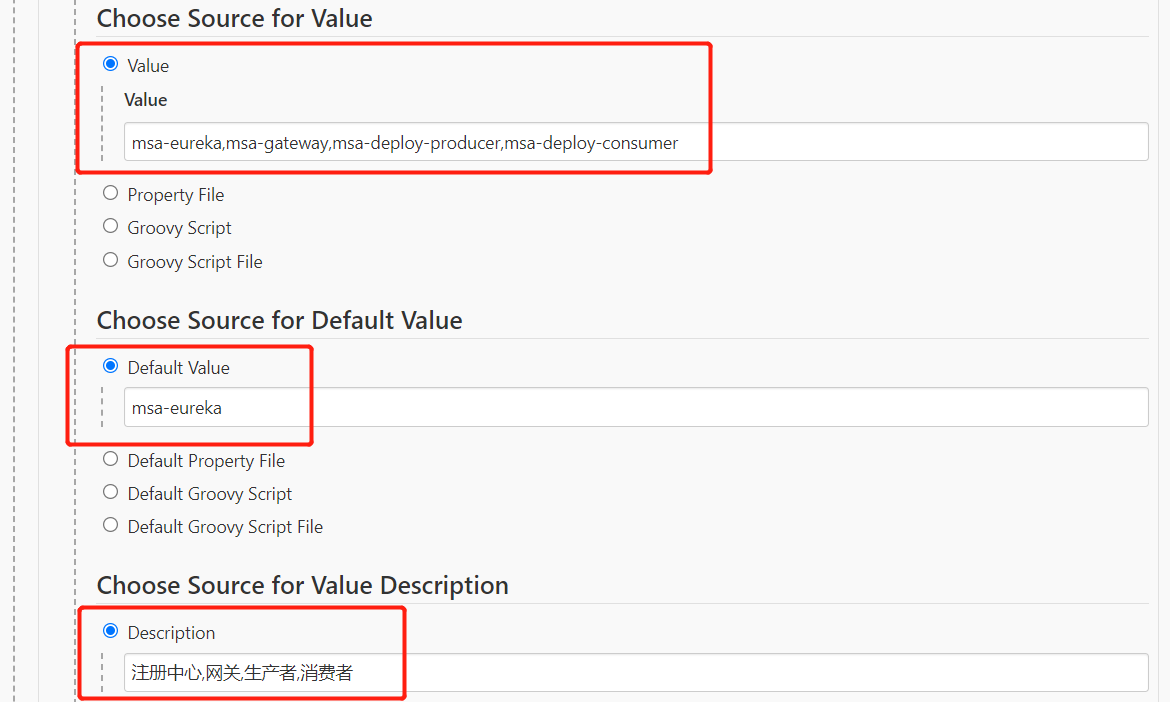
2.配置项目选择参数
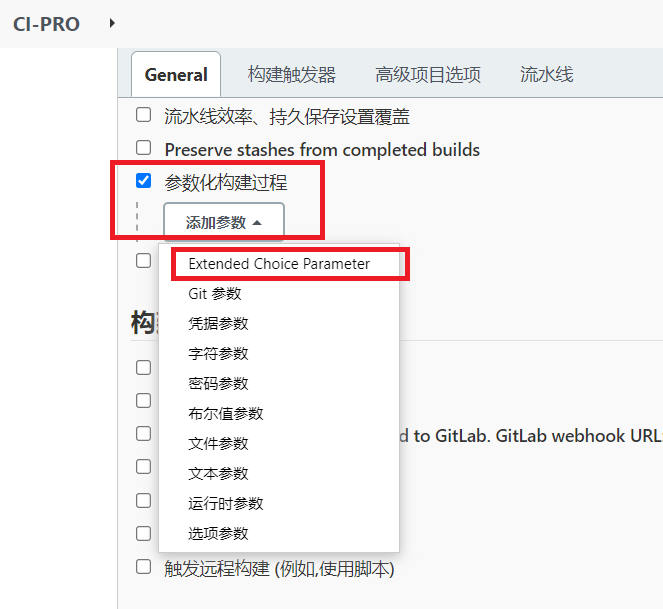
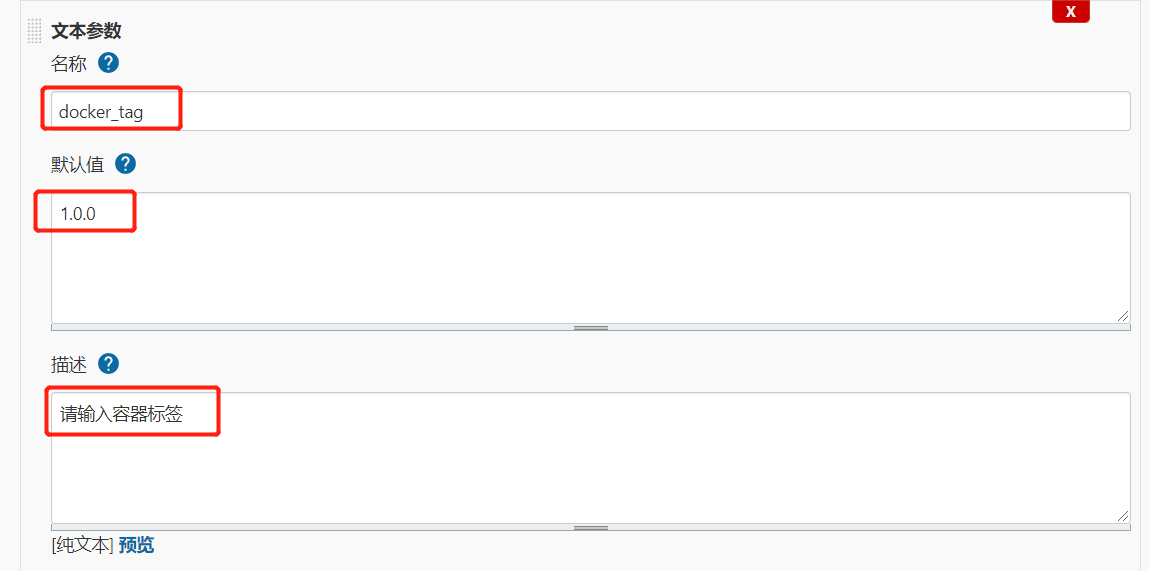
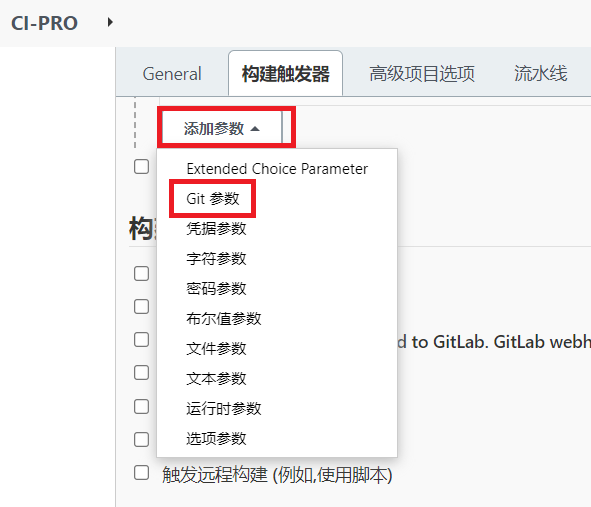
3.配置容器标签参数
4.配置Git参数
5.配置Pipeline
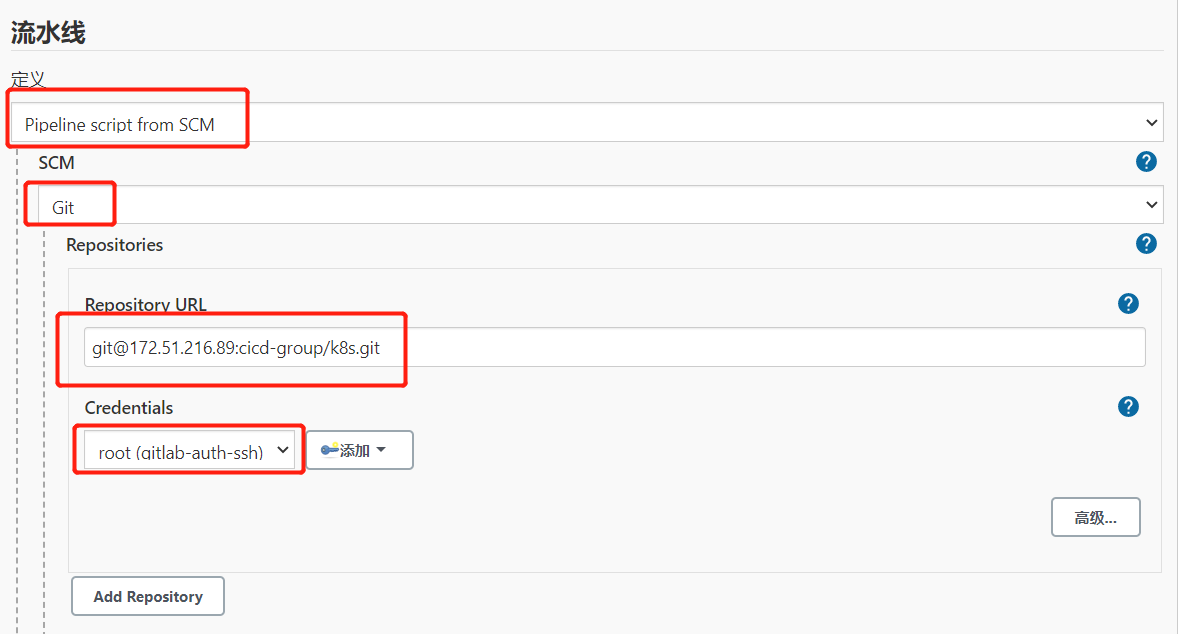
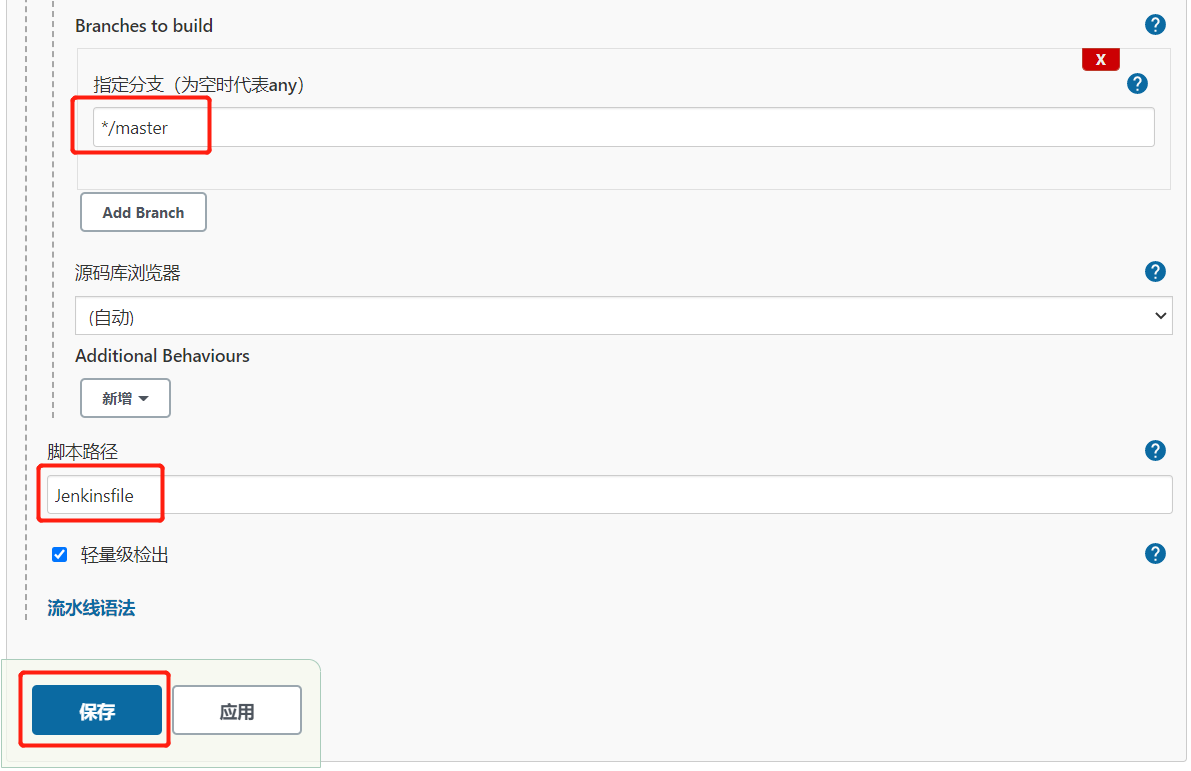
3.Jenkinsfile构建脚本
Jenkinsfile构建脚本
1
2
3
4
5
6
7
8
9
10
11
12
13
14
15
16
17
18
19
20
21
22
23
24
25
26
27
28
29
30
31
32
33
34
35
36
37
38
39
40
41
42
43
44
45
46
47
48
49
50
51
52
53
54
55
56
57
58
59
60
61
62
63
64
65
66
67
68
69
70
71
72
73
74
75
76
77
78
79
80
81
82
83
84
85
86
87
88
89
90
91
92

//gitlab的凭证
def git_auth = "187cbba0-9691-4d60-aa50-34f0af93ee8c"

//构建版本的名称
def build_tag = "latest"

//阿里云镜像仓库地址
def harbor_url = "172.51.216.89:16888"

//镜像库项目名称
def harbor_project = "springcloud"

//Harbor的登录凭证ID
def harbor_auth = "00d513fc-38be-46b3-8e59-630ab4eb4044"


node {

    //获取当前选择的项目名称数组
    def selectedProjectNames = "${project_name}".split(",")


    stage('拉取源码') {
        checkout([$class: 'GitSCM', branches: [[name: 'refs/tags/${git_tag}']], extensions: [], userRemoteConfigs: [[credentialsId: "${git_auth}", url: 'git@172.51.216.89:cicd-group/k8s.git']]])
    }

    stage('代码审查') {
        for(int i=0;i<selectedProjectNames.length;i++){

            //当前遍历的项目名称
            def currentProjectName = selectedProjectNames[i];

            //定义当前Jenkins的SonarQubeScanner工具
            def scannerHome = tool 'SonarQube-Scanner'

            //引用当前JenkinsSonarQube环境
            withSonarQubeEnv('SonarQube7.6') {
                sh """
                    cd ${currentProjectName}
                    ${scannerHome}/bin/sonar-scanner
                """
            }
        }
    }

    stage('编译,安装公共子工程') {
        sh "echo 编译,安装公共子工程"

        //编译,安装公共工程
        // sh "mvn -f tensquare_common clean install"
    }

    stage('编译,构建镜像,上传镜像') {
        for(int i=0;i<selectedProjectNames.length;i++){

            //当前遍历的项目名称
            def currentProjectName = selectedProjectNames[i];

            //编译,构建本地镜像
            sh "mvn -f ${currentProjectName} clean package dockerfile:build"

            //本地镜像名称
            def buildImageName = "${currentProjectName}:${build_tag}"

            //推送镜像名称
            def pushImageName = "${currentProjectName}:${docker_tag}"

            //对镜像打上标签
            sh "docker tag ${buildImageName} ${harbor_url}/${harbor_project}/${pushImageName}"

            //把镜像推送到Harbor
            withCredentials([usernamePassword(credentialsId: "${harbor_auth}", passwordVariable: 'password', usernameVariable: 'username')]) {

                //登录镜像仓库
                sh "docker login -u ${username} -p ${password} ${harbor_url}"

                //上传镜像
                sh "docker push ${harbor_url}/${harbor_project}/${pushImageName}"

                sh "echo 镜像上传成功"
            }

            //删除本地镜像
            sh """
                docker rmi ${buildImageName}
                docker rmi ${harbor_url}/${harbor_project}/${pushImageName}
            """
        }
    }

}
使用明文登录Harbor
1
2
3
4
5
6
7
8
9
10
11
12
13
14
15
16
17
18
19
20
21
22
23
24
25
26
27
28
29
30
31
32
33
34
35
36
37
38
39
40
41
42
43
44
45
46
47
48
49
50
51
52
53
54
55
56
57
58
59
60
61
62
63
64
65
66
67
68
69
70
71
72
73
74
75
76
77
78
79
80

//gitlab的凭证
def git_auth = "187cbba0-9691-4d60-aa50-34f0af93ee8c"

//构建版本的名称
def build_tag = "latest"

//镜像仓库地址
def harbor_url = "172.51.216.89:16888"

//镜像库项目名称
def harbor_project = "springcloud"


node {

    //获取当前选择的项目名称数组
    def selectedProjectNames = "${project_name}".split(",")


    stage('拉取源码') {
        checkout([$class: 'GitSCM', branches: [[name: 'refs/tags/${git_tag}']], extensions: [], userRemoteConfigs: [[credentialsId: "${git_auth}", url: 'git@172.51.216.89:cicd-group/k8s.git']]])
    }

    stage('代码审查') {
        for(int i=0;i<selectedProjectNames.length;i++){
            //当前遍历的项目名称
            def currentProjectName = selectedProjectNames[i];

            //定义当前Jenkins的SonarQubeScanner工具
            def scannerHome = tool 'SonarQube-Scanner'
            //引用当前JenkinsSonarQube环境
            withSonarQubeEnv('SonarQube7.6') {
                sh """
                    cd ${currentProjectName}
                    ${scannerHome}/bin/sonar-scanner
                """
            }
        }
    }

    stage('编译,安装公共子工程') {
        sh "echo 编译,安装公共子工程"

        //编译,安装公共工程
        // sh "mvn -f tensquare_common clean install"
    }

    stage('编译,构建镜像,上传镜像') {
        for(int i=0;i<selectedProjectNames.length;i++){

            //当前遍历的项目名称
            def currentProjectName = selectedProjectNames[i];

            //编译,构建本地镜像
            sh "mvn -f ${currentProjectName} clean package dockerfile:build"

            //本地镜像名称
            def buildImageName = "${currentProjectName}:${build_tag}"
            //推送镜像名称
            def pushImageName = "${currentProjectName}:${docker_tag}"

            //对镜像打上标签
            sh "docker tag ${buildImageName} ${harbor_url}/${harbor_project}/${pushImageName}"

            //登录Harbor镜像仓库
            sh "docker login -u admin -p admin  ${harbor_url}"

            //上传镜像
            sh "docker push ${harbor_url}/${harbor_project}/${pushImageName}"

            //删除本地镜像
            sh """
                docker rmi ${buildImageName}
                docker rmi ${harbor_url}/${harbor_project}/${pushImageName}
            """
        }
    }

}
4.构建项目
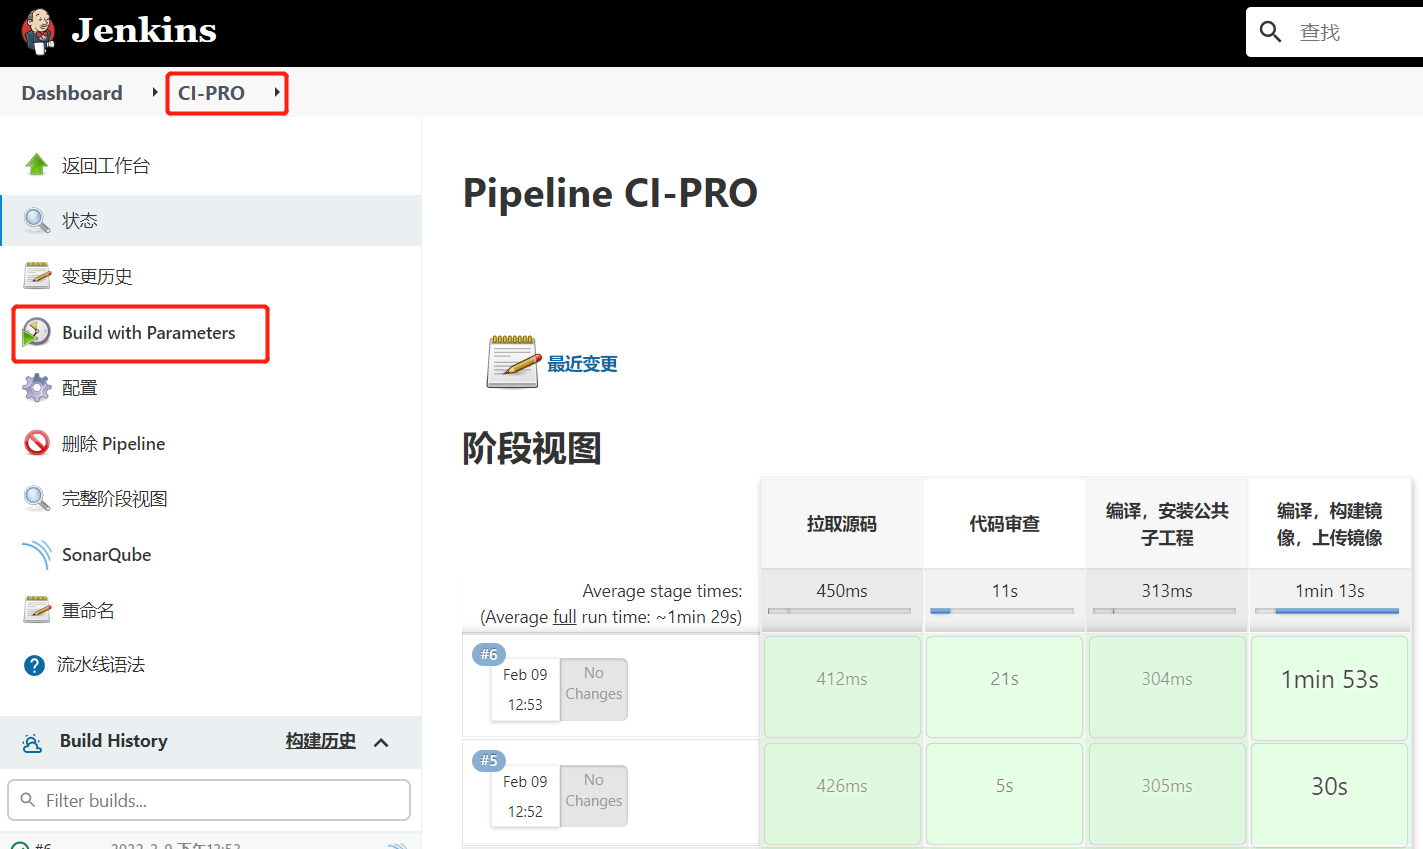
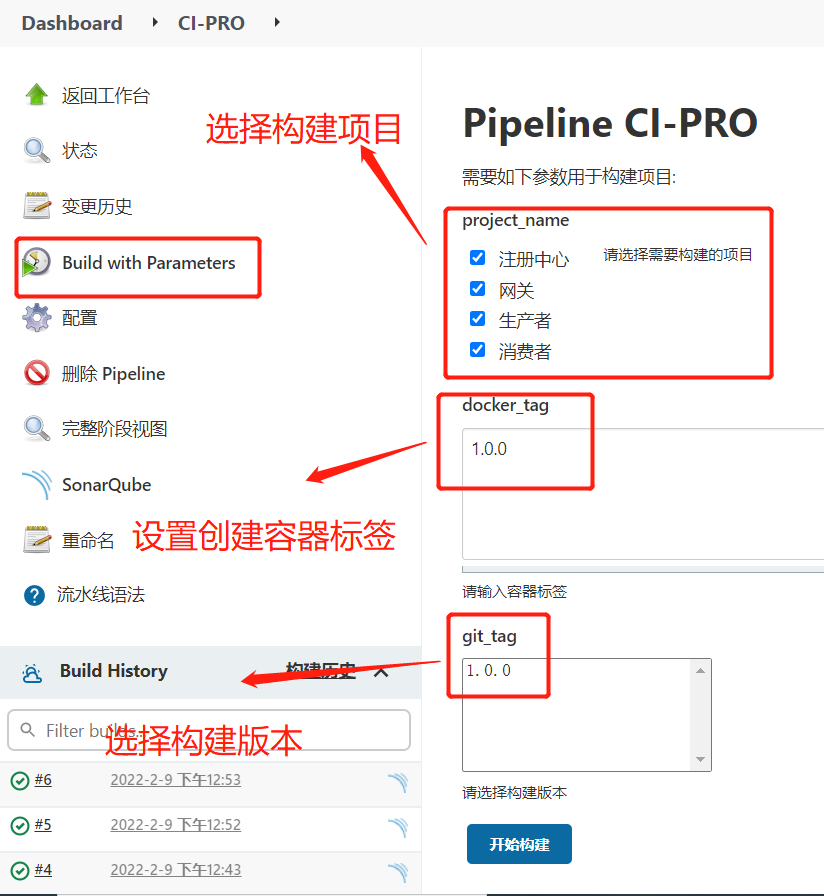
查看/var/lib/jenkins/workspace/目录,发现已经从Gitlab成功拉取了代码到Jenkins中。
1
2
3
4
5
6
7
8
9
10
11
12
13
14
15
16
17
18
19
20
21
22
23
24
25
26
27
28
29
30
31
32
33
34
35
36
37
[root@localhost ~]# cd /var/lib/jenkins/workspace/
[root@localhost workspace]# ll
total 4
drwxr-xr-x 26 root root 4096 Feb  9 12:11 CI-PRO
drwxr-xr-x  2 root root    6 Feb  9 12:55 CI-PRO@tmp


[root@localhost workspace]# cd CI-PRO
[root@localhost CI-PRO]# ll
total 16
-rw-r--r-- 1 root root 1131 Feb  9 12:11 deploy.sh
-rw-r--r-- 1 root root  719 Feb  9 12:11 Dockerfile
-rw-r--r-- 1 root root 2468 Feb  9 12:11 Jenkinsfile
drwxr-xr-x 3 root root   50 Feb  9 12:11 msa-admin
drwxr-xr-x 3 root root   50 Feb  9 12:11 msa-admin-client
drwxr-xr-x 3 root root   50 Feb  9 12:11 msa-consumer
drwxr-xr-x 5 root root  134 Feb  9 12:55 msa-deploy-consumer
drwxr-xr-x 3 root root   32 Feb  9 12:11 msa-deploy-job
drwxr-xr-x 5 root root  134 Feb  9 12:55 msa-deploy-producer
drwxr-xr-x 5 root root  156 Feb  9 12:53 msa-eureka
drwxr-xr-x 3 root root   68 Feb  9 12:11 msa-eureka-client
drwxr-xr-x 3 root root   50 Feb  9 12:11 msa-ext-elk
drwxr-xr-x 3 root root   50 Feb  9 12:11 msa-ext-job
drwxr-xr-x 3 root root   71 Feb  9 12:11 msa-ext-mysql
drwxr-xr-x 3 root root   71 Feb  9 12:11 msa-ext-postgresql
drwxr-xr-x 3 root root   50 Feb  9 12:11 msa-ext-prometheus
drwxr-xr-x 3 root root   50 Feb  9 12:11 msa-ext-rabbitmq
drwxr-xr-x 3 root root   50 Feb  9 12:11 msa-ext-redis
drwxr-xr-x 5 root root  134 Feb  9 12:54 msa-gateway
drwxr-xr-x 3 root root   50 Feb  9 12:11 msa-k8s-rabbitmq
drwxr-xr-x 3 root root   50 Feb  9 12:11 msa-k8s-redis
drwxr-xr-x 3 root root   50 Feb  9 12:11 msa-producer
drwxr-xr-x 3 root root   50 Feb  9 12:11 msa-sentinel-consumer
drwxr-xr-x 3 root root   50 Feb  9 12:11 msa-sentinel-producer
drwxr-xr-x 3 root root   50 Feb  9 12:11 msa-zipkin-consumer
drwxr-xr-x 3 root root   50 Feb  9 12:11 msa-zipkin-producer
-rw-r--r-- 1 root root 3442 Feb  9 12:11 pom.xml
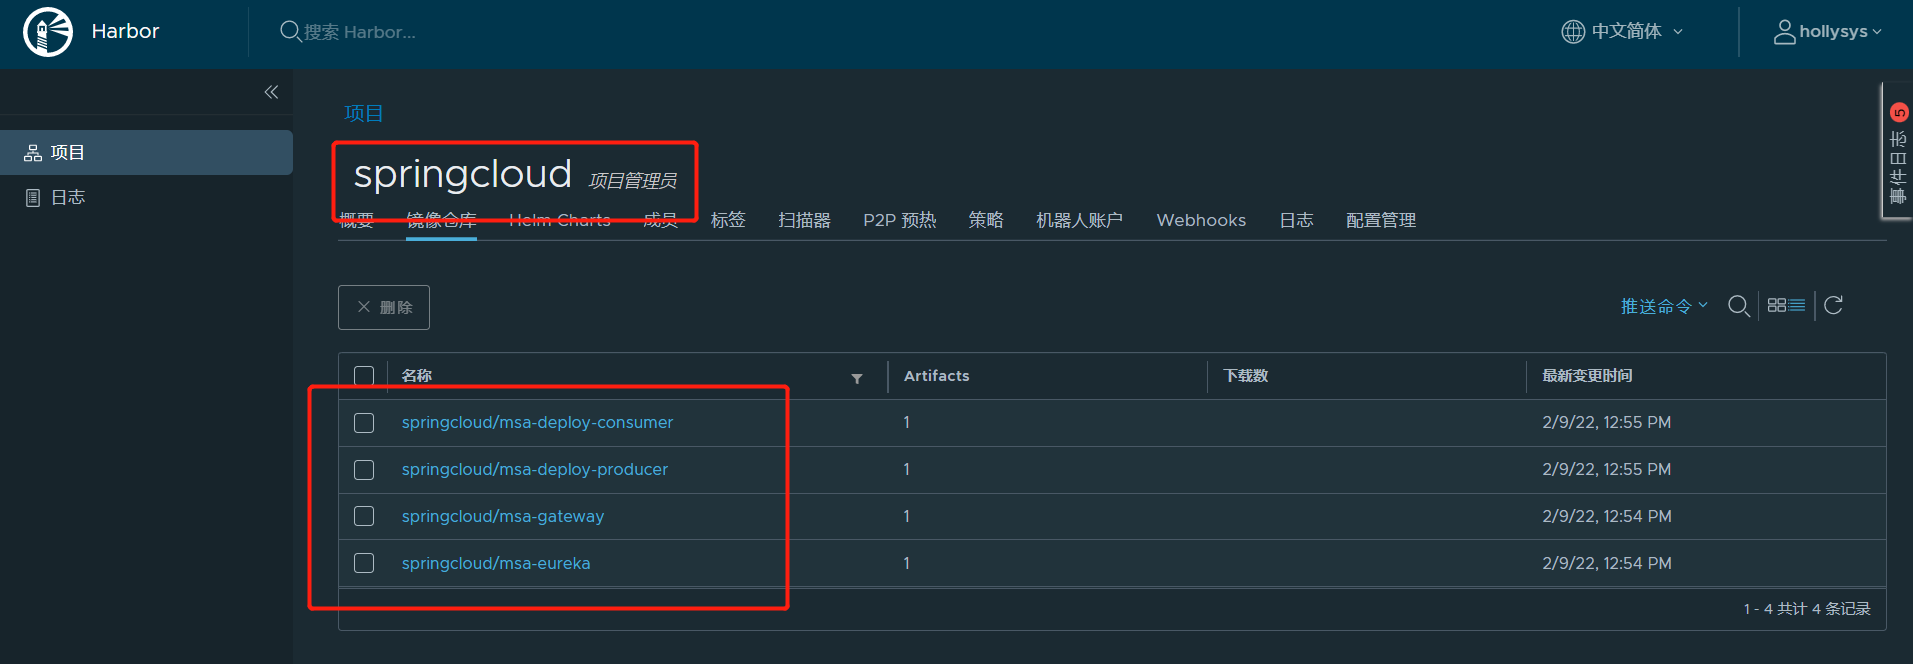
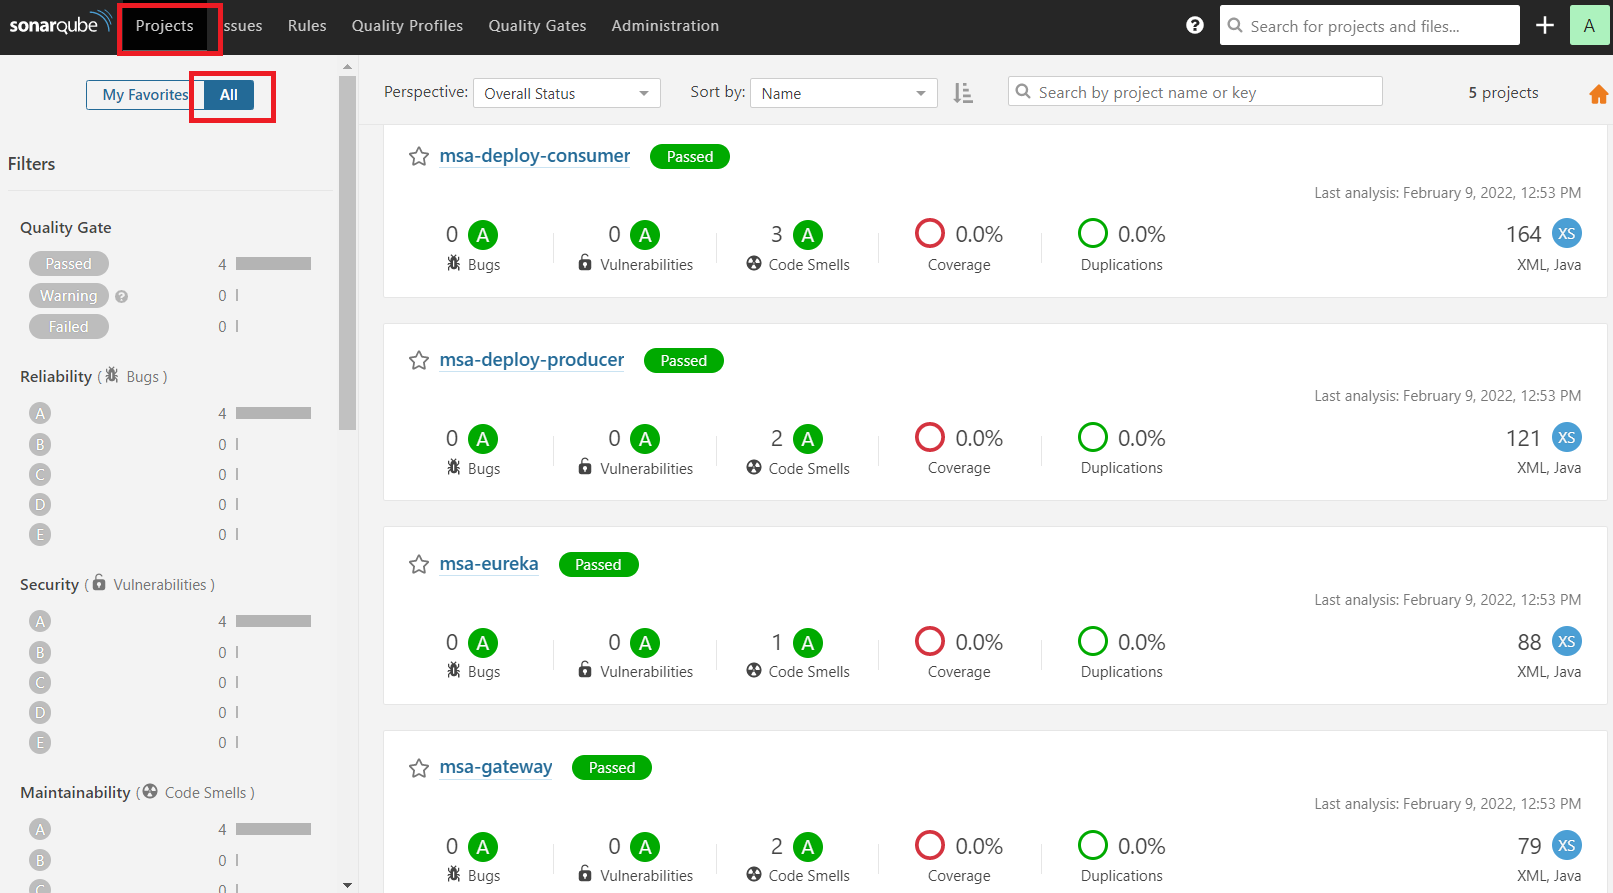
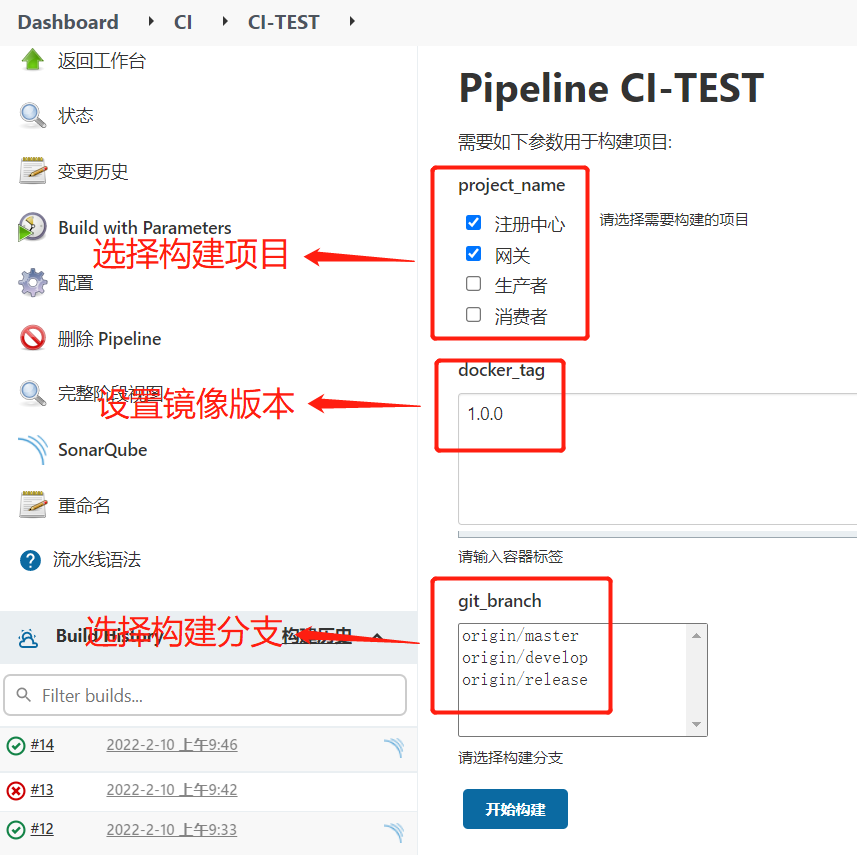
四、测试CI流水线
1.流水线设计
- 流水线构建非生产环境镜像,上传的Harbor镜像仓库
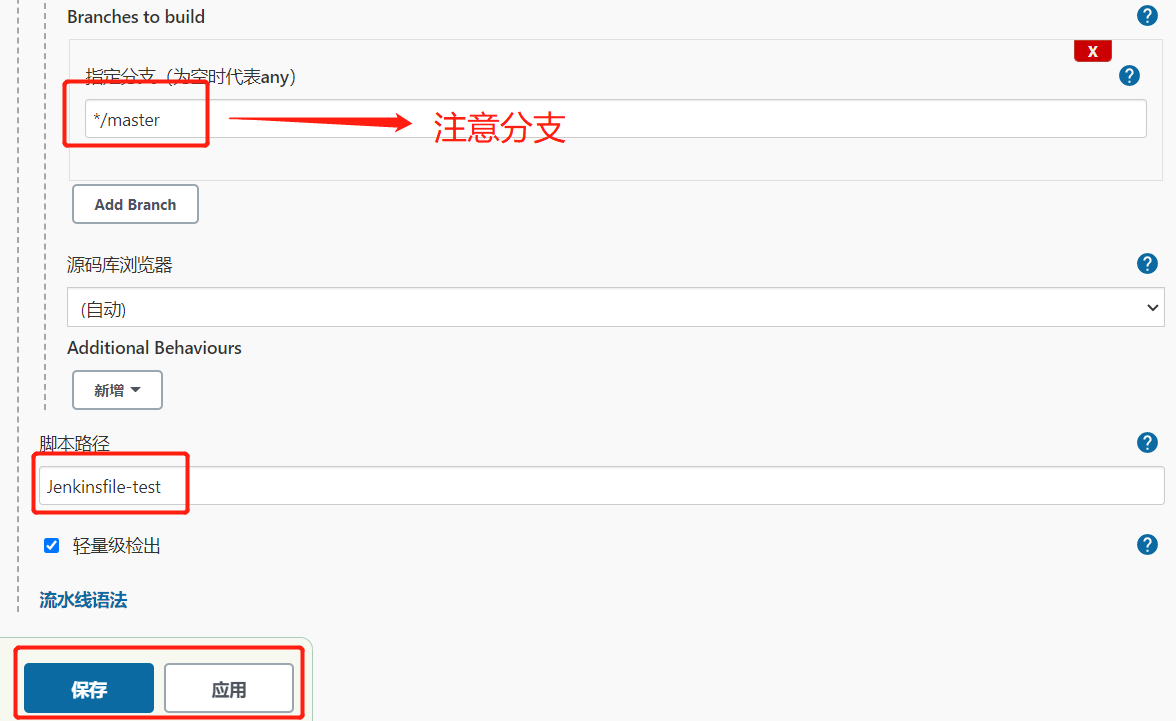
- 从master以外分支构建镜像,使用分支当前版本作为标签构建镜像
- 构建的微服务项目可以动态选择
- GitLab分支可直接选择
- 容器标签可动态设置,尽量与生产环境镜像区分
2.创建流水线项目
1.创建项目
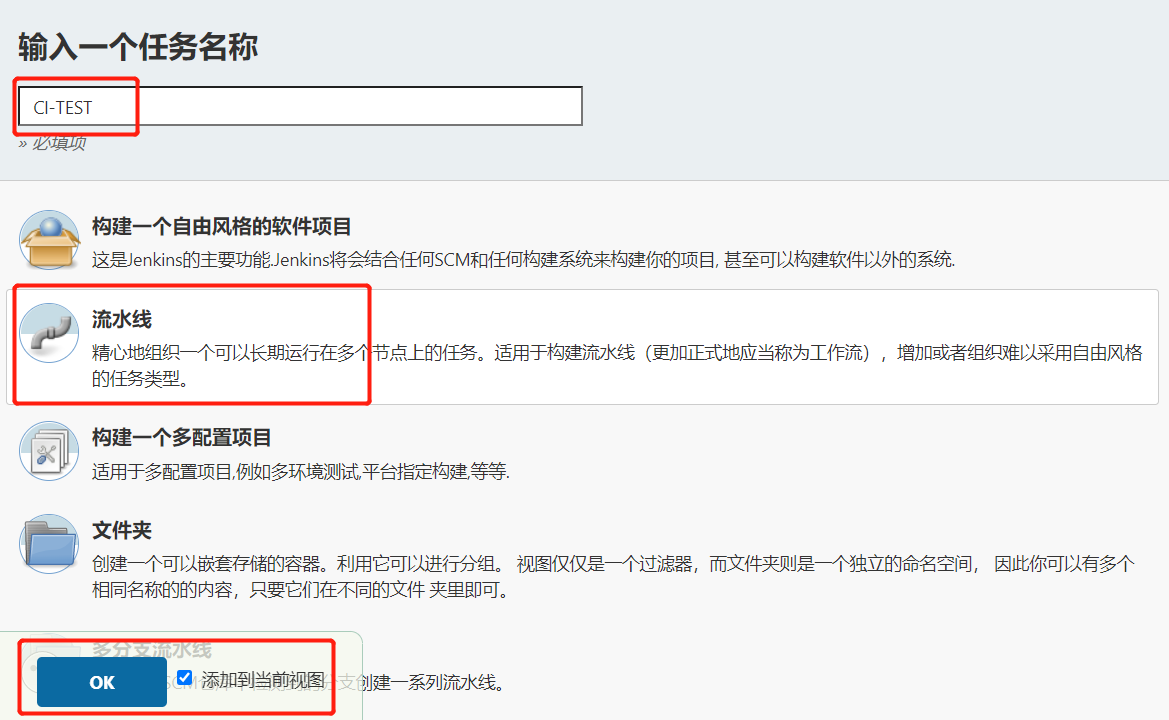
2.配置项目选择参数


3.配置容器标签参数

4.配置Git参数

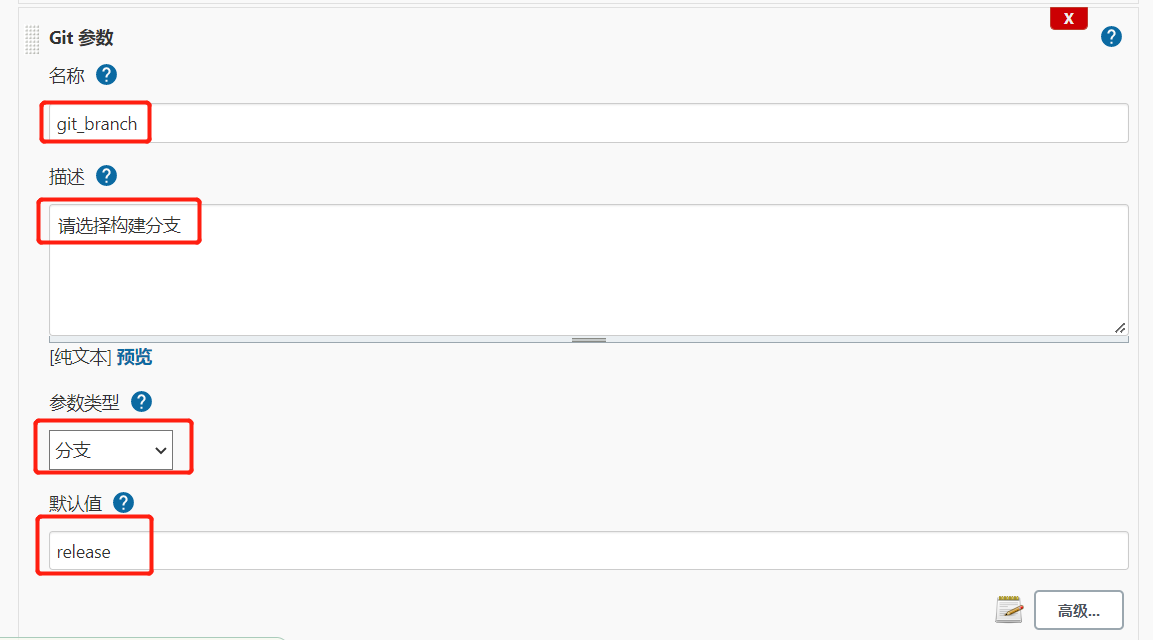


5.配置Pipeline

3.Jenkinsfile构建脚本
Jenkinsfile-test构建脚本
1
2
3
4
5
6
7
8
9
10
11
12
13
14
15
16
17
18
19
20
21
22
23
24
25
26
27
28
29
30
31
32
33
34
35
36
37
38
39
40
41
42
43
44
45
46
47
48
49
50
51
52
53
54
55
56
57
58
59
60
61
62
63
64
65
66
67
68
69
70
71
72
73
74
75
76
77
78
79
80
81
82
83
84
85
86
87
88
89
90
91
//gitlab的凭证
def git_auth = "187cbba0-9691-4d60-aa50-34f0af93ee8c"

//构建版本的名称
def build_tag = "latest"

//阿里云镜像仓库地址
def harbor_url = "172.51.216.89:16888"

//镜像库项目名称
def harbor_project = "springcloud"

//Harbor的登录凭证ID
def harbor_auth = "00d513fc-38be-46b3-8e59-630ab4eb4044"


node {

    //获取当前选择的项目名称数组
    def selectedProjectNames = "${project_name}".split(",")


    stage('拉取源码') {
        checkout([$class: 'GitSCM', branches: [[name: "${git_branch}"]], extensions: [], userRemoteConfigs: [[credentialsId: "${git_auth}", url: 'git@172.51.216.89:cicd-group/k8s.git']]])
    }

    stage('代码审查') {
        for(int i=0;i<selectedProjectNames.length;i++){

            //当前遍历的项目名称
            def currentProjectName = selectedProjectNames[i];

            //定义当前Jenkins的SonarQubeScanner工具
            def scannerHome = tool 'SonarQube-Scanner'

            //引用当前JenkinsSonarQube环境
            withSonarQubeEnv('SonarQube7.6') {
                sh """
                    cd ${currentProjectName}
                    ${scannerHome}/bin/sonar-scanner
                """
            }
        }
    }

    stage('编译,安装公共子工程') {
        sh "echo 编译,安装公共子工程"

        //编译,安装公共工程
        // sh "mvn -f tensquare_common clean install"
    }

    stage('编译,构建镜像,上传镜像') {
        for(int i=0;i<selectedProjectNames.length;i++){

            //当前遍历的项目名称
            def currentProjectName = selectedProjectNames[i];

            //编译,构建本地镜像
            sh "mvn -f ${currentProjectName} clean package dockerfile:build"

            //本地镜像名称
            def buildImageName = "${currentProjectName}:${build_tag}"

            //推送镜像名称
            def pushImageName = "${currentProjectName}:${docker_tag}"

            //对镜像打上标签
            sh "docker tag ${buildImageName} ${harbor_url}/${harbor_project}/${pushImageName}"

            //把镜像推送到Harbor
            withCredentials([usernamePassword(credentialsId: "${harbor_auth}", passwordVariable: 'password', usernameVariable: 'username')]) {

                //登录镜像仓库
                sh "docker login -u ${username} -p ${password} ${harbor_url}"

                //上传镜像
                sh "docker push ${harbor_url}/${harbor_project}/${pushImageName}"

                sh "echo 镜像上传成功"
            }

            //删除本地镜像
            sh """
                docker rmi ${buildImageName}
                docker rmi ${harbor_url}/${harbor_project}/${pushImageName}
            """
        }
    }

}
4.构建项目
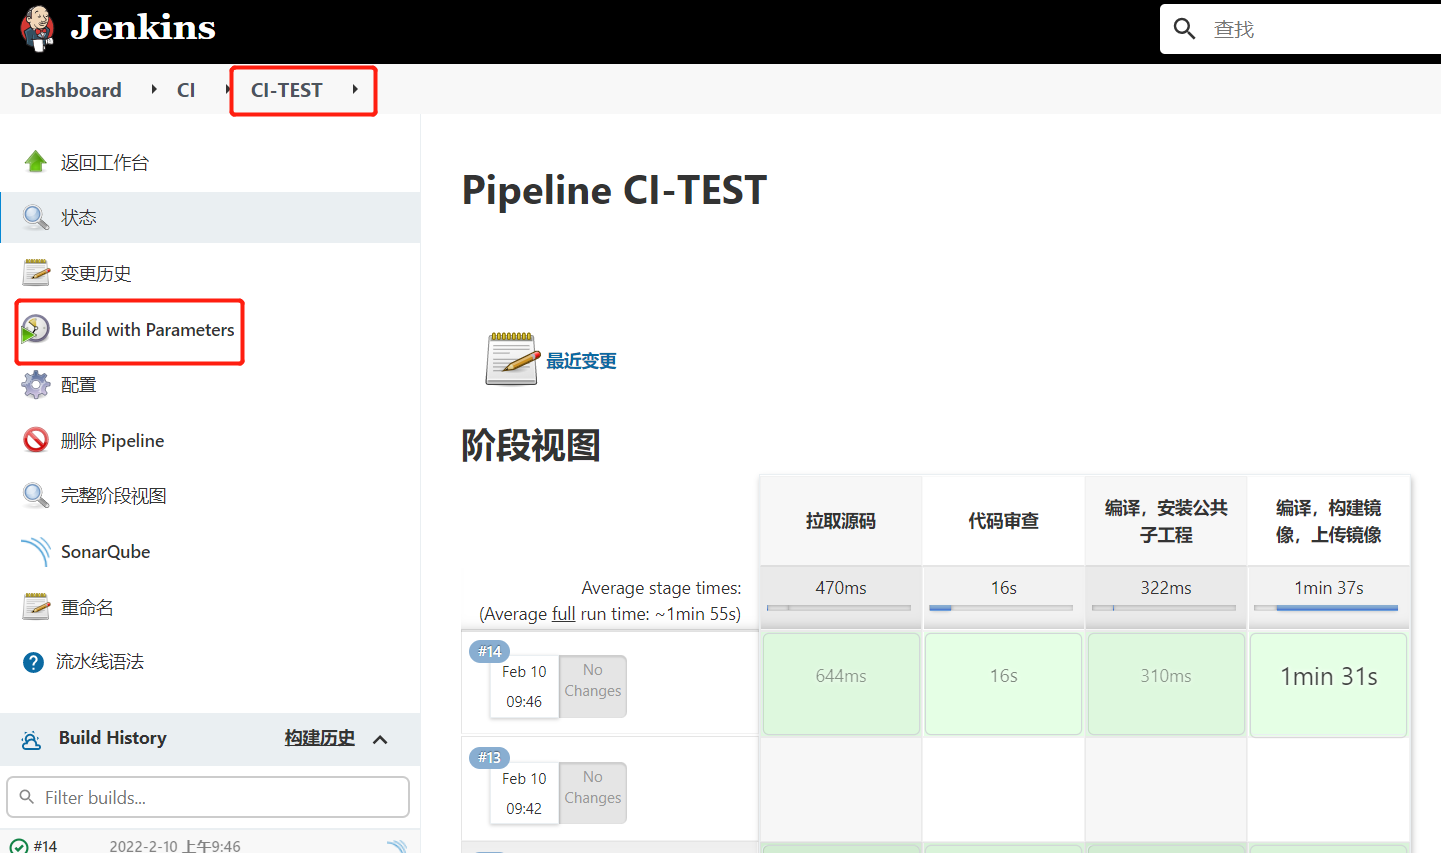

查看/var/lib/jenkins/workspace/目录,发现已经从Gitlab成功拉取了代码到Jenkins中。
1
2
3
4
5
6
7
8
9
10
11
12
13
14
15
16
17
18
19
20
21
22
23
24
25
26
27
28
29
30
31
32
33
34
35
36
37
[root@localhost ~]# cd /var/lib/jenkins/workspace/
[root@localhost workspace]# ll
total 4
drwxr-xr-x 26 root root 4096 Feb  9 12:11 CI-PRO
drwxr-xr-x  2 root root    6 Feb  9 12:55 CI-PRO@tmp


[root@localhost workspace]# cd CI-PRO
[root@localhost CI-PRO]# ll
total 16
-rw-r--r-- 1 root root 1131 Feb  9 12:11 deploy.sh
-rw-r--r-- 1 root root  719 Feb  9 12:11 Dockerfile
-rw-r--r-- 1 root root 2468 Feb  9 12:11 Jenkinsfile
drwxr-xr-x 3 root root   50 Feb  9 12:11 msa-admin
drwxr-xr-x 3 root root   50 Feb  9 12:11 msa-admin-client
drwxr-xr-x 3 root root   50 Feb  9 12:11 msa-consumer
drwxr-xr-x 5 root root  134 Feb  9 12:55 msa-deploy-consumer
drwxr-xr-x 3 root root   32 Feb  9 12:11 msa-deploy-job
drwxr-xr-x 5 root root  134 Feb  9 12:55 msa-deploy-producer
drwxr-xr-x 5 root root  156 Feb  9 12:53 msa-eureka
drwxr-xr-x 3 root root   68 Feb  9 12:11 msa-eureka-client
drwxr-xr-x 3 root root   50 Feb  9 12:11 msa-ext-elk
drwxr-xr-x 3 root root   50 Feb  9 12:11 msa-ext-job
drwxr-xr-x 3 root root   71 Feb  9 12:11 msa-ext-mysql
drwxr-xr-x 3 root root   71 Feb  9 12:11 msa-ext-postgresql
drwxr-xr-x 3 root root   50 Feb  9 12:11 msa-ext-prometheus
drwxr-xr-x 3 root root   50 Feb  9 12:11 msa-ext-rabbitmq
drwxr-xr-x 3 root root   50 Feb  9 12:11 msa-ext-redis
drwxr-xr-x 5 root root  134 Feb  9 12:54 msa-gateway
drwxr-xr-x 3 root root   50 Feb  9 12:11 msa-k8s-rabbitmq
drwxr-xr-x 3 root root   50 Feb  9 12:11 msa-k8s-redis
drwxr-xr-x 3 root root   50 Feb  9 12:11 msa-producer
drwxr-xr-x 3 root root   50 Feb  9 12:11 msa-sentinel-consumer
drwxr-xr-x 3 root root   50 Feb  9 12:11 msa-sentinel-producer
drwxr-xr-x 3 root root   50 Feb  9 12:11 msa-zipkin-consumer
drwxr-xr-x 3 root root   50 Feb  9 12:11 msa-zipkin-producer
-rw-r--r-- 1 root root 3442 Feb  9 12:11 pom.xml


